Do you need to know How to Carve a Spatchcock Turkey? I’ve got you covered! With step by step instructions, I’ll give you everything you need to know to get the perfect Thanksgiving turkey.

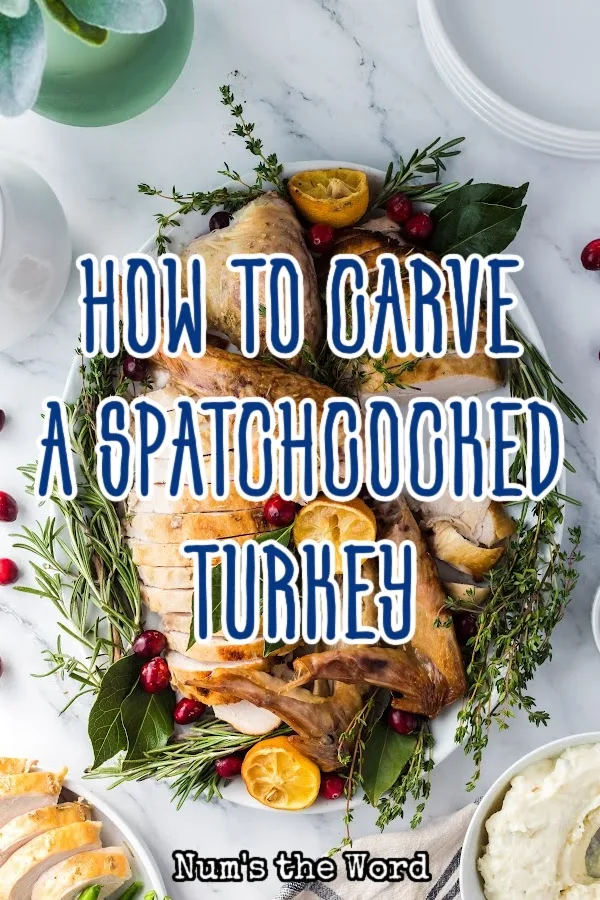
Ah that glistening, golden-brown spatchcocked turkey, crispy skin practically begging you to dive in. How can you resist?
But, as with any masterpiece, presentation is key! And knowing how to cut this turkey is totally different to cutting a whole turkey!
This step-by-step guide will walk you through carving that beauty with ease and also style. So you can get back to relaxing and feasting!
You’ll learn to cut so that every bite of your spatchcocked turkey is deliciously juicy and tender. It’s seriously a game changer!
Plus cutting it the right way makes sure your crispy skin retains its crunch.
And the presentation is Ahhh-mazing. It will definitely be the centerpiece of any holiday meal.
No special equipment is needed – just a sharp carving knife and a bit of patience. Yay!

How Long Should a Turkey Breast Rest Before Carving?
A turkey actually needs a bit of time to rest before cutting into it. The golden rule here is patience!
After you’ve cooked your spatchcocked turkey to a beautiful golden brown (yum!), let the turkey rest for at least 20 minutes or longer.
That lets the juices redistribute throughout the bird.
By giving it that little rest time, your breast meat will be tender and mouth-wateringly juicy.
Pro Tip:
- Remember the internal temperature must reach 165 in the breast and 175 in the thigh.
- Use an instant read thermometer to make sure it’s hot enough.

Is Carving a Spatchcock Turkey the Same as a Traditional Turkey?
While there are some similarities, carving a spatchcocked turkey is somewhat different than the traditional bird.
The spatchcock turkey is totally flattened and has the backbone removed. While a whole bird obviously is round and a bit more difficult to cut.
I find that cutting a spatchcock turkey can actually be more straightforward and easy than cutting a traditional turkey once you get the hang of it.
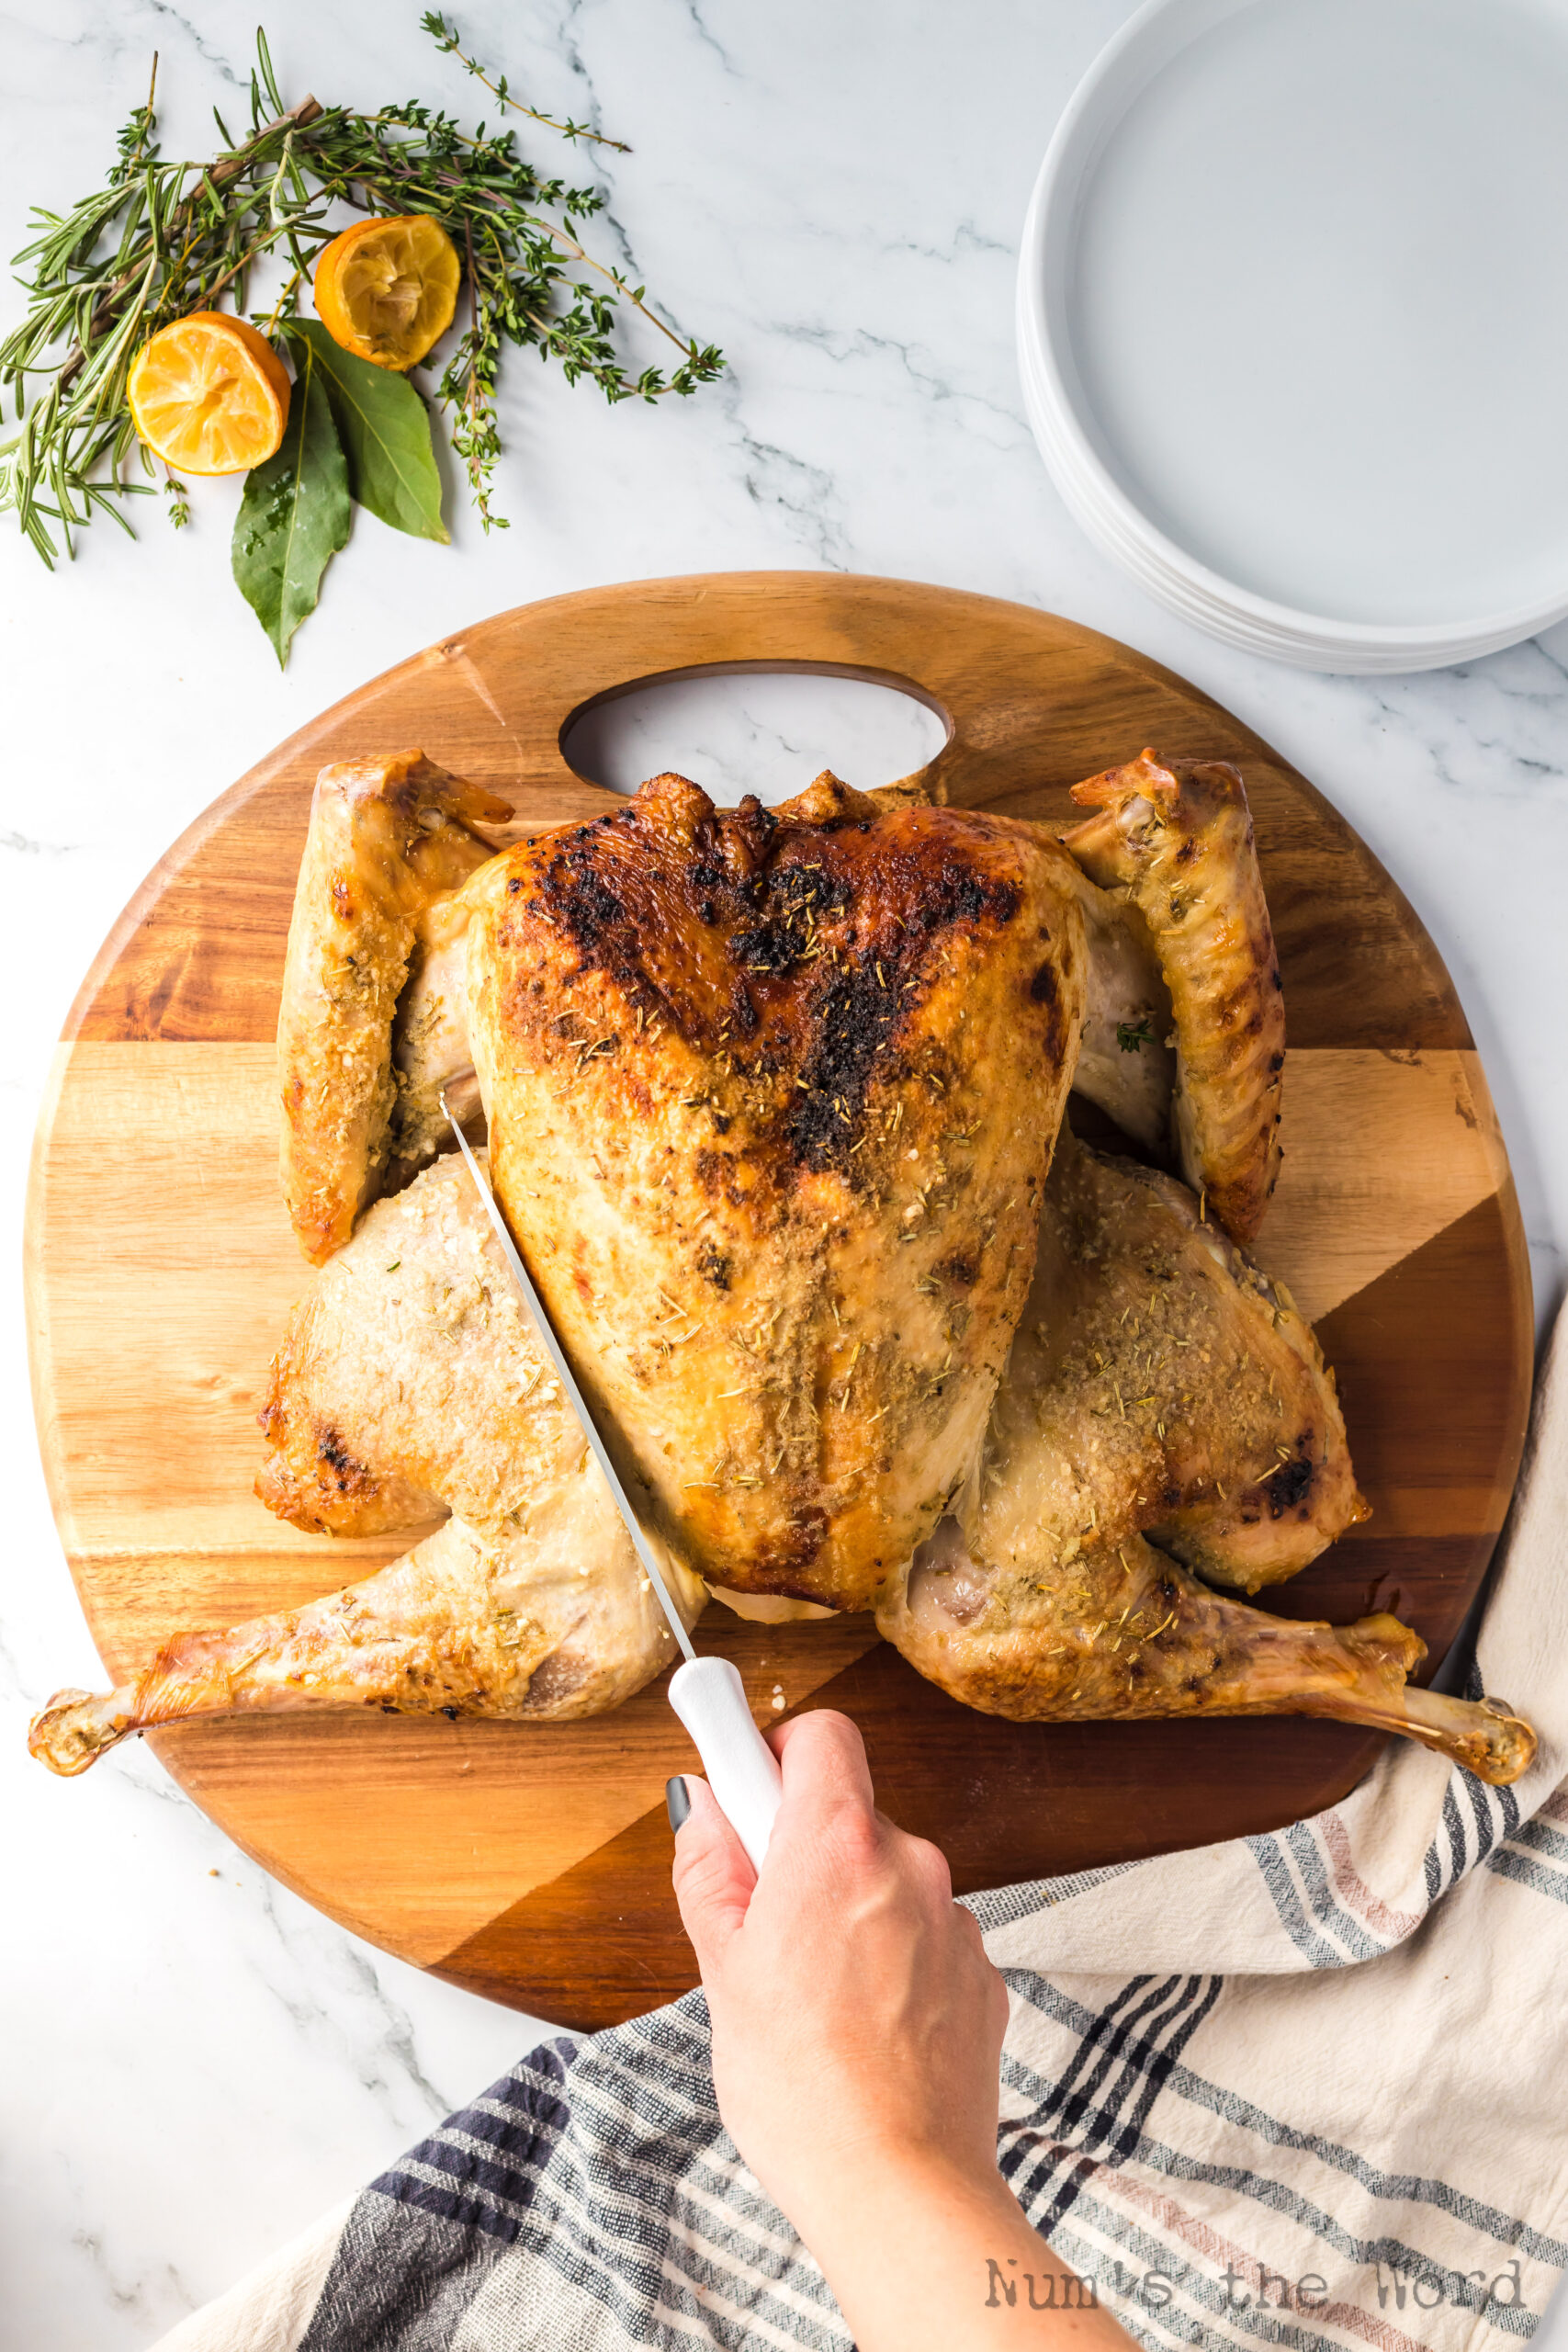
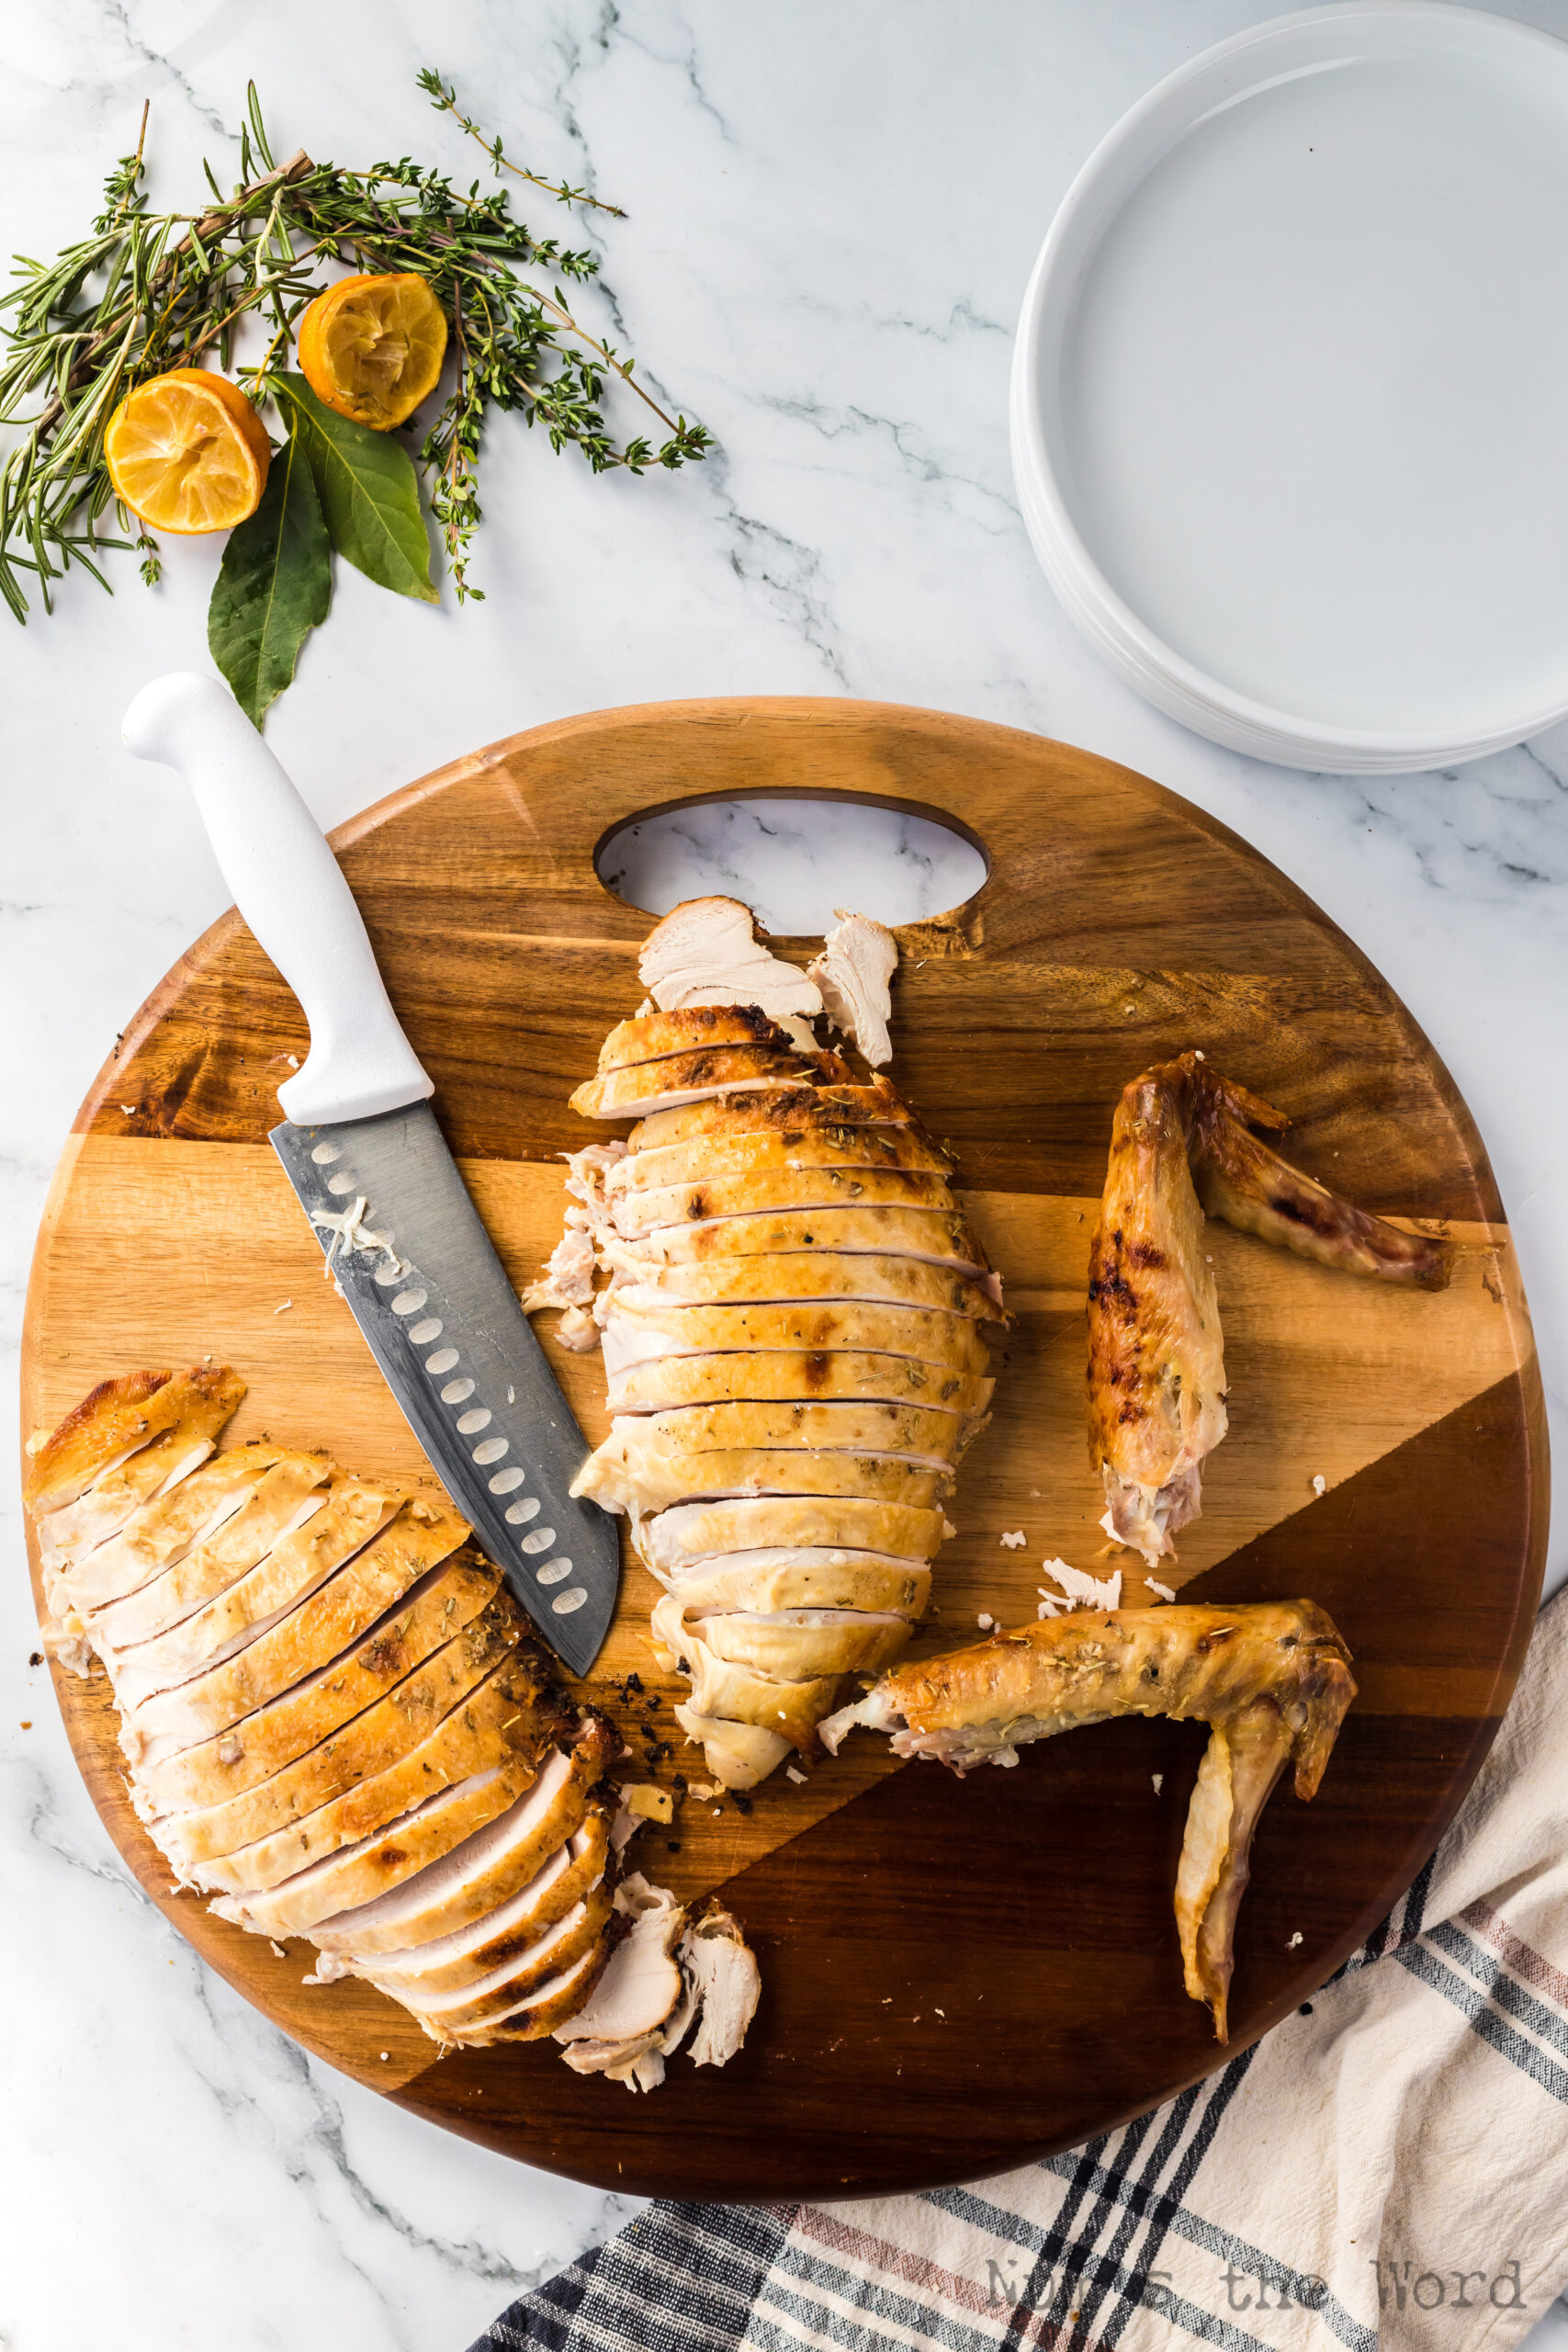
You’ll first remove the turkey legs and then the wings. There’s a bit of connecting tissue on those that you’ll need to snip.
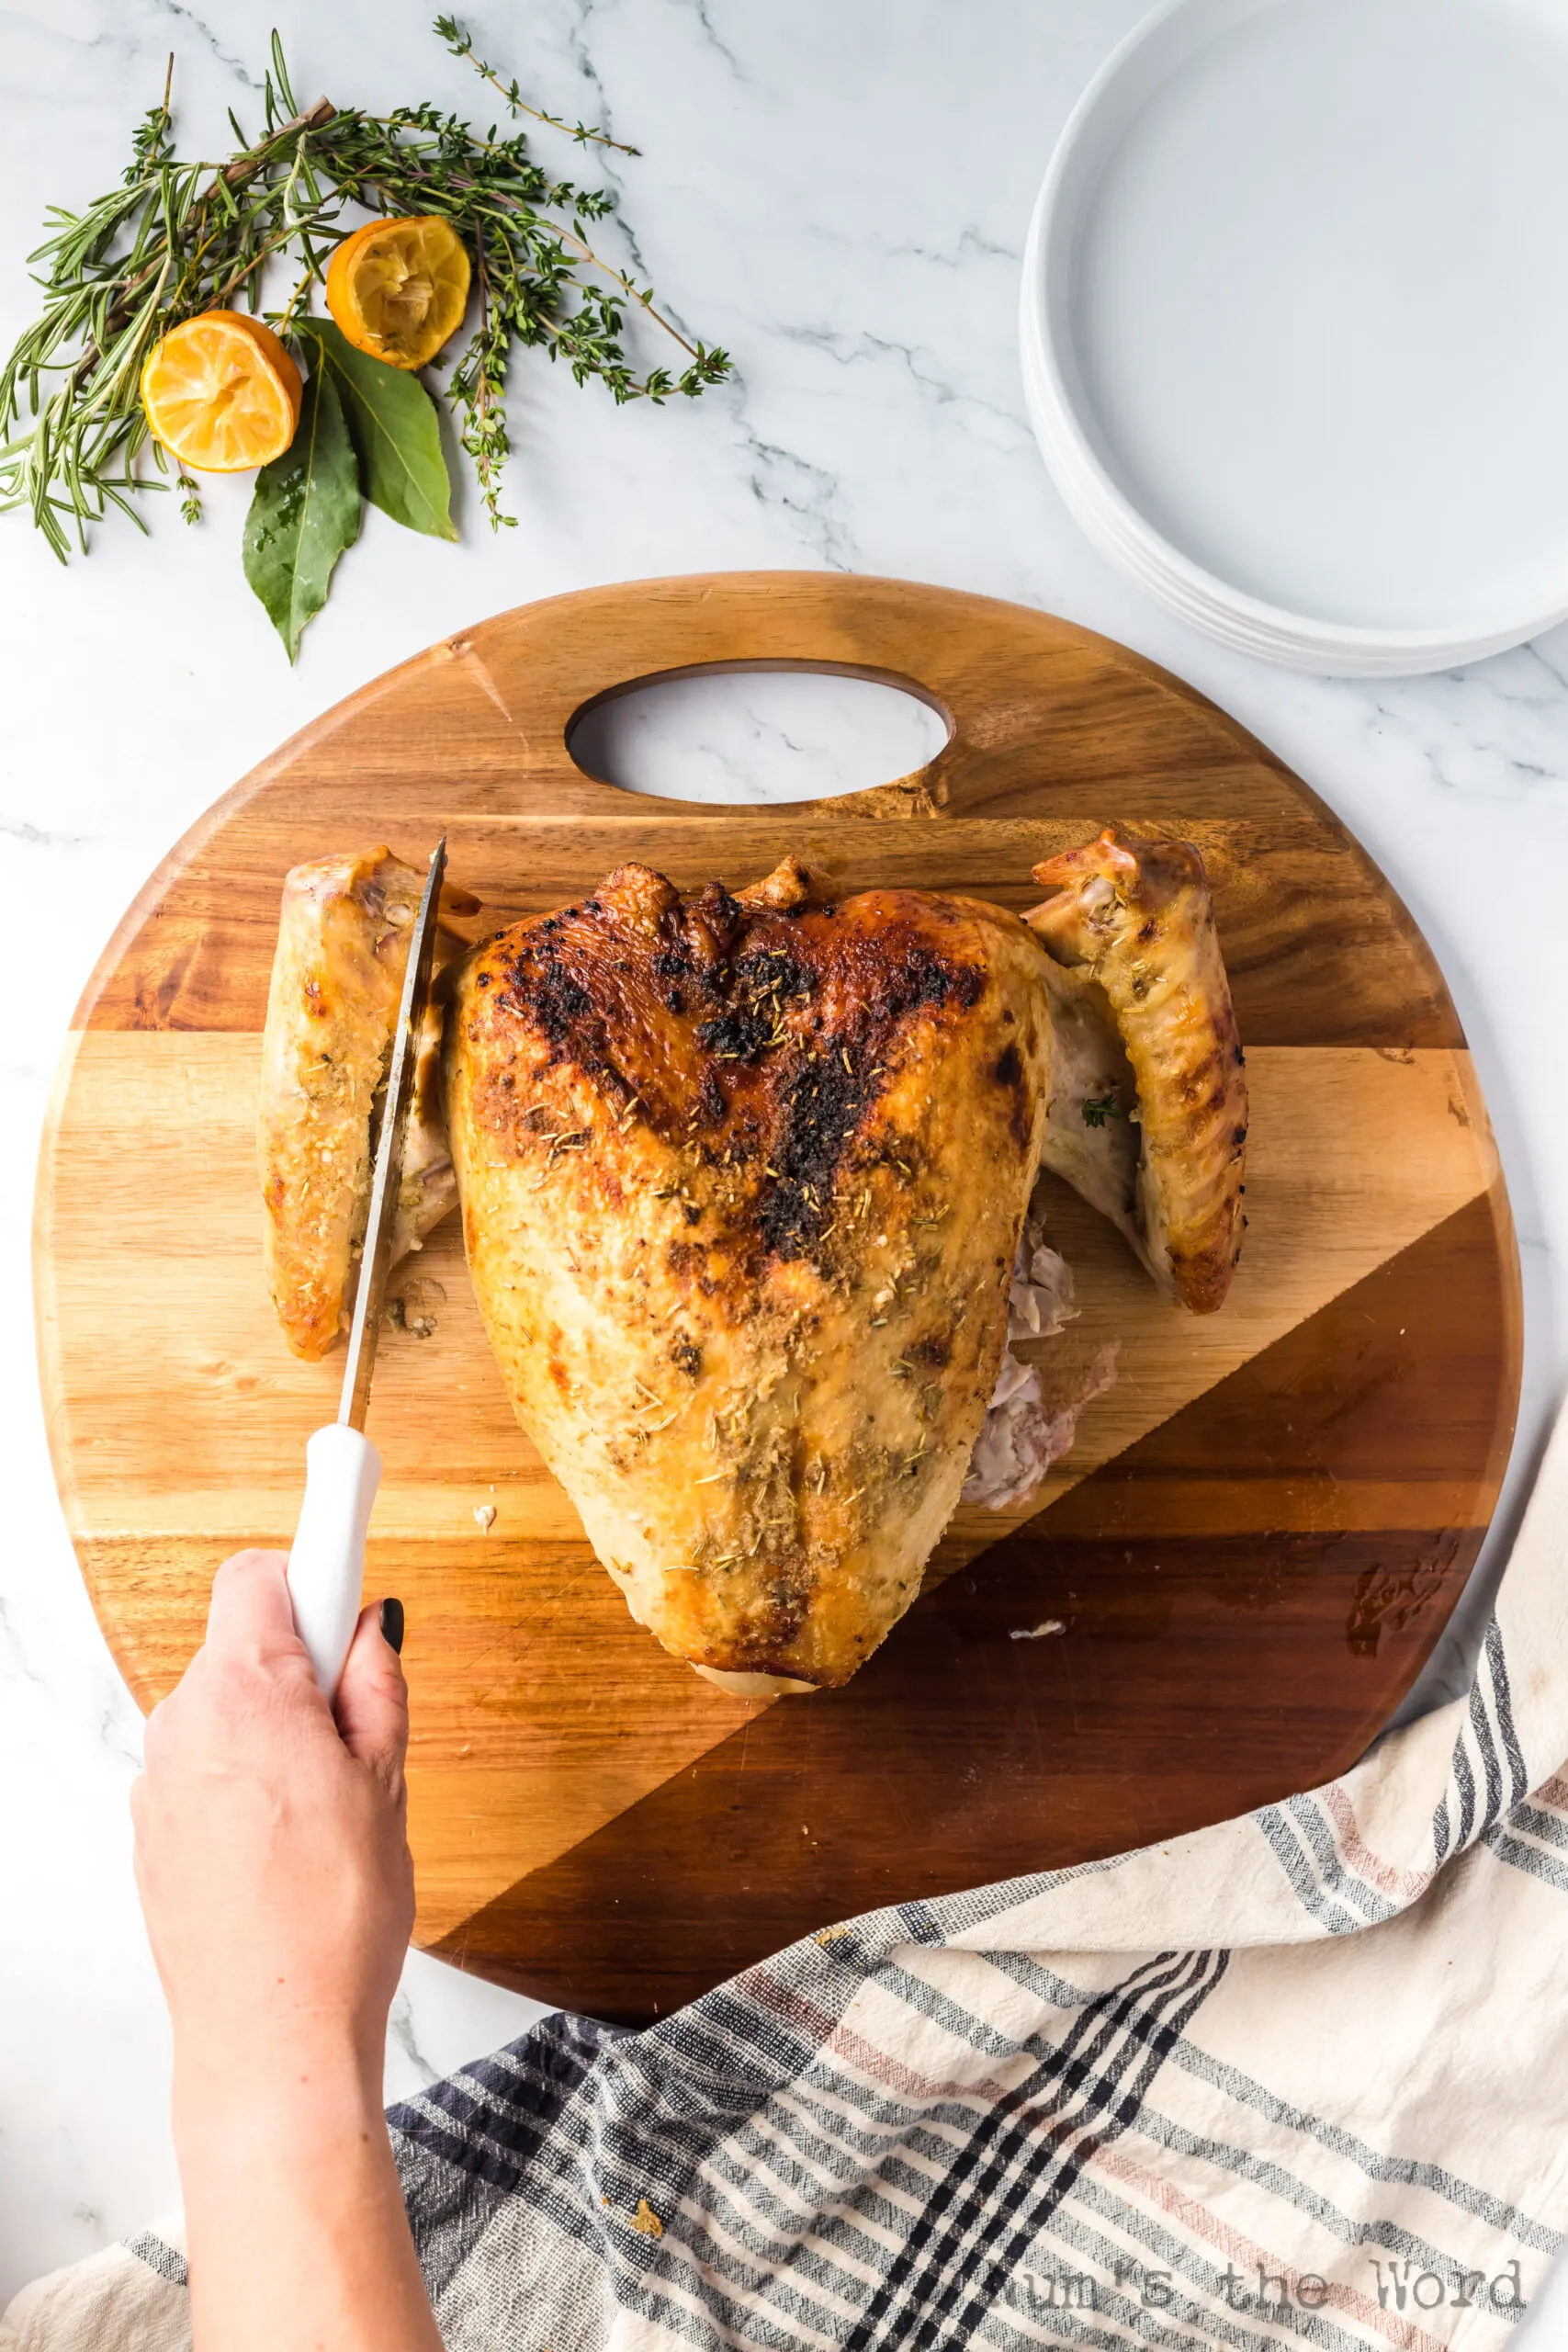
Then it’s time for the turkey breasts!
Find the breast bone and cut closely all the way down the side of the turkey. That way you can remove the entire turkey breast. Make an identical cut on the other side.
Then you’ll remove the thighs, slice both the breast meat and the thigh meat, and arrange. Done!
Pro Tips:
- Use a clean kitchen towel or paper towels to grip the turkey better when carving.
- Always start with a sharp knife, and remember to make confident, long cuts for best results.
- It’s also a good idea to use a fairly large cutting board. It’s a lot of bird!

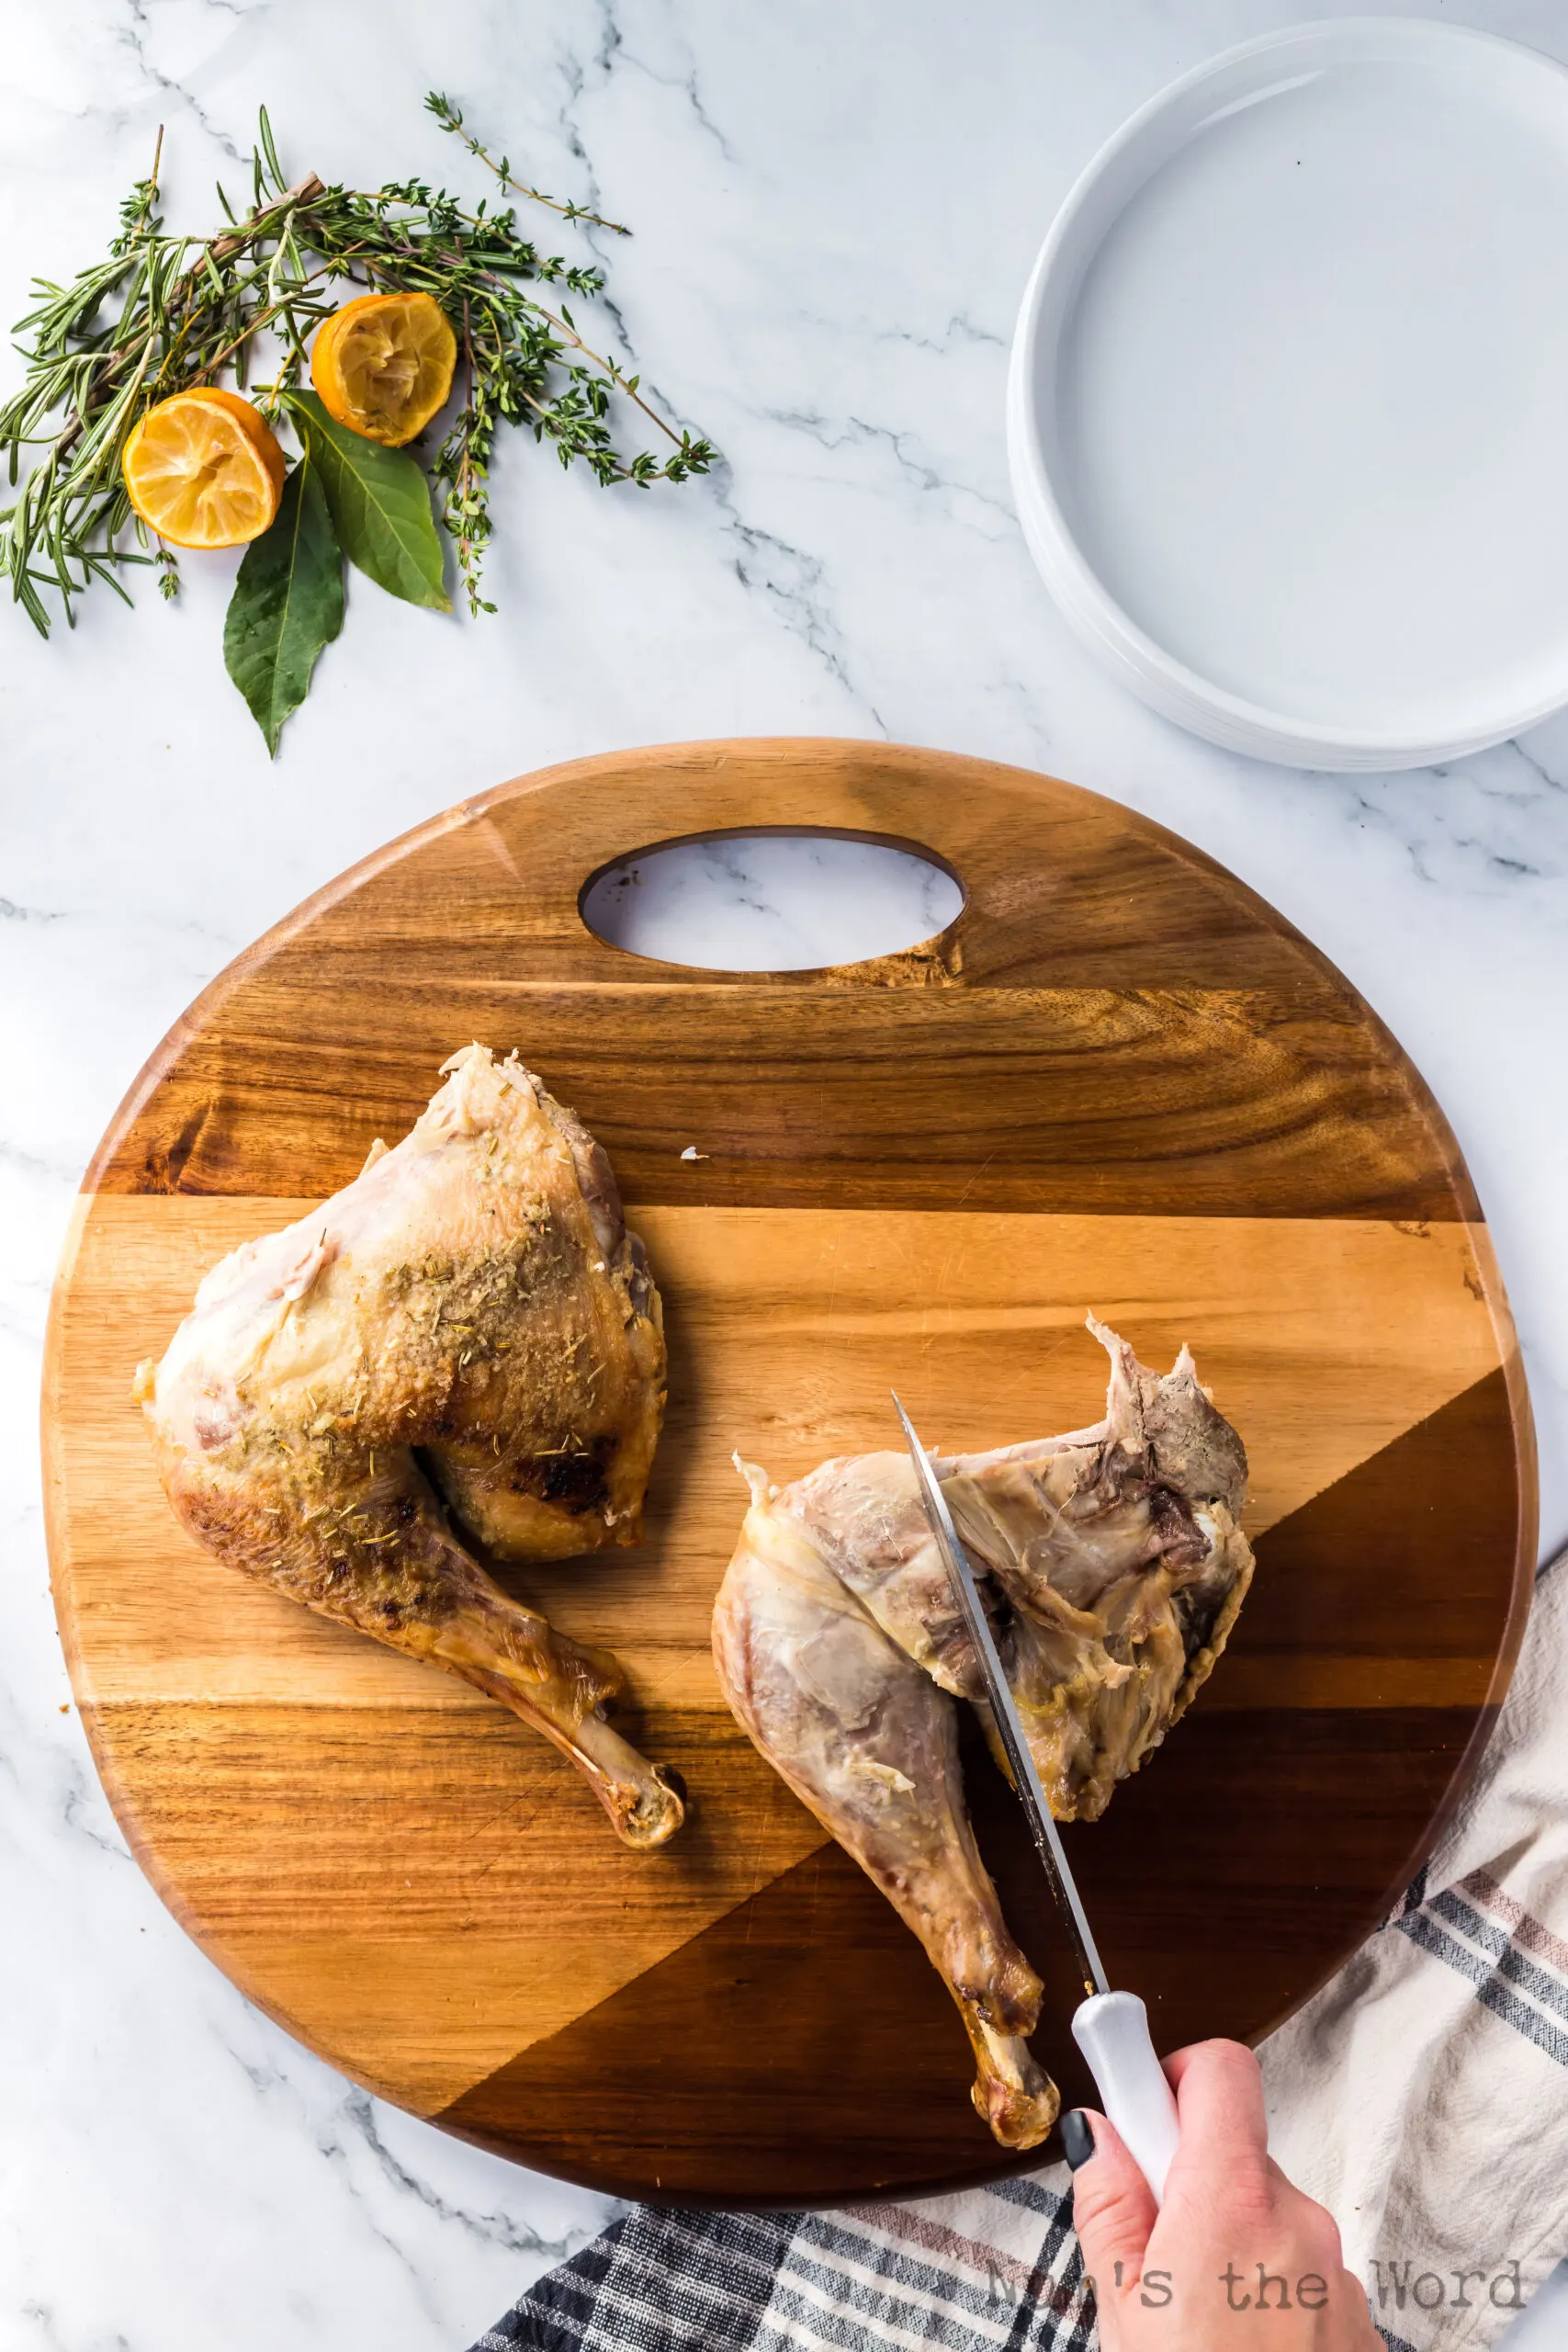
How to Carve Turkey Thighs?
Thigh meat is one of the juiciest parts of the turkey!
Start by identifying the thigh joint and making an incision there. This can be a bit messy! But if you keep cutting it’ll be worth it.
Once you’ve removed the thigh, you can easily slice the meat into 1/4 inch slices. Then you can bite right into all that juicy goodness!
1/4 inch slices are relatively thin slices but not so thin that people feel hungry after eating them!


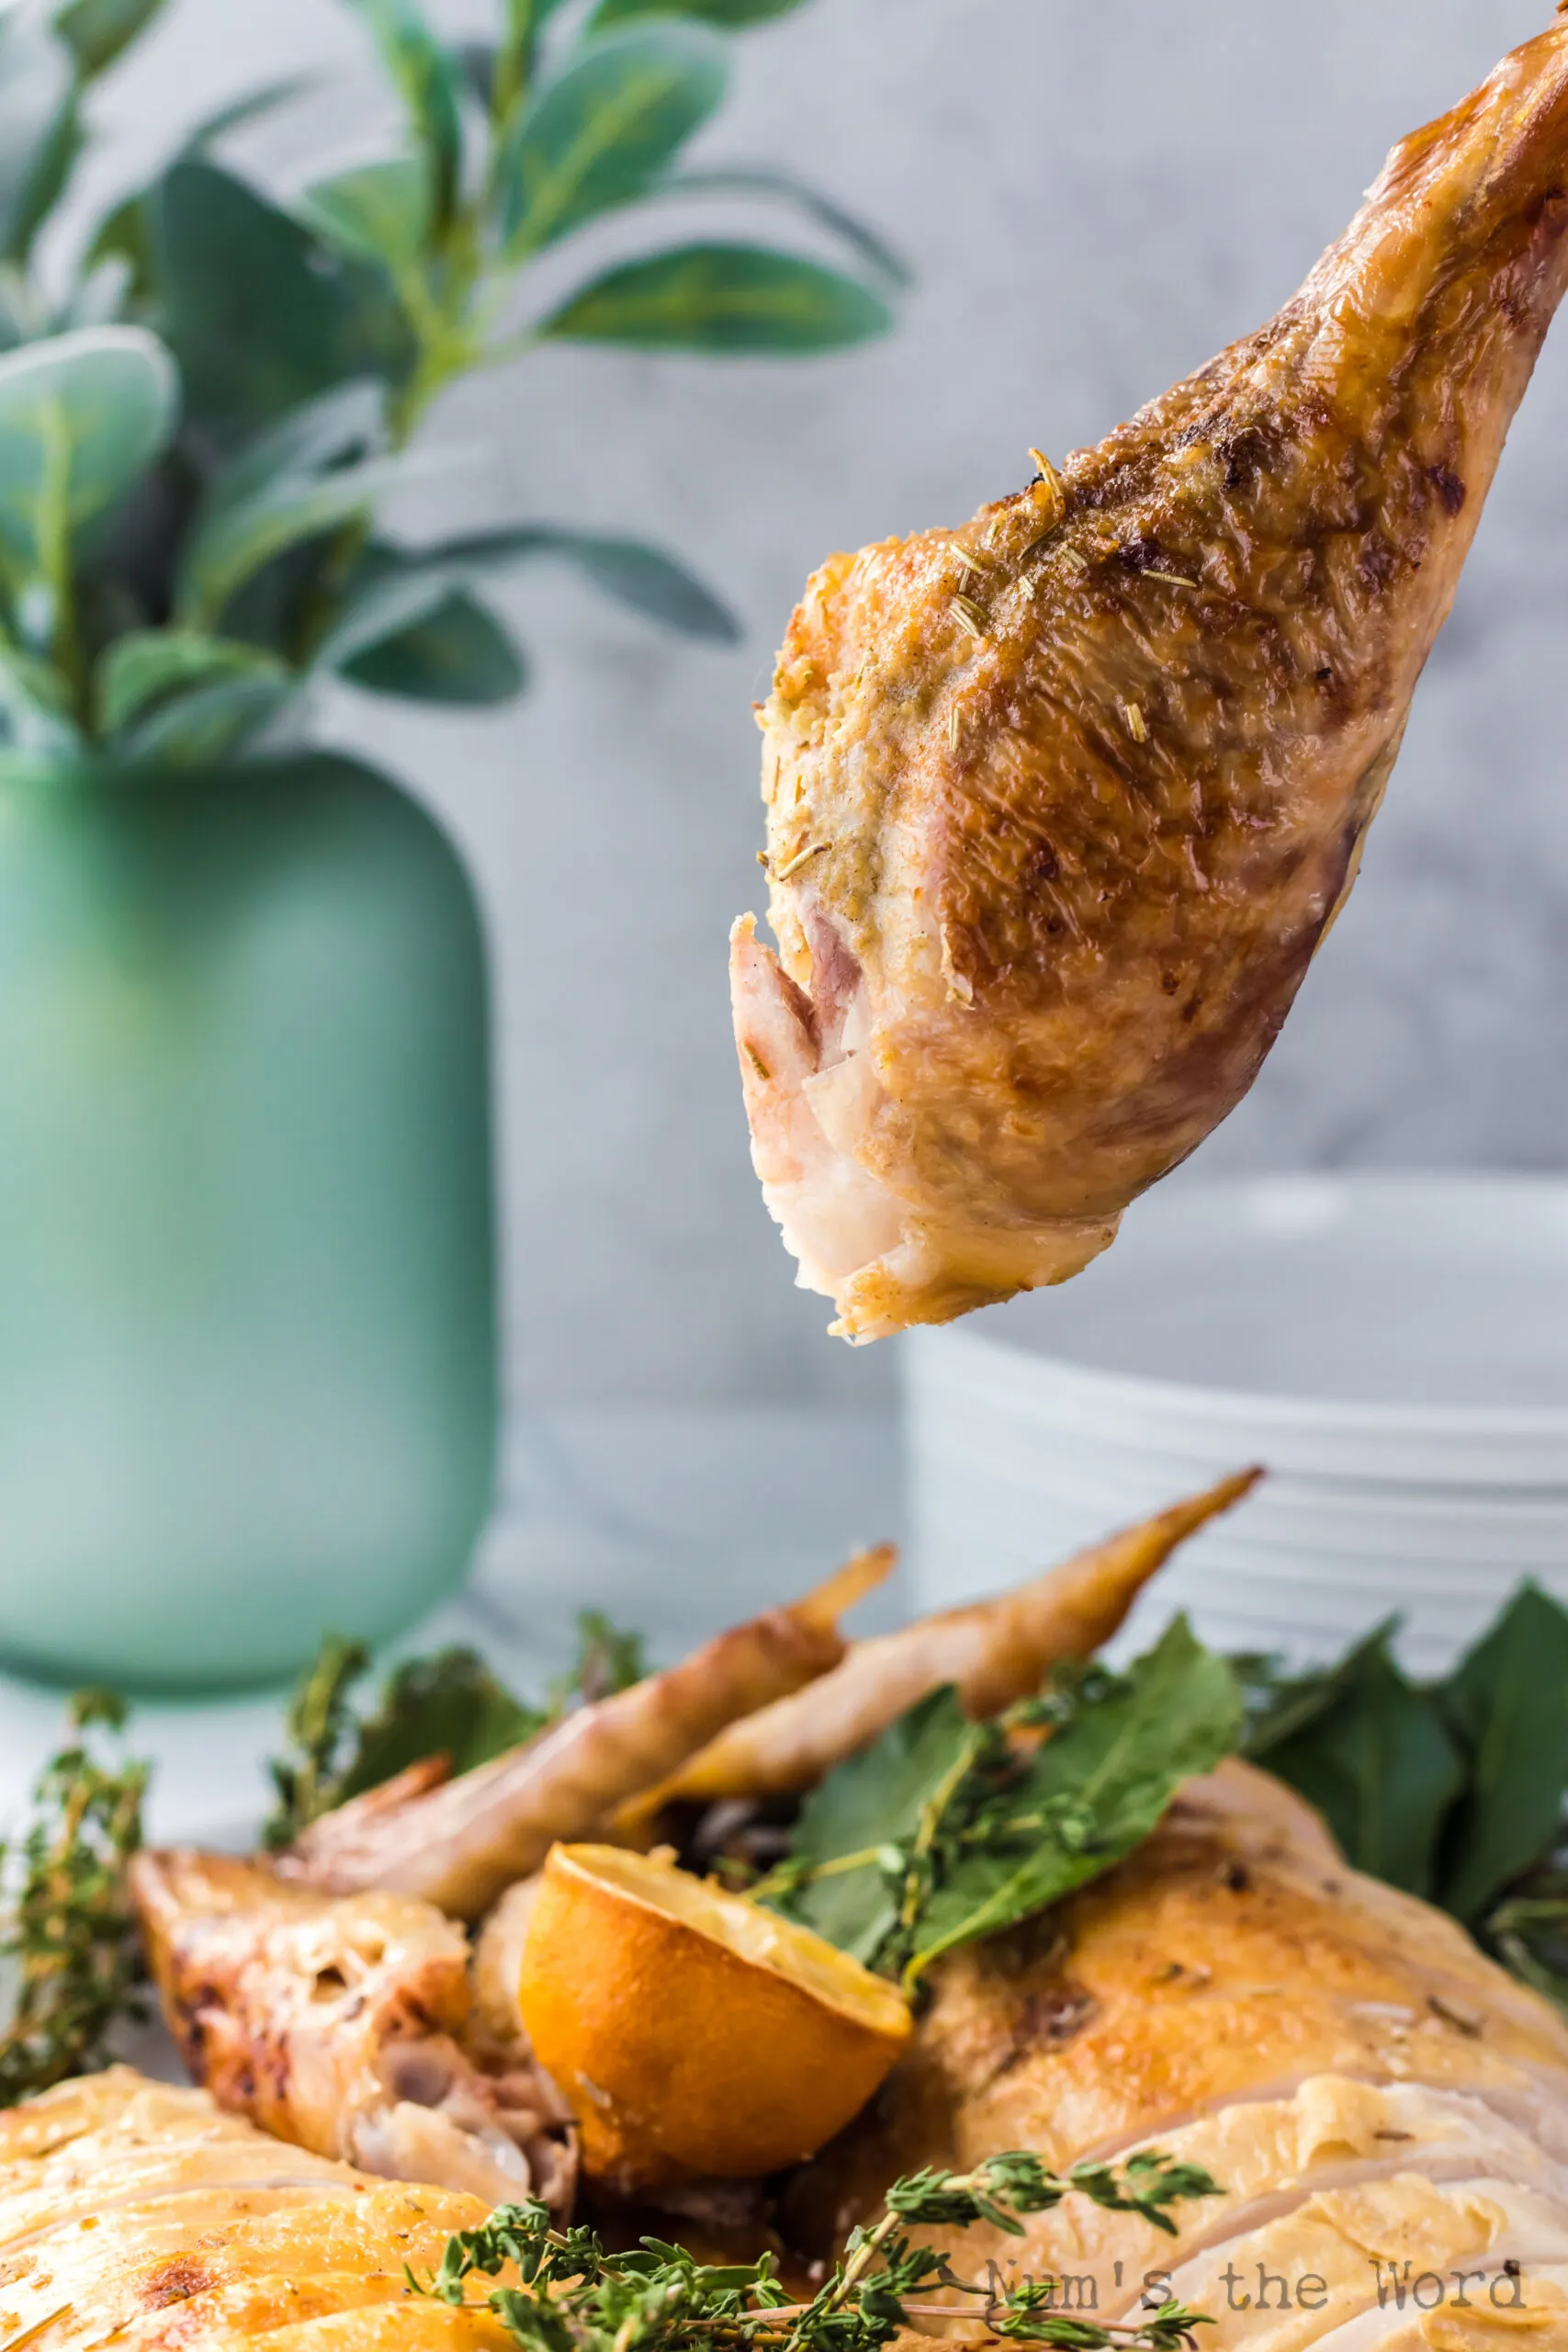
How to Carve Turkey Legs?
To carve those succulent turkey legs, find the joint at the base.
Carefully cut the tendons connecting them.
With a bit of gentle tugging, the legs should come off fairly easily.
And there you have it – the prized dark meat ready for serving!

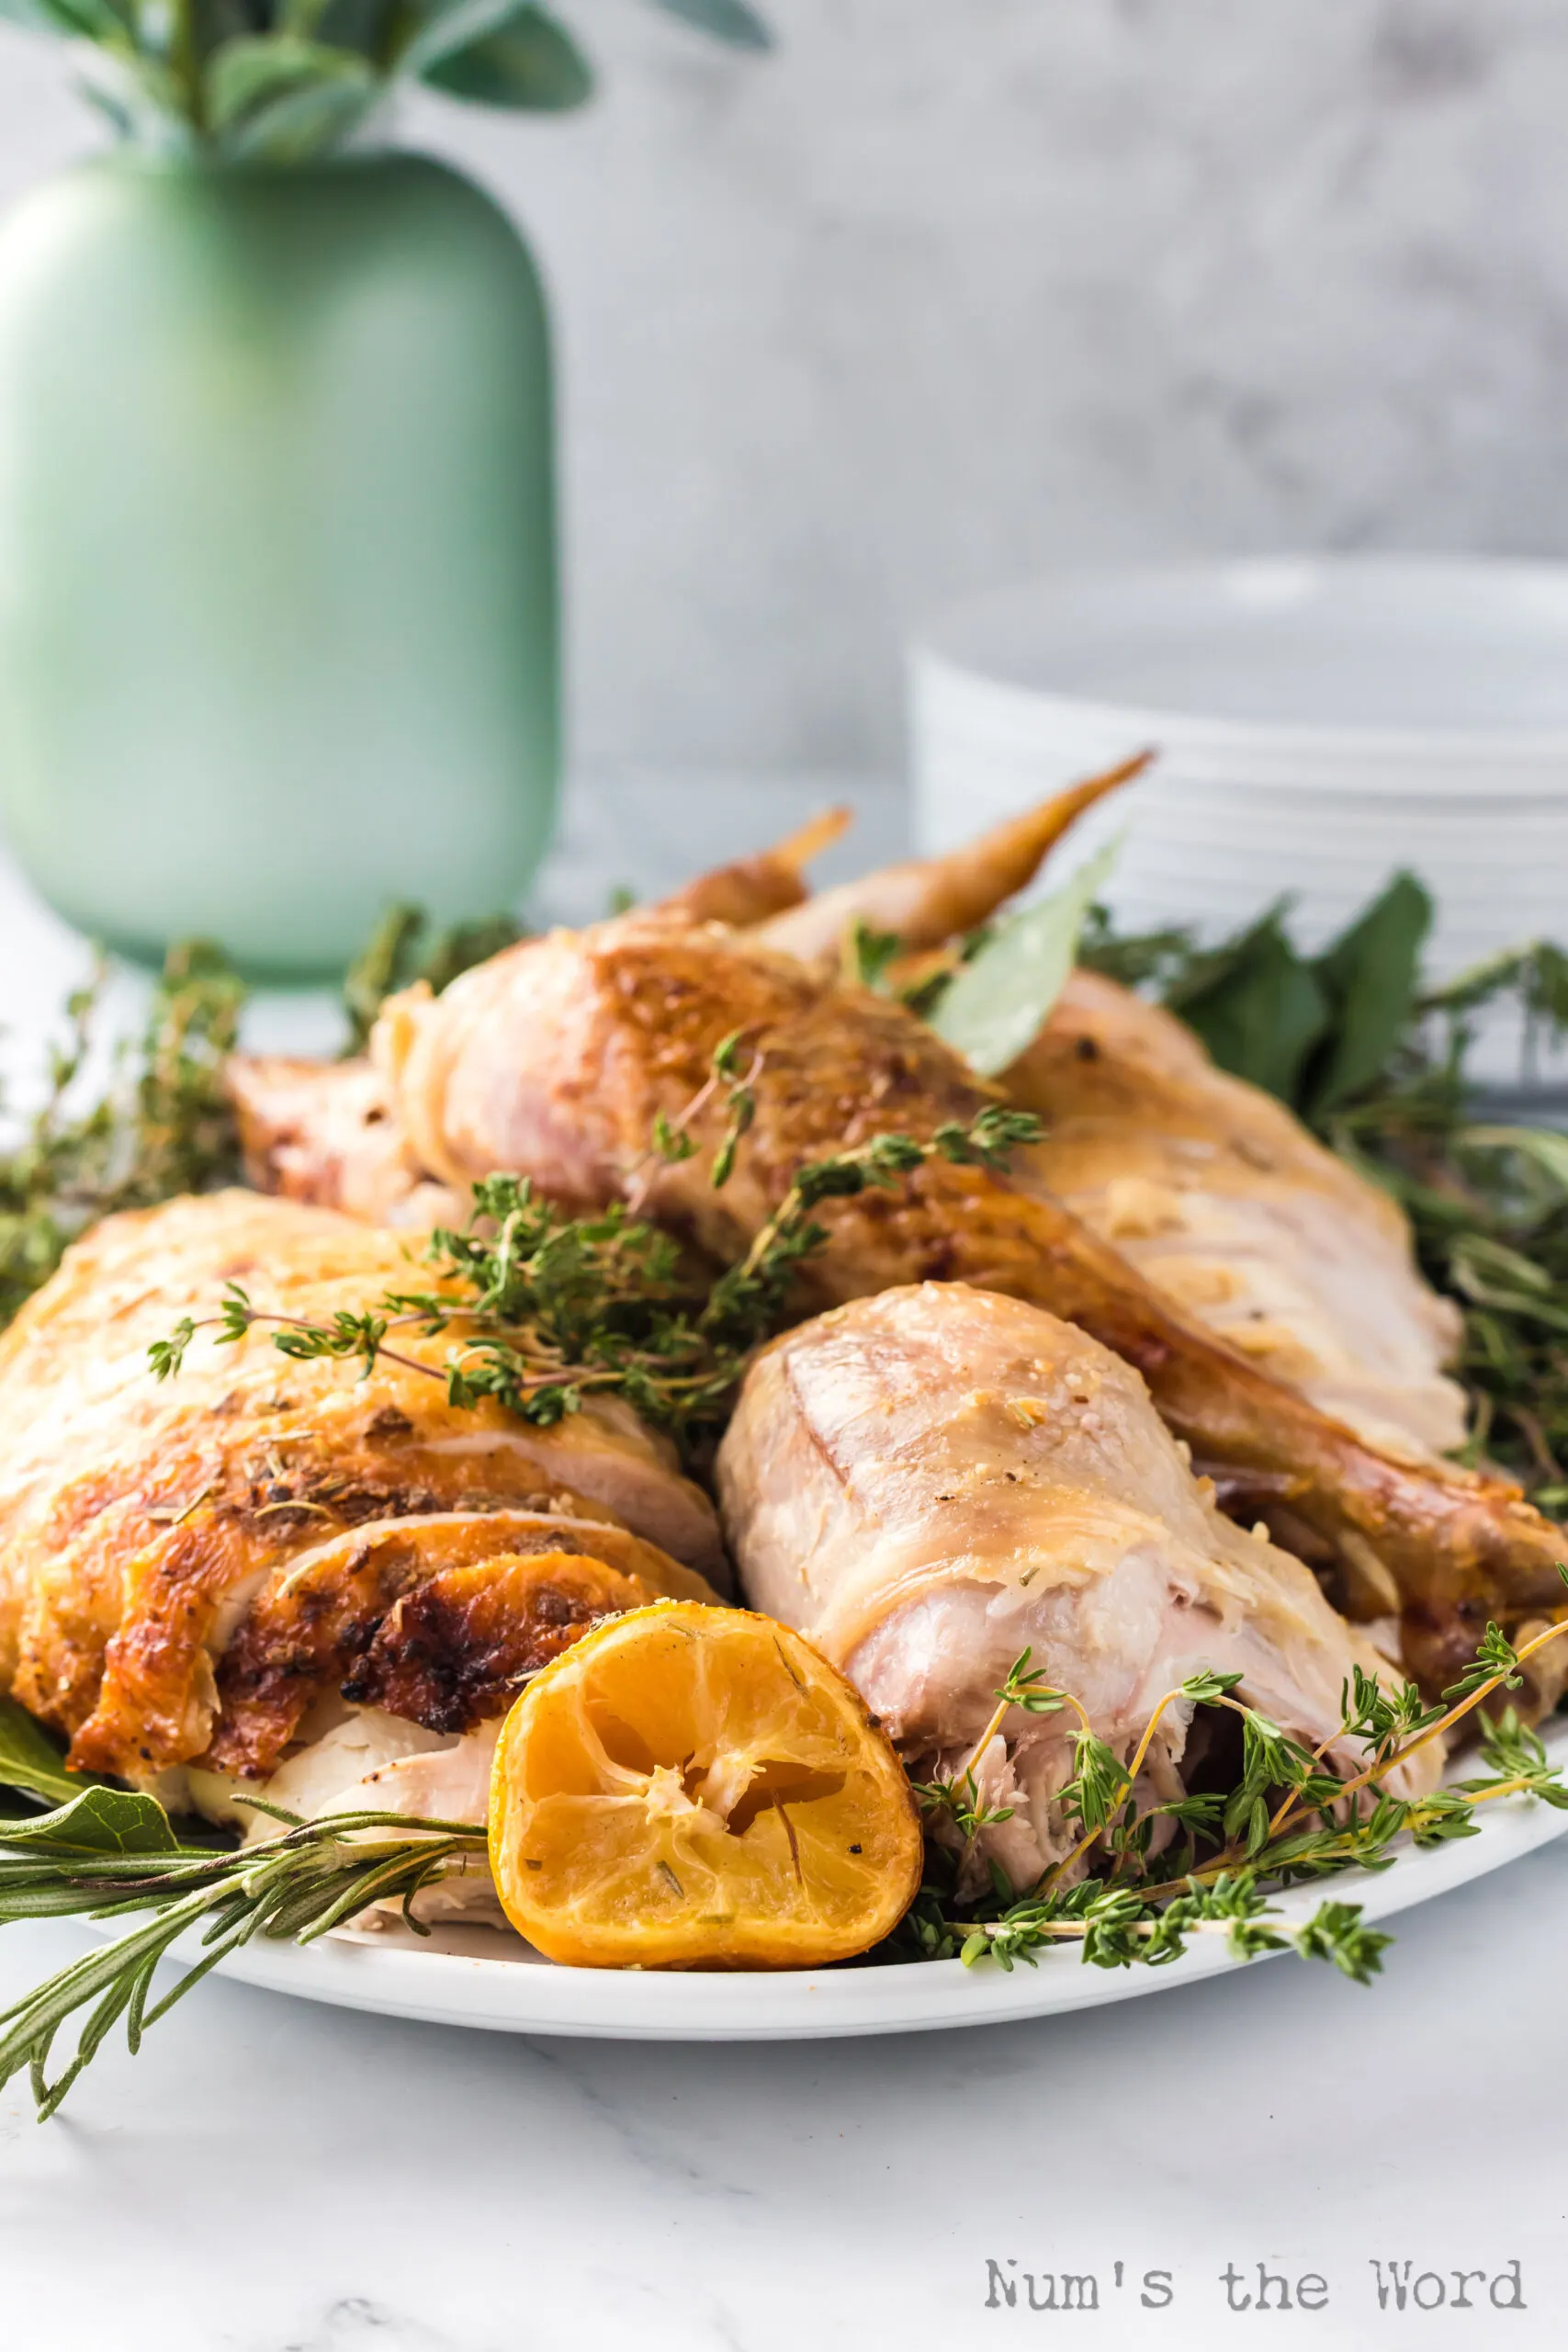
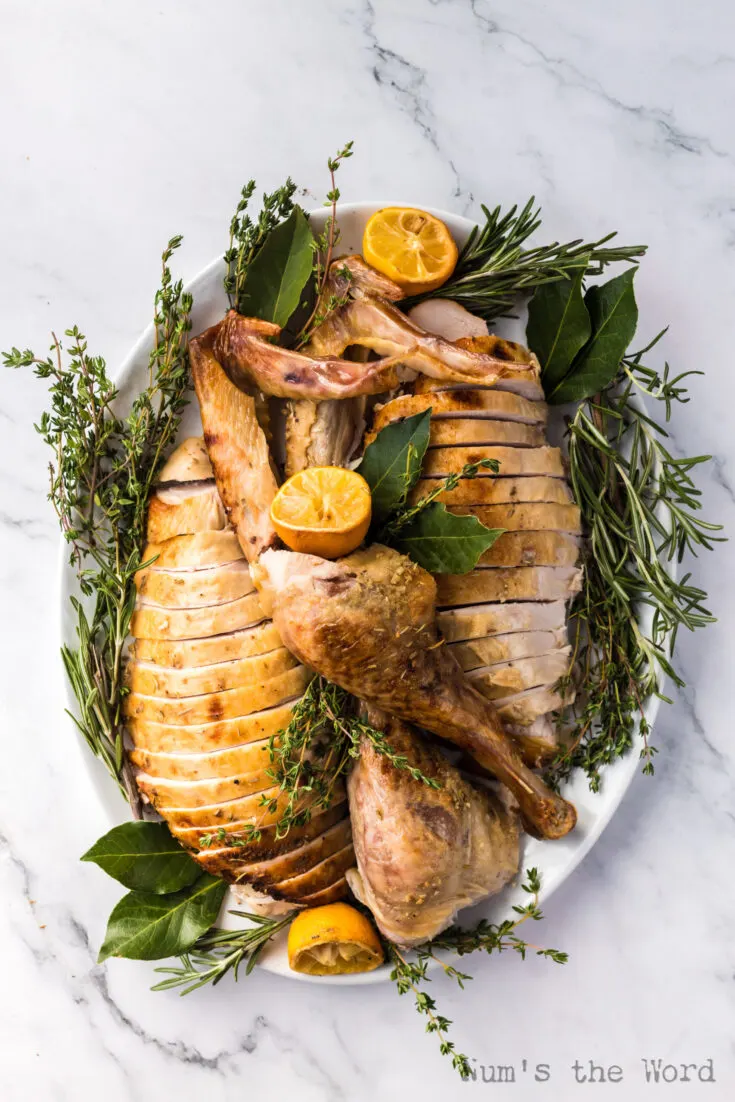
How to Display a Carved Spatchcocked Turkey?
Presentation of a holiday turkey is kinda like location when it comes to real estate! It’s all about that presentation!
So first start by arranging the breast, thighs, legs, and wings onto your large serving platter.
Then garnish with fresh thyme, rosemary, bay leaves, cranberries, and even some lemons used during the cooking process.
This makes it SO pretty! All that color? Not to mention the smells! It’s pretty hard to resist a turkey served up in this way!


Can You Carve a Cold Turkey?
Yes, you can carve a cold Thanksgiving bird. However, for the best texture and flavor, it’s best to carve the turkey while it’s still warm.
I actually find it’s easier to carve while a bit warmer. The tendons and juicy meat separate better I think than waiting until it gets cold.
That said, make sure you still account for the rest time! You don’t want to try cutting into a piping hot turkey!
Not only is it better flavor wise with the rest time but it’s also easier to carve.
If you’ve stored your turkey in the fridge, make sure to let it come to room temperature before carving.
That way it’s not cold when you carve it.
And I should mention here, it’s probably obvious, but you can never carve a frozen turkey.
Always make sure you cook the turkey before carving.
How to Reheat Carved Turkey?
For reheating, place the carved pieces on a rimmed baking sheet and cover with aluminum foil.
Warm in an oven set to a low temperature.
Be sure the meat doesn’t dry out. This is especially important when reheating meat. It can quickly become dry.
So just heat it until warm, not fully cooking it.
You could also reheat it in the microwave in very short bursts. Meat heats up REALLY quickly in the microwave. So be careful.

What is the Best Knife to Carve a Turkey?
The ideal knife is a very sharp carving knife.
A sharp knife will have a thin, long blade perfect for making those long cuts through the turkey.
A high quality carving knife from Amazon will make the process smooth and efficient.
Don’t ever use a dull knife. Not only is it more difficult to cut with a dull knife, it’s actually more dangerous.
You need to push harder to get the knife through the meat and are more likely to cut yourself when using a dull knife.
How to Store Leftover Turkey?
Wrap the remaining pieces of turkey tightly in aluminum foil or place them in airtight containers.
Store in the refrigerator for up to 3-4 days.
It’s best to let the turkey come to room temperature before transferring. But I try not to let the turkey sit out for hours on the table before I put it away.
The quicker it gets to the fridge after the meal is over, the longer and better it will last.


What to Make with Leftover Turkey?
You can make SO many things with leftover turkey! The possibilities are seriously probably endless!
Your delicious turkey can grace your table for days after the main event!
Here are some recipes with leftover turkey I’ve loved over the years:
- Panera Turkey Avocado BLT
- Turkey Broccoli Casserole
- Turkey Turnovers Puff Pastry
- Turkey Cranberry Sandwich
- Turkey Noodle Soup
- Turkey Bone Broth (for that leftover turkey carcass!)
And don’t forget, anything that usually calls for chicken, can easily be swapped out for turkey:
- Poppy Seed Chicken Casserole
- Creamy Chicken and Rice Soup
- Chicken Lasagna
- Creamy Chicken Enchiladas
- Chicken Pockets Crescent Rolls
- Creamy Salsa Verde Chicken Enchiladas
- Turkey Havarti Sandwich Recipe
- Chicken Broccoli Divan
- Avocado Chicken Salad
Whether it’s your first spatchcocked bird or you’re a seasoned chef, carving your Thanksgiving turkey can be fun!

Now that you know everything about how to carve a spatchcock turkey, enjoy the process!
Before you know it, you’ll be presenting a platter that’s as beautiful as it is delicious. Happy carving, and even happier eating!
How to Carve a Spatchcock Turkey

This is the ultimate guide for How to Carve a Spatchcocked Turkey! With step-by-step instructions and pro tips, you're guaranteed success!
Ingredients
Instructions
- Let cooked turkey rest for at least 20 minutes or longer.
- Remove both turkey legs, as shown in the photos. There is a joint at the base of each leg that you will want to cut the tendons connecting them, and the legs will come off fairly easily.
- Remove both wings. There is another joint here that you will also need to cut the tendons, as well as some other connecting tissue.
- Find the breastbone of the turkey. Slowly cut down very closely to the breastbone all the way down until the turkey breast can be removed. Repeat on both sides.
- Remove the lower portion of the wings (the portion that was connected to the bird.
- Take both turkey breasts and cut in 1/4 inch slices all the way through the entire breast.
- Removed the thighs from the turkey legs. Take the dark meat from the tops of the thighs (this can be a little messy, just keep cutting the meat that you want until it is removed), and cut the meat into 1/4 inch slices.
- Arrange the breast, thighs, legs and wings onto your serving platter.
- Use thyme, rosemary, bay leaves, cranberries and lemons (from cooking the turkey) to garnish your turkey carvings.
- Arrange turkey on platter and serve.
MS
Monday 20th of November 2023
I am always intimidated by craving a turkey and this was a helpful guide!
Janelle
Thursday 29th of February 2024
So glad it was helpful! Carving a turkey is VERY intimidating, I agree!
Kathleen
Sunday 19th of November 2023
Thanks for the easy how-to! Loved, loved our turkey!!
Debi
Thursday 16th of November 2023
These are great tips. I had to look this up before Thanksgiving so I know how to do it. Thanks!