Have you ever wondered how to can potatoes? Don’t worry we have you covered! With this simple step by step guide, you’ll become a canning master today!


Canning potatoes is easier than you think and we’re here to show you exactly how to do it with these simply to follow step by step instructions.
With rising prices, bare shelves and products unavailable when you need them, more people are learning how to can like their grandma’s.
Food storage is a great way to prepare for a rainy day and to ensure you never run out of your favorite ingredients!
When it comes to canning potatoes you’ll first need a pressure cooker. If you have never used one, or have heard all the horror stories attached to pressure cookers, don’t worry.
With our easy to follow step by step guide, you’ll have success every time you make these canned potatoes.
Here at Num’s the Word, we use the raw pack canning potato method. Which means we can raw potatoes, not par boiled potatoes. We’ve never had an issue with this method and thoroughly enjoy the results of our labors all year long.
Keep in mind that the biggest issue with canning potatoes is the high starch content that potatoes have. This requires us to wash them frequently, drain starchy water and never reuse water, but to continually get new fresh water. Don’t panic, we’ll walk you through each and every step.
Let’s talk about some of the most frequently asked questions I get asked when it comes to pressure canning potatoes and get you some answers!
What are the best potatoes for canning?
From experience, I’ve found that the best canning potatoes are Yukon Gold and Russet potatoes. That’s because they are the two I’ve actually canned and both with equally excellent results.
I’ve found that Yukon gold, due to their smaller nature work great canned whole or cubed. While Russet potatoes, due to their larger size work best cubed.
The one potato I’ve not yet canned but have heard good things about are red potatoes. If you can red potatoes, leave a comment and let me know your results.
Do you have to peel potatoes before canning?
I personally always peel my potatoes before canning. My family likes to use these for soups, stews and quick mashed potatoes, all which require no skins.
I’ve heard that you do not have to, as long as they are washed really well, however it is not required. Many people have success with canning unpeeled potatoes. Just make sure to really scrub your potatoes well.
Can I use citric acid for canning potatoes?
The quick answer is no you cannot use citric acid for canning potatoes. You can however use ascorbic acid for canning potatoes, which is similar, but different.
The recommendation is 1 teaspoon to 1 gallon of water. I however do not. The canning process we use has been around for over 50 years and does not use any acid or lemon juice for canning potatoes.
Some people prefer to do this as a way to prevent potatoes from darkening. Out of all the cans of potatoes we’ve done over the years, I’ve only had 1 can that had potatoes darken.
That is enough of a testament to me that I do not need to add extras to get great results when canning potatoes.
Can potatoes be canned raw?
Potatoes can absolutely be canned raw! In fact, it’s our preferred method and called canning potatoes the raw pack method!
This is the way my mother-in-law canned her potatoes and it worked just fine for her and it’s how we’ve also been doing it for many years now.
Modern methods recommend par boiling or blanching your potatoes before canning. If you want to try this, par boil cubed potatoes for 2 minutes and whole potatoes for 10.
Do I have to add salt when canning potatoes?
You do not have to add salt when canning potatoes. It is simply used for flavoring. I however prefer to add salt to my canned potatoes.
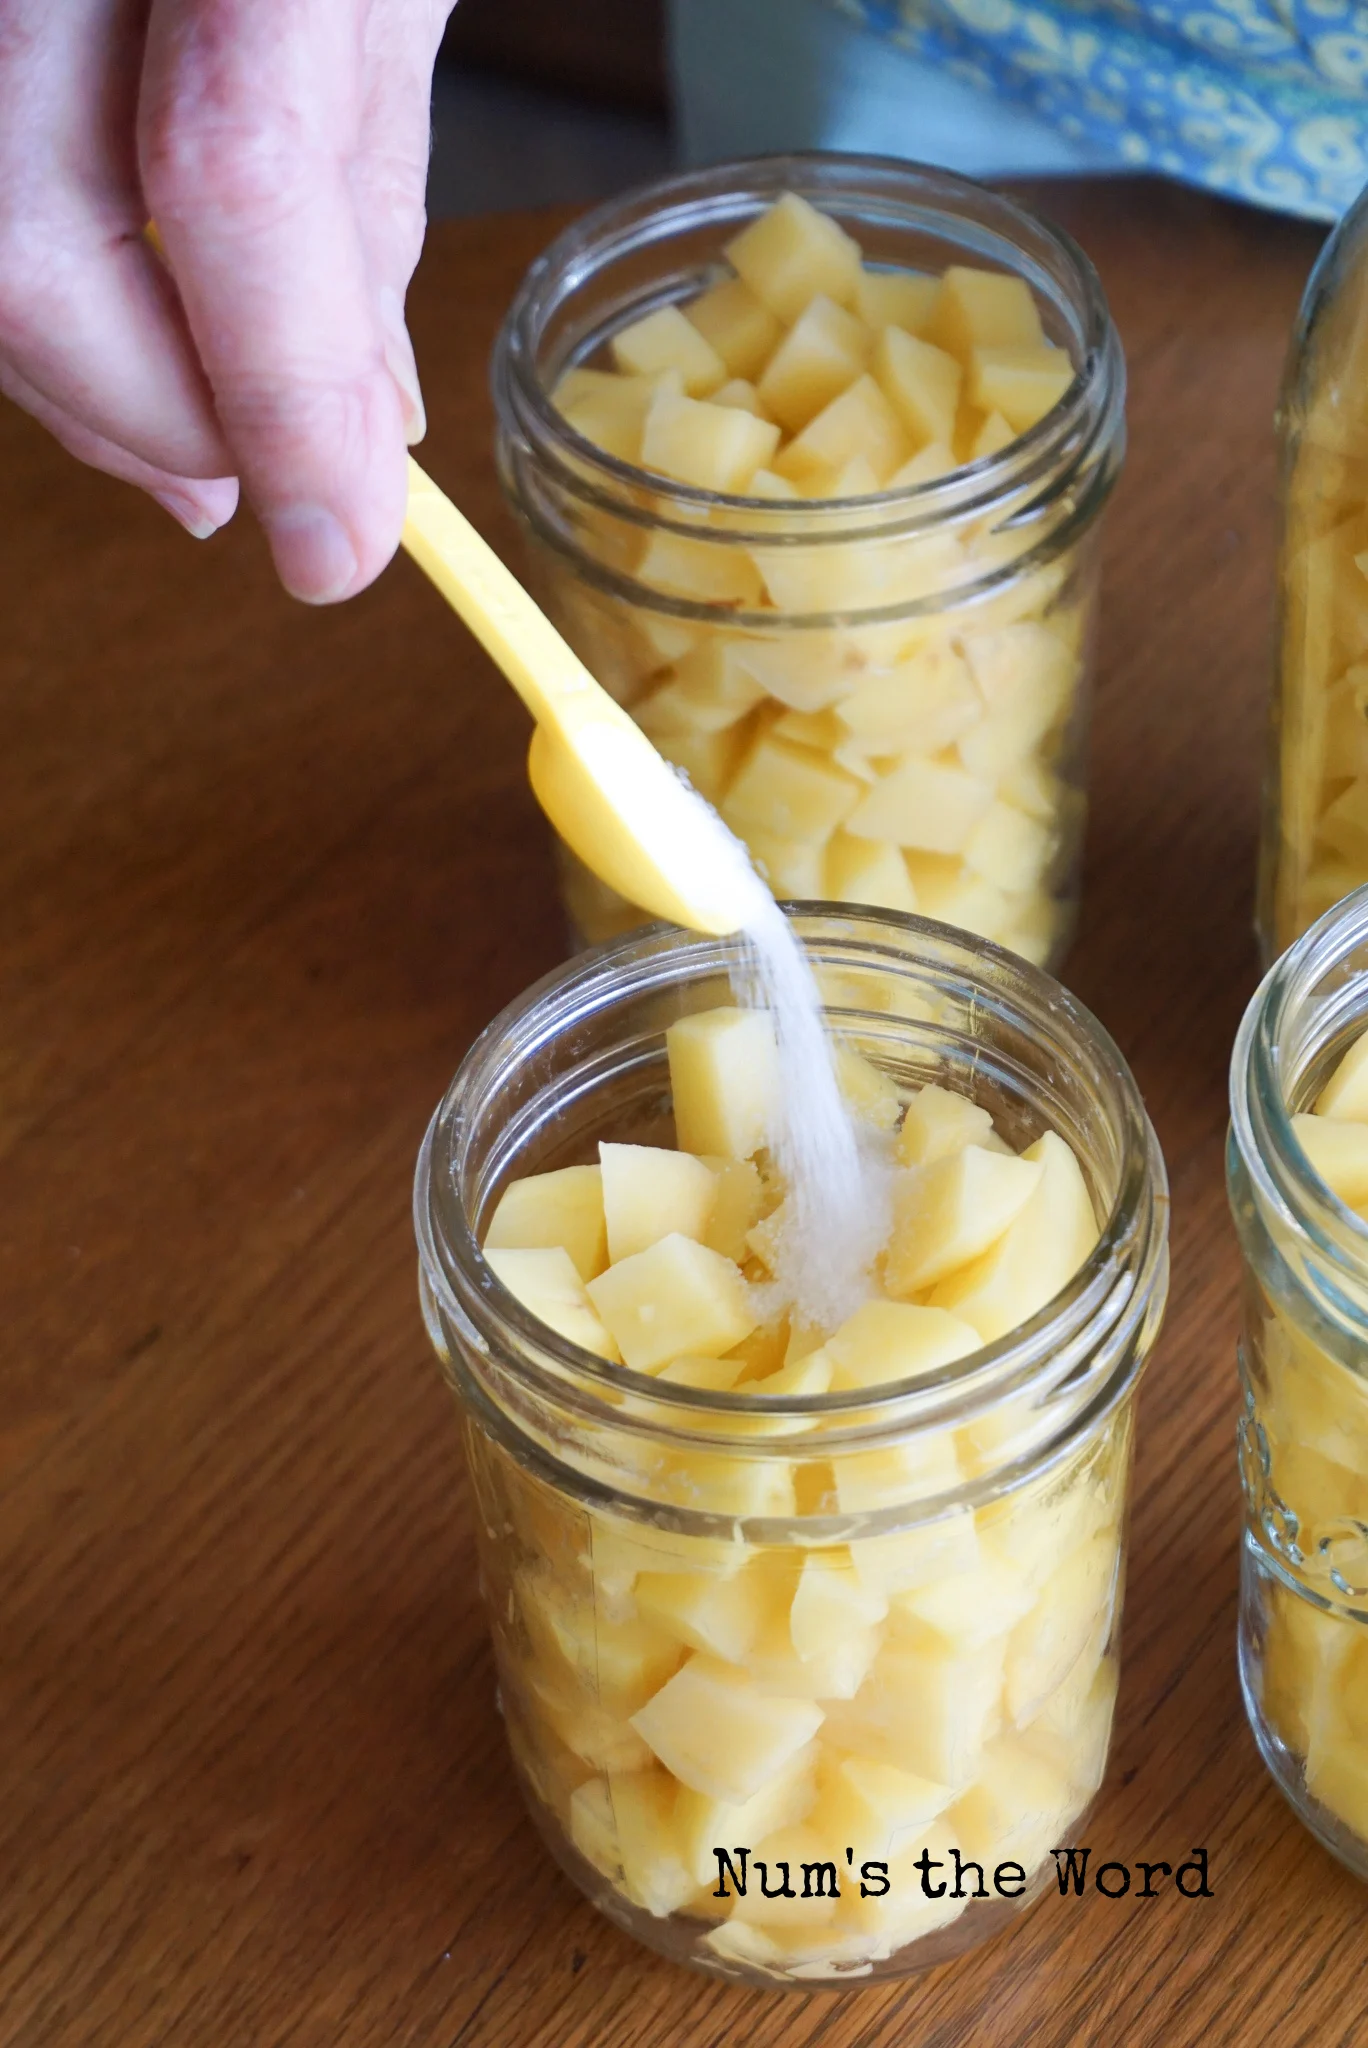
If you do want to add salt to your potatoes, add 1/2 teaspoon canning salt to your pint jars and 1 teaspoon canning salt to your quart jars.

What kind of salt can I use to can potatoes?
If you choose to add salt to your canning potatoes, you’ll want to use canning and pickling salt. Canning and pickling salt is pure salt with no additives.
Additives found in traditional table salt and sea salt can turn your liquid cloudy or even a different color.
Though fine to eat, it may trip you up psychologically.
Canning whole potatoes versus diced potatoes
There isn’t a technical benefit to canning whole potatoes versus diced potatoes. The main obvious advantage is time. Not having to dice your potatoes will save you time.
However due to the potatoes not being diced, you have a lot of space left in your jars that diced potatoes could fill. If doing whole potatoes, we recommend using small potatoes
The preference on whether to can who potatoes or diced potatoes will come down to you and what your intentions are with using home-canned potatoes.
Do you want to make mashed potatoes from canned potatoes? Then whole is a great way to go.
If you want to add your potatoes to soups and stews, having the potatoes already diced, makes cooking with them a breeze.
Can dogs eat potatoes?
Your dog can eat potatoes, but only cooked ones. When canning, make sure you don’t drop raw potato skins or raw pieces on the floor for your dogs.
Raw potatoes contain Solanine which is toxic to some dog breeds. Cooked potatoes have low levels of solanine which is ok for your dogs. Just don’t go overboard and feed them excessive amounts of potatoes.
Now that we’ve answered your most frequently asked questions, let’s get onto the process of canning!
If you want more canning recipes, check these out:
And today we’ll learn how to can potatoes, the raw pack method!
What ingredients do you need for canning potatoes?
- Gold or Russet Potatoes – how many you need will depend on the size of your potatoes and how many jars you want to can. I found 10 pounds of potatoes will can 7 quart jars.
- Salt – 1 teaspoon canning and pickling salt per quart jar
- Hot water – boiling is best!
Canning Potatoes Step 1:
Whether you are using fresh picked potatoes or store bought potatoes, you’ll want to wash and scrub all the dirt and debris off of them.
As mentioned in the ingredients white potatoes like russet or Yukon gold work great for canning. Even though Yukon gold have thin skins, we still peal them. That is a personal choice.
Canning Potatoes Step 2:
Before we peel our potatoes, find a large bowl or large pot and fill it half full with ice water.
As you peel your potatoes, you want to remove all the skin, eyes and imperfections. Your potatoes should be white, and clean.
Once your potatoes are skinned, place them in the ice water. This will help remove starch as well as prevent your potatoes from oxidizing.
We recommend peeling all your potatoes at one time before moving onto the next step.
If you plan to can a lot of jars, we recommend getting a few extra hands to help. It really does speed up the process.


Canning Potatoes Step 3:
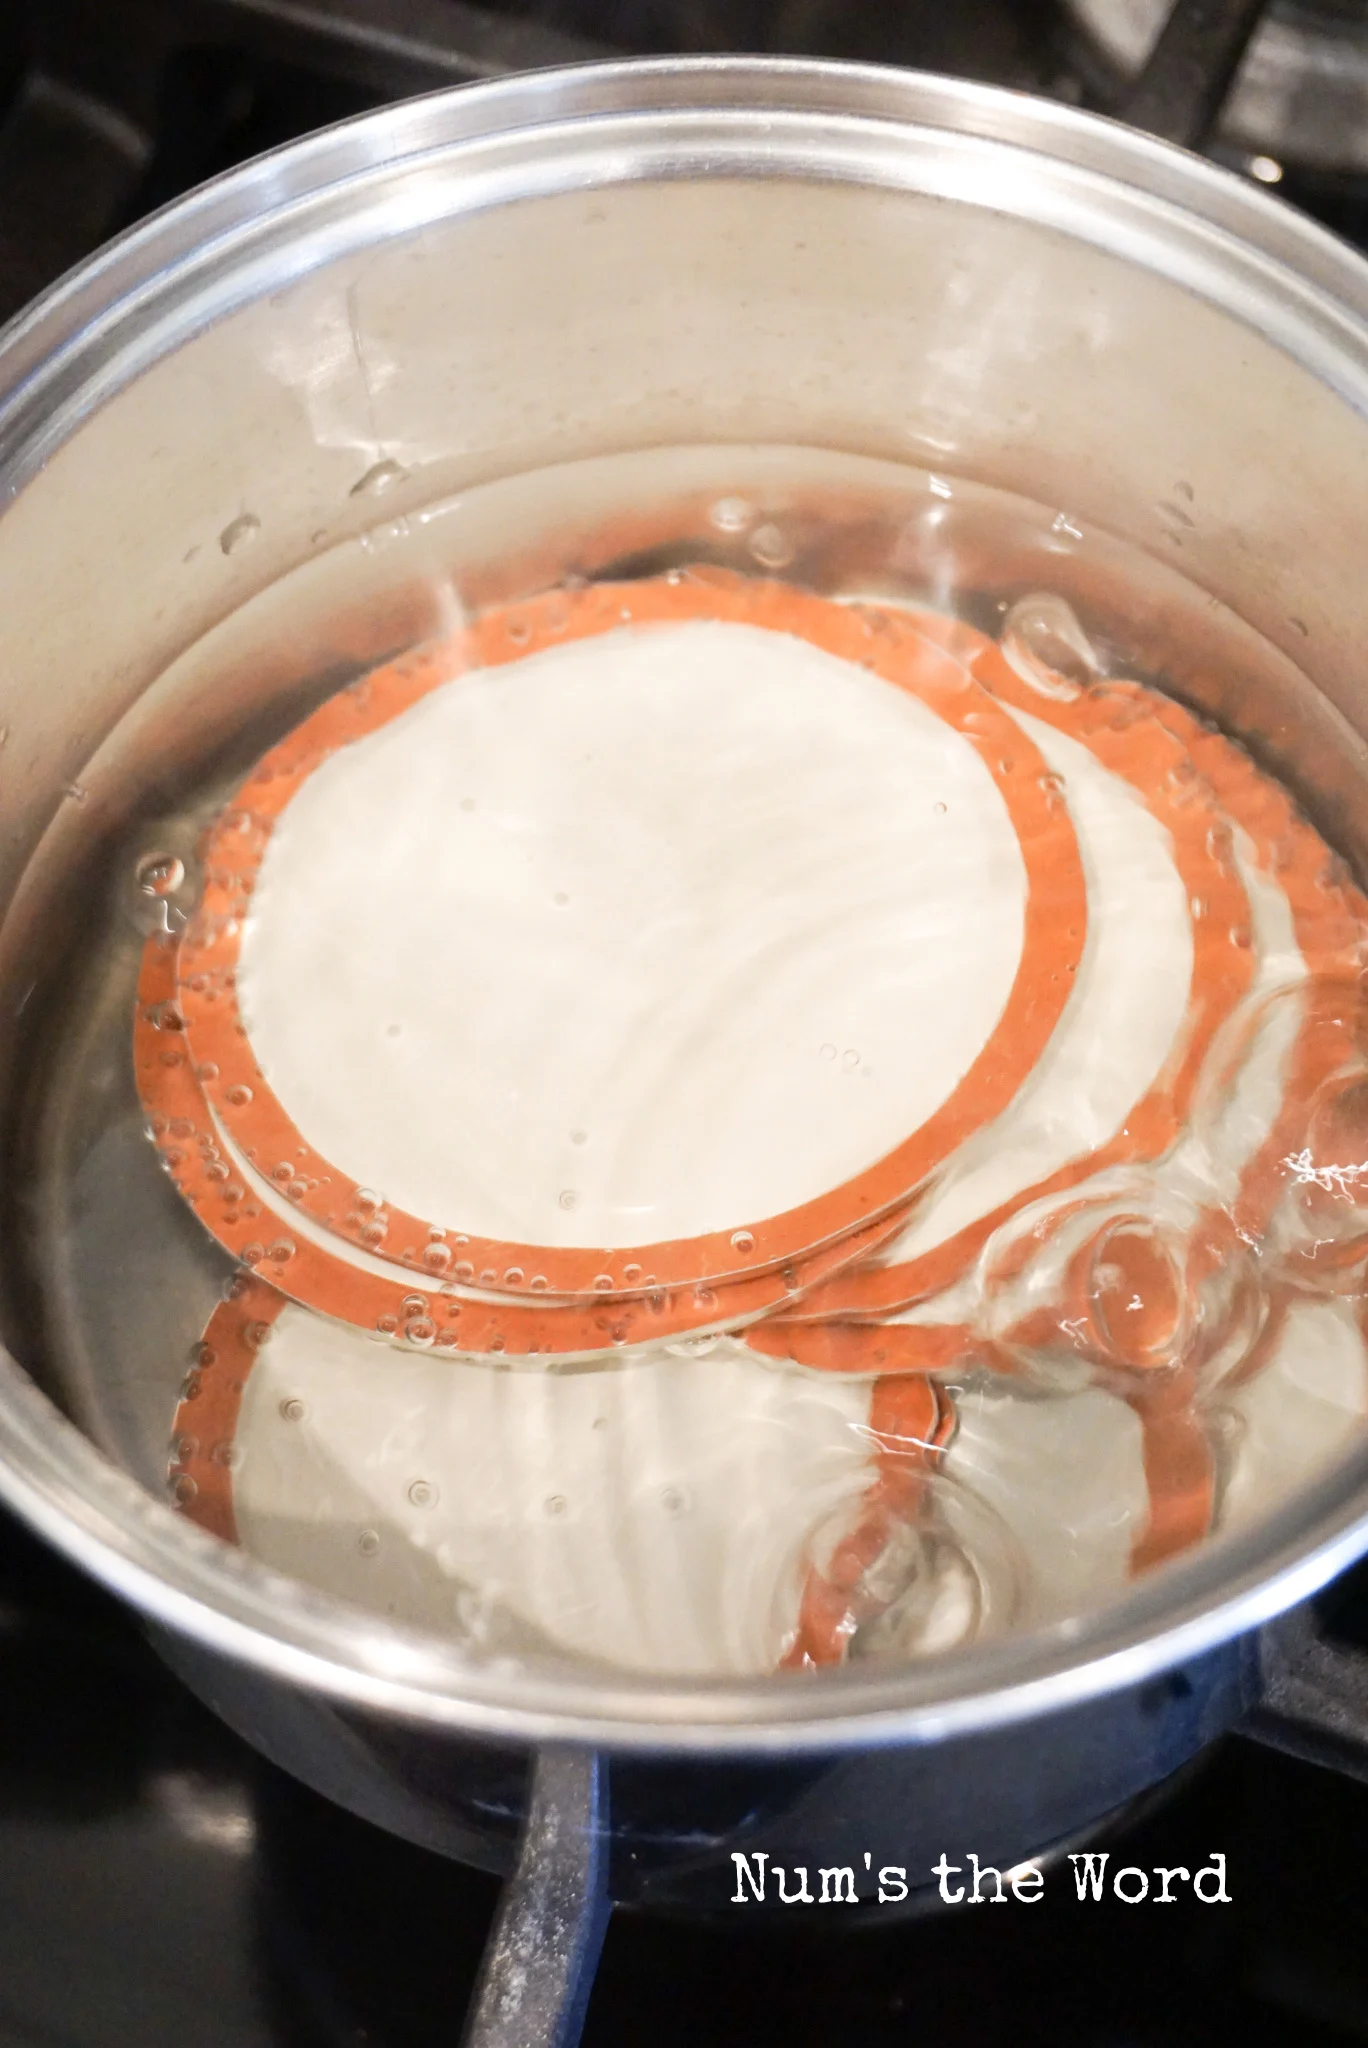
Now it’s time to prepare your jars and lids.
Set your pressure canner on the stove with canning base. Pour two quarts of water into the pot (or as many as are recommended by your canners manufacturer).
Place jars upside down on canning base and turn burner to hot.
lids to pot and make sure they are submerged. If there isn’t enough room, get a second small pot of water and add lids.
Bring small pot to a boil and cook lids for 1 minute.
Once jars and lids have steamed for 1 minute or longer and are nice and hot, remove the hot jars from the canner and place on a kitchen towel to cool upside down. Repeat with remaining canning jars.


Canning Potatoes Step 4:
While jars are steaming, it’s time to dice your potatoes (if dicing, you can also can whole).
Now that all your potatoes are peeled and in the cold water with ice, it’s time to dump your water, rinse your potatoes and place them back in the bowl with new ice water.
You’ll also want to prepare a second bowl or pot of ice water for the soon to be diced potatoes.
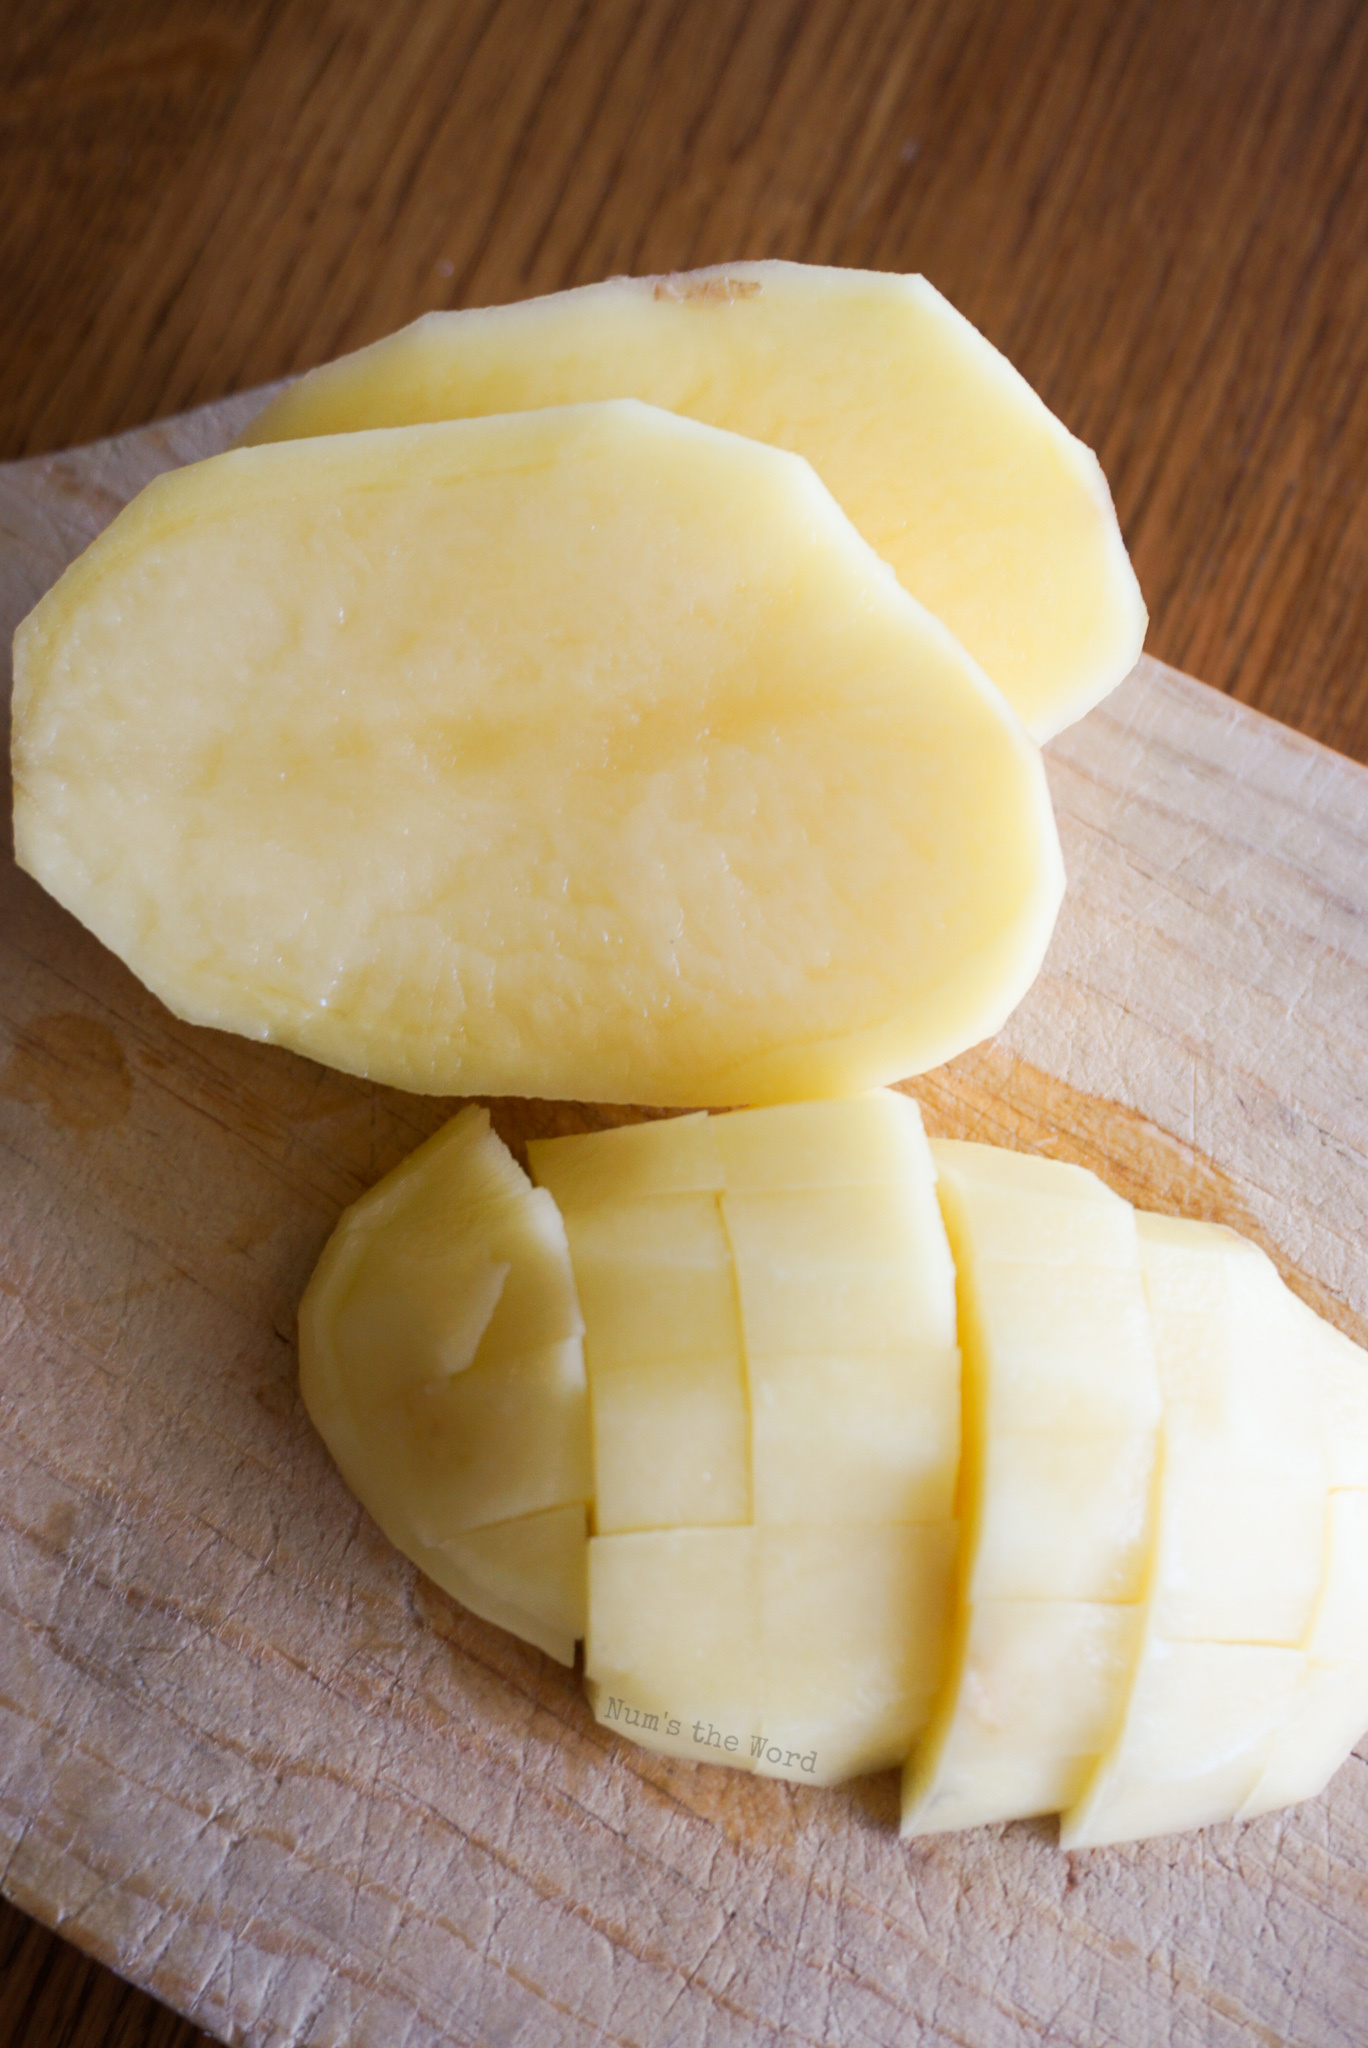
Once you have those two things prepared it’s time to dice your potatoes. Each diced potato should be bite sized. We cut potatoes into 1/2 inch to 3/4 inch squares or rectangles.
My preferred method is to lay the peeled potato on the cutting board and slicing it in half lengthwise.
Then cut each half into thirds and then squares. Set cubes into new bowl of ice water and repeat with remaining potatoes.

Canning Potatoes Step 5:
By this step, your jars and lids should be sterilized and cooling. You can now turn your canner to low or off while you prepare potatoes.
Drain diced potatoes and rinse well. We want to rinse off any extra starch. Starch can make the liquid in jars go cloudy, but don’t worry it can’t hurt you. Rinsing your potatoes helps prevent a buildup of starch in the jars.
Once potatoes have been rinsed and drained, it’s time to fill your jars or blanch your potatoes (if you choose the blanching method)
If packing your jars with raw potatoes, skip to step 7. If blanching potatoes, continue to step 7.

Canning Potatoes Step 6: Optional
If blanching your potatoes, bring a large pot of water to boiling.
Add in potatoes and blanch.
Diced potatoes should cook for 2 minutes. Before removing, straining and adding to canning jars.
Whole potatoes should cook for 10 minutes. Before removing, straining and adding to canning jars.
Note: Discard water and do not reuse it. It will be full of starch which acts as a thickening agent and will gel your potatoes. You always want to use fresh water.
Canning Potatoes Step 7:
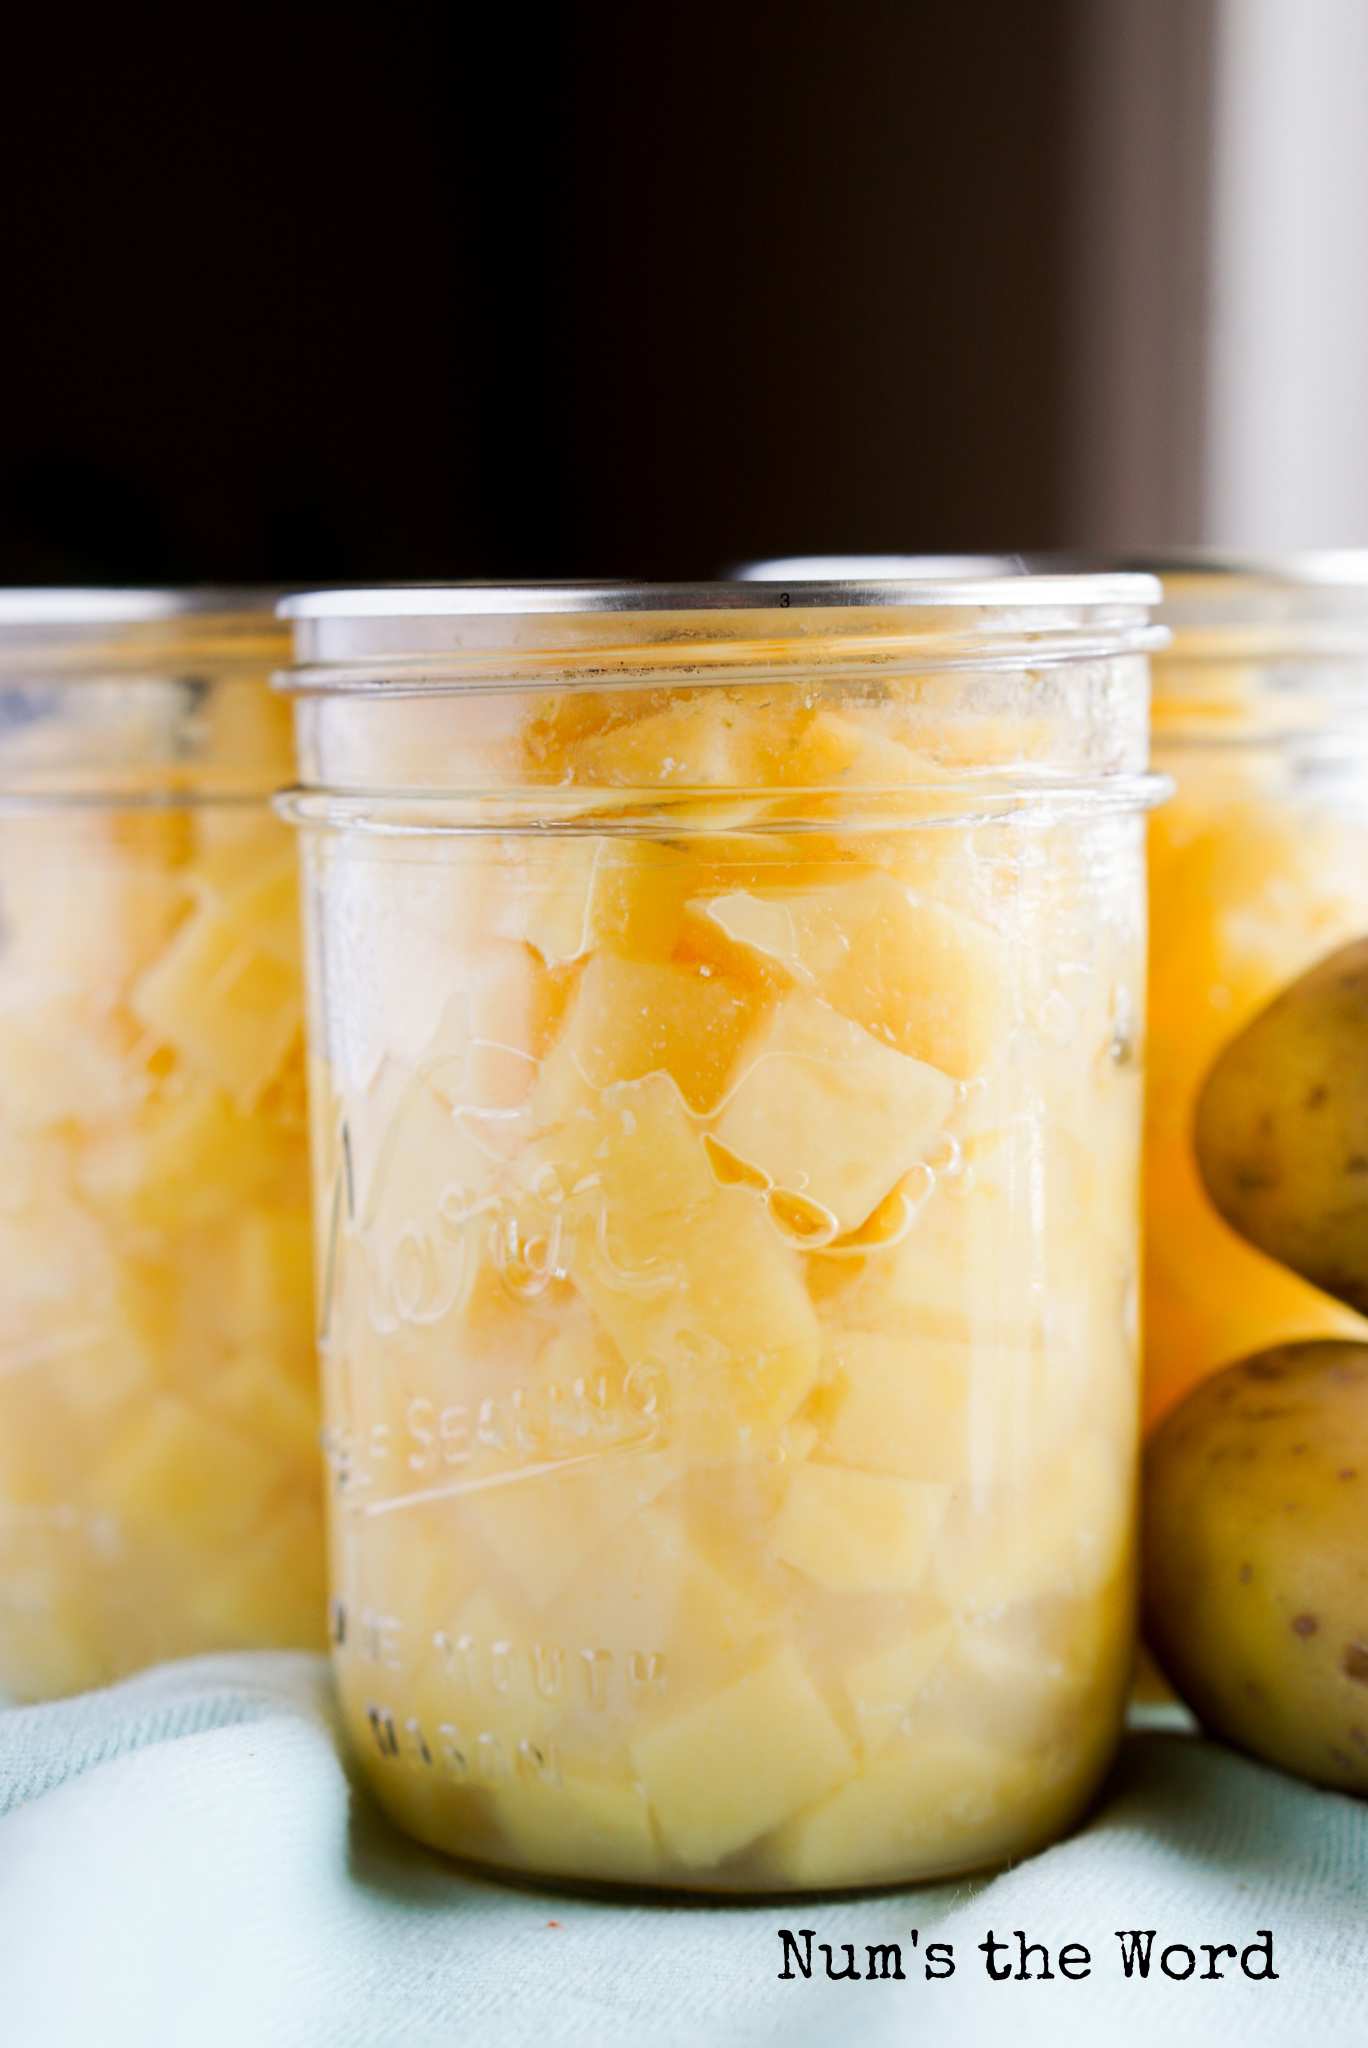
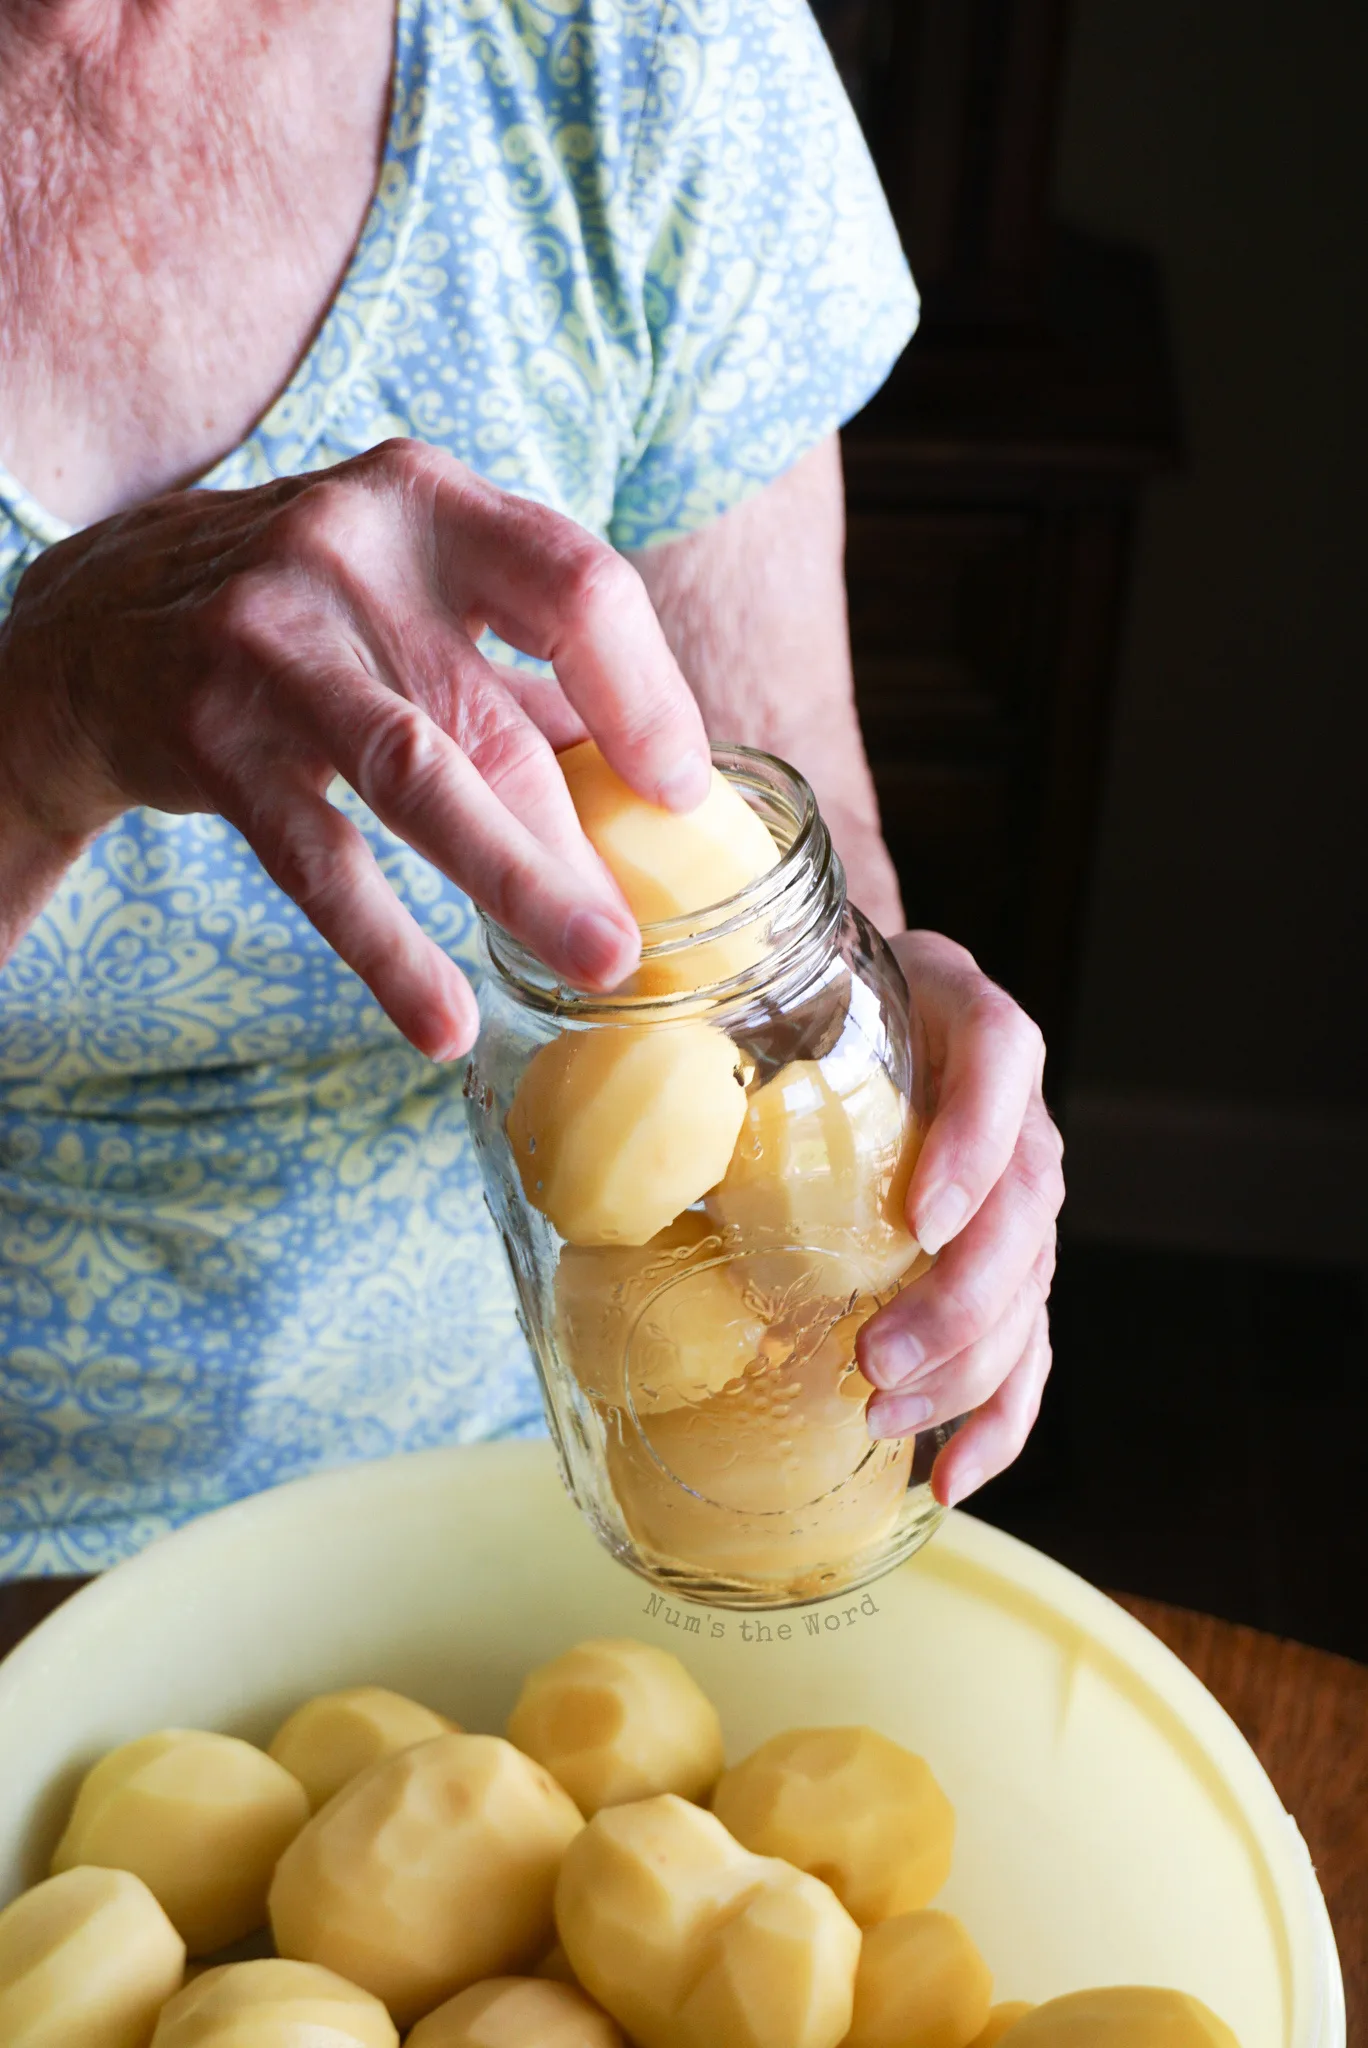
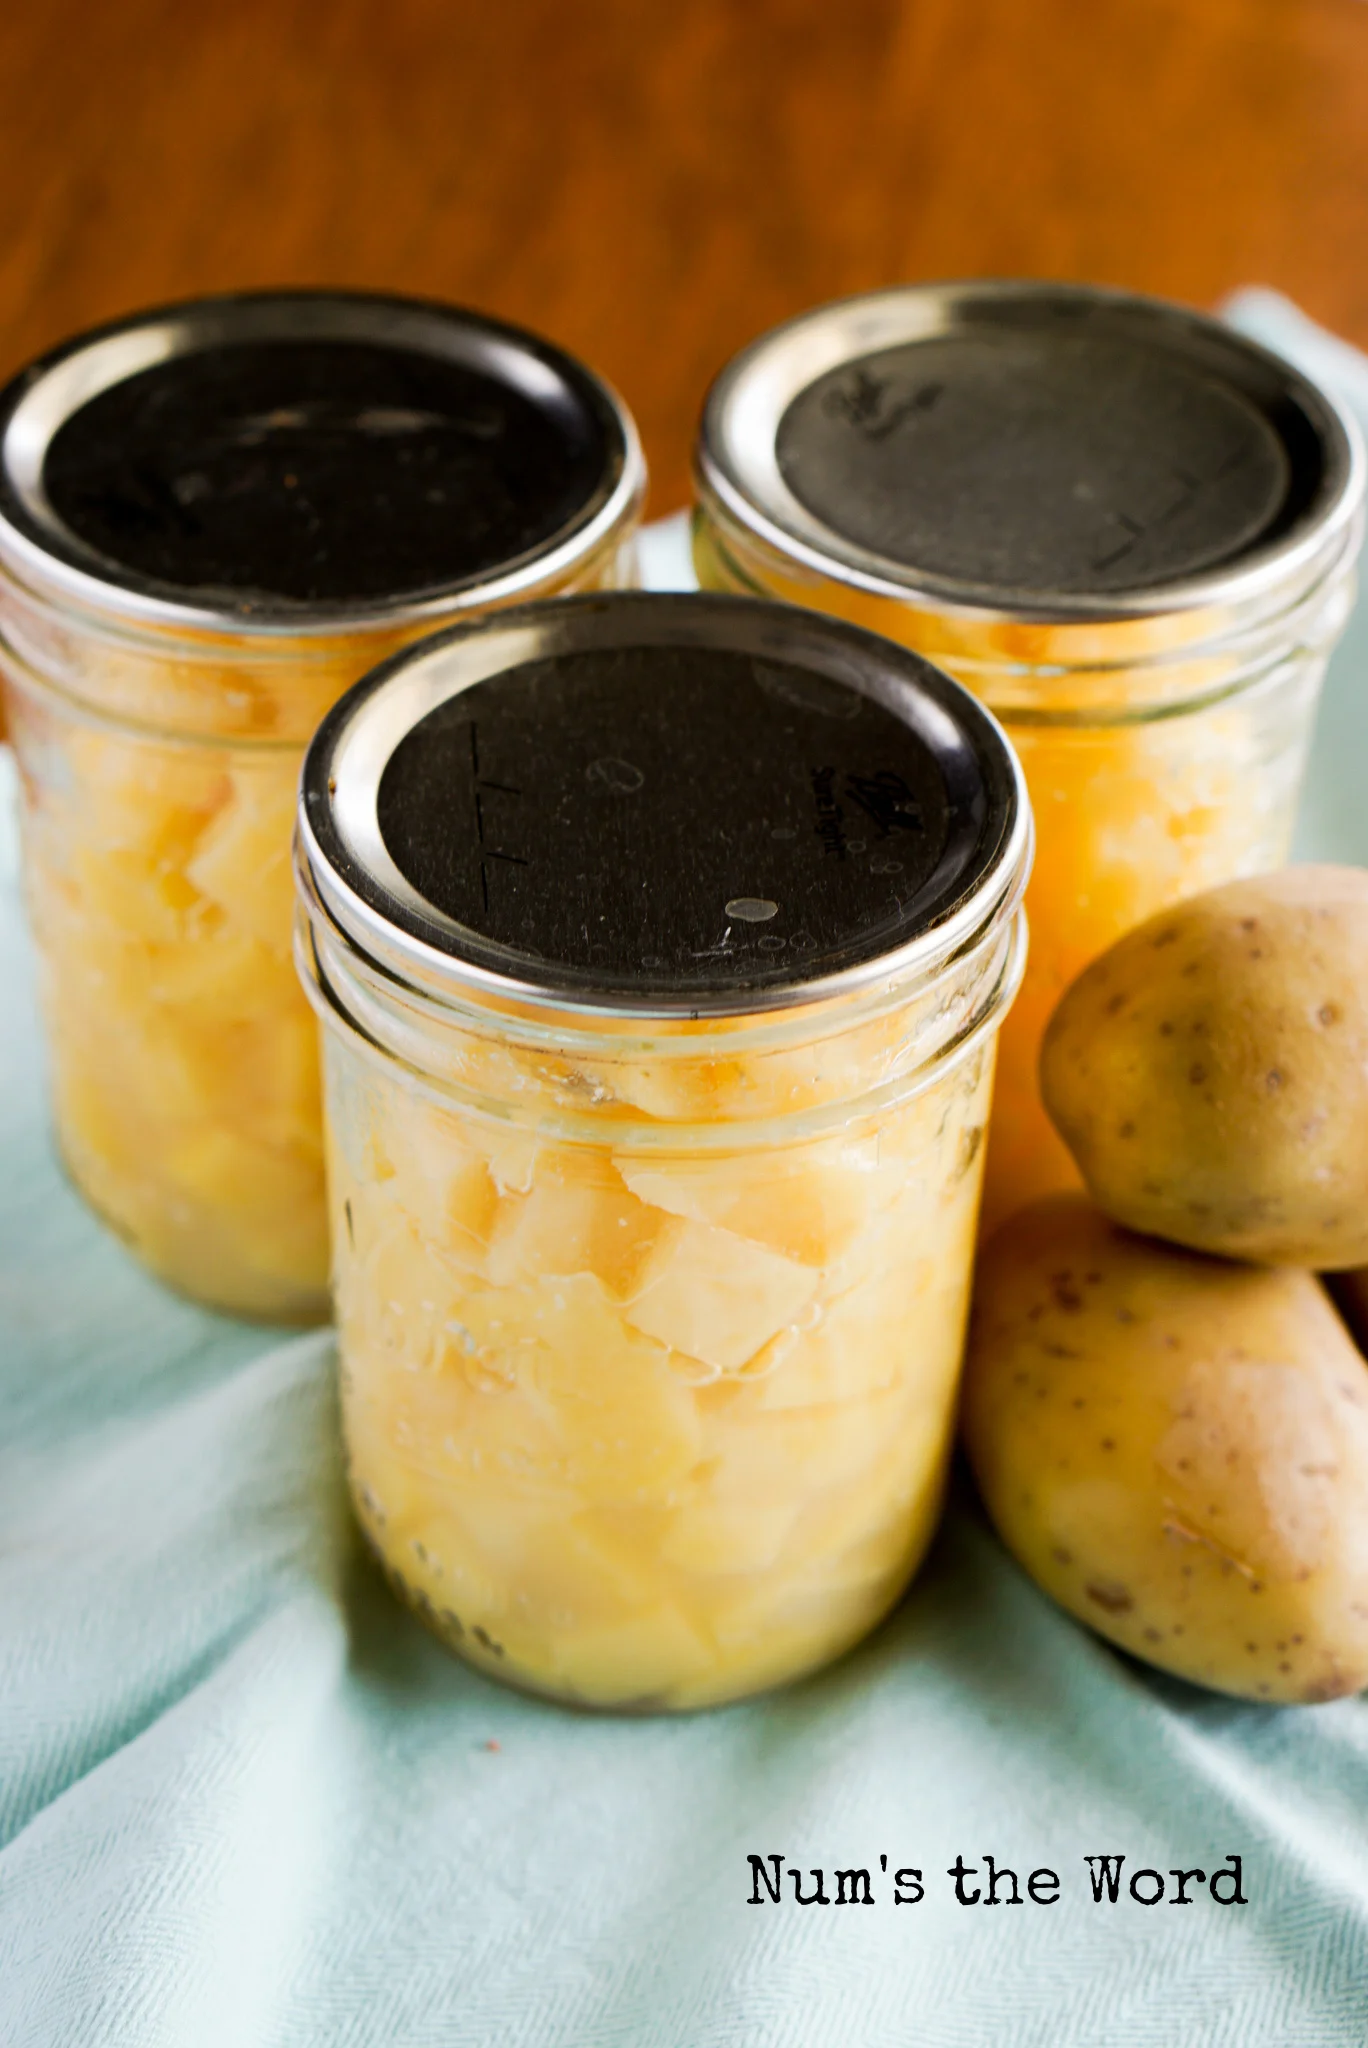
Using a canning funnel, fill each jar to the top with potato pieces.
Lift up the jar and gently tap it on the bottom of your free hand to get potatoes to adjust and fill in any empty spaces in the jar. If there is enough room at the top, add more potatoes.
Do you fill potatoes to the top of the jar. You want to go only to the neck of the jar, not the rim. Ideally you want 1 inch of headspace at the top of your jar.
Set filled jars aside and repeat with remaining jars.
Note: Headspace means 1 inch with no water or vegetables, just air.
Canning Potatoes Step 8:
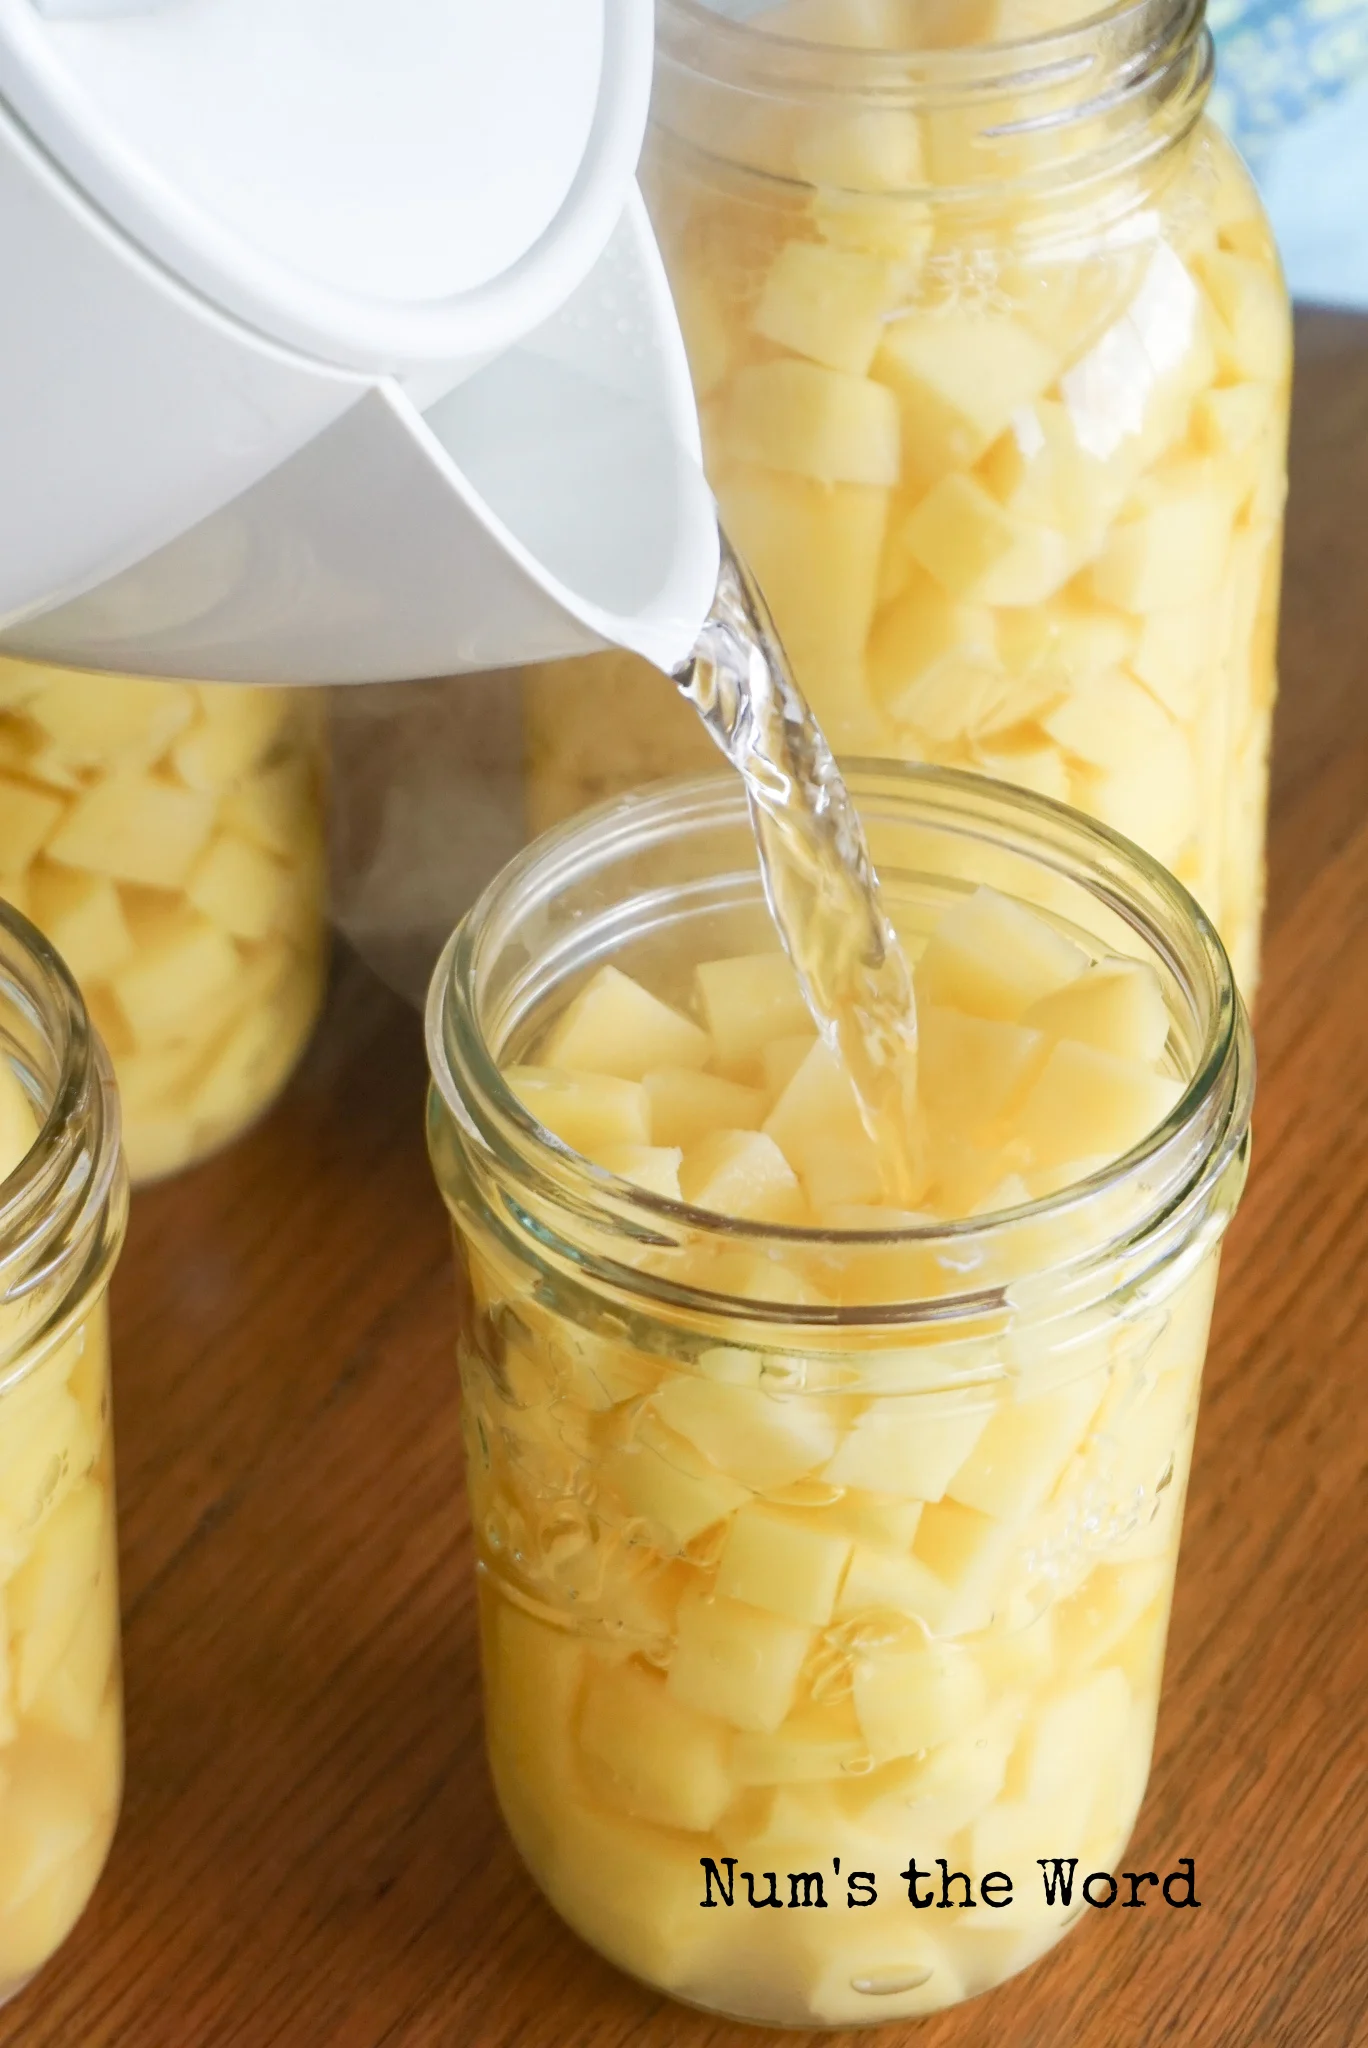
Now it’s time to heat some clean fresh water. According to the National Center for Home Food Preservation the water you use for raw packed foods should be 140*F and 180*F for hot packed food.
If you are raw packing your potatoes, heat your water to 140*F.
If you are parboiling or blanching your potatoes first, the water you add to your jars should be 180*F.
While water is heating up, it’s time to add your salt. Salt is NOT required for this recipe.
We like the flavor of salt so we add 1/2 a teaspoon of canning and pickling salt to each pint or 1 teaspoon of salt (canning and pickling salt!) to each quart.
If you aren’t sure why we use canning and pickling salt, please see the above frequently asked questions.

Canning Potatoes Step 9:
After the salt has been added to the jars (if desired) it’s time to fill each jar with boiling water.
Carefully pour boiling water into each filled jar of potatoes all the way up to the neck.
Repeat with remaining jars. Do not add your lids yet.
After you’ve added water to each of your jars, we need to remove any air bubbles that may be trapped in between your potatoes.
Grab a butter knife or a chop stick and run it along the inside edge of each jar. As you do this, you should see air bubbles escape to the top.

Canning Potatoes Step 10:
Now it’s time to wipe your rims. There may be salt particles or even just dust from the air which could prevent the jars from sealing properly.
Grab a wet paper towel or a paper towel with a little vinegar on it and wipe each jar rim.

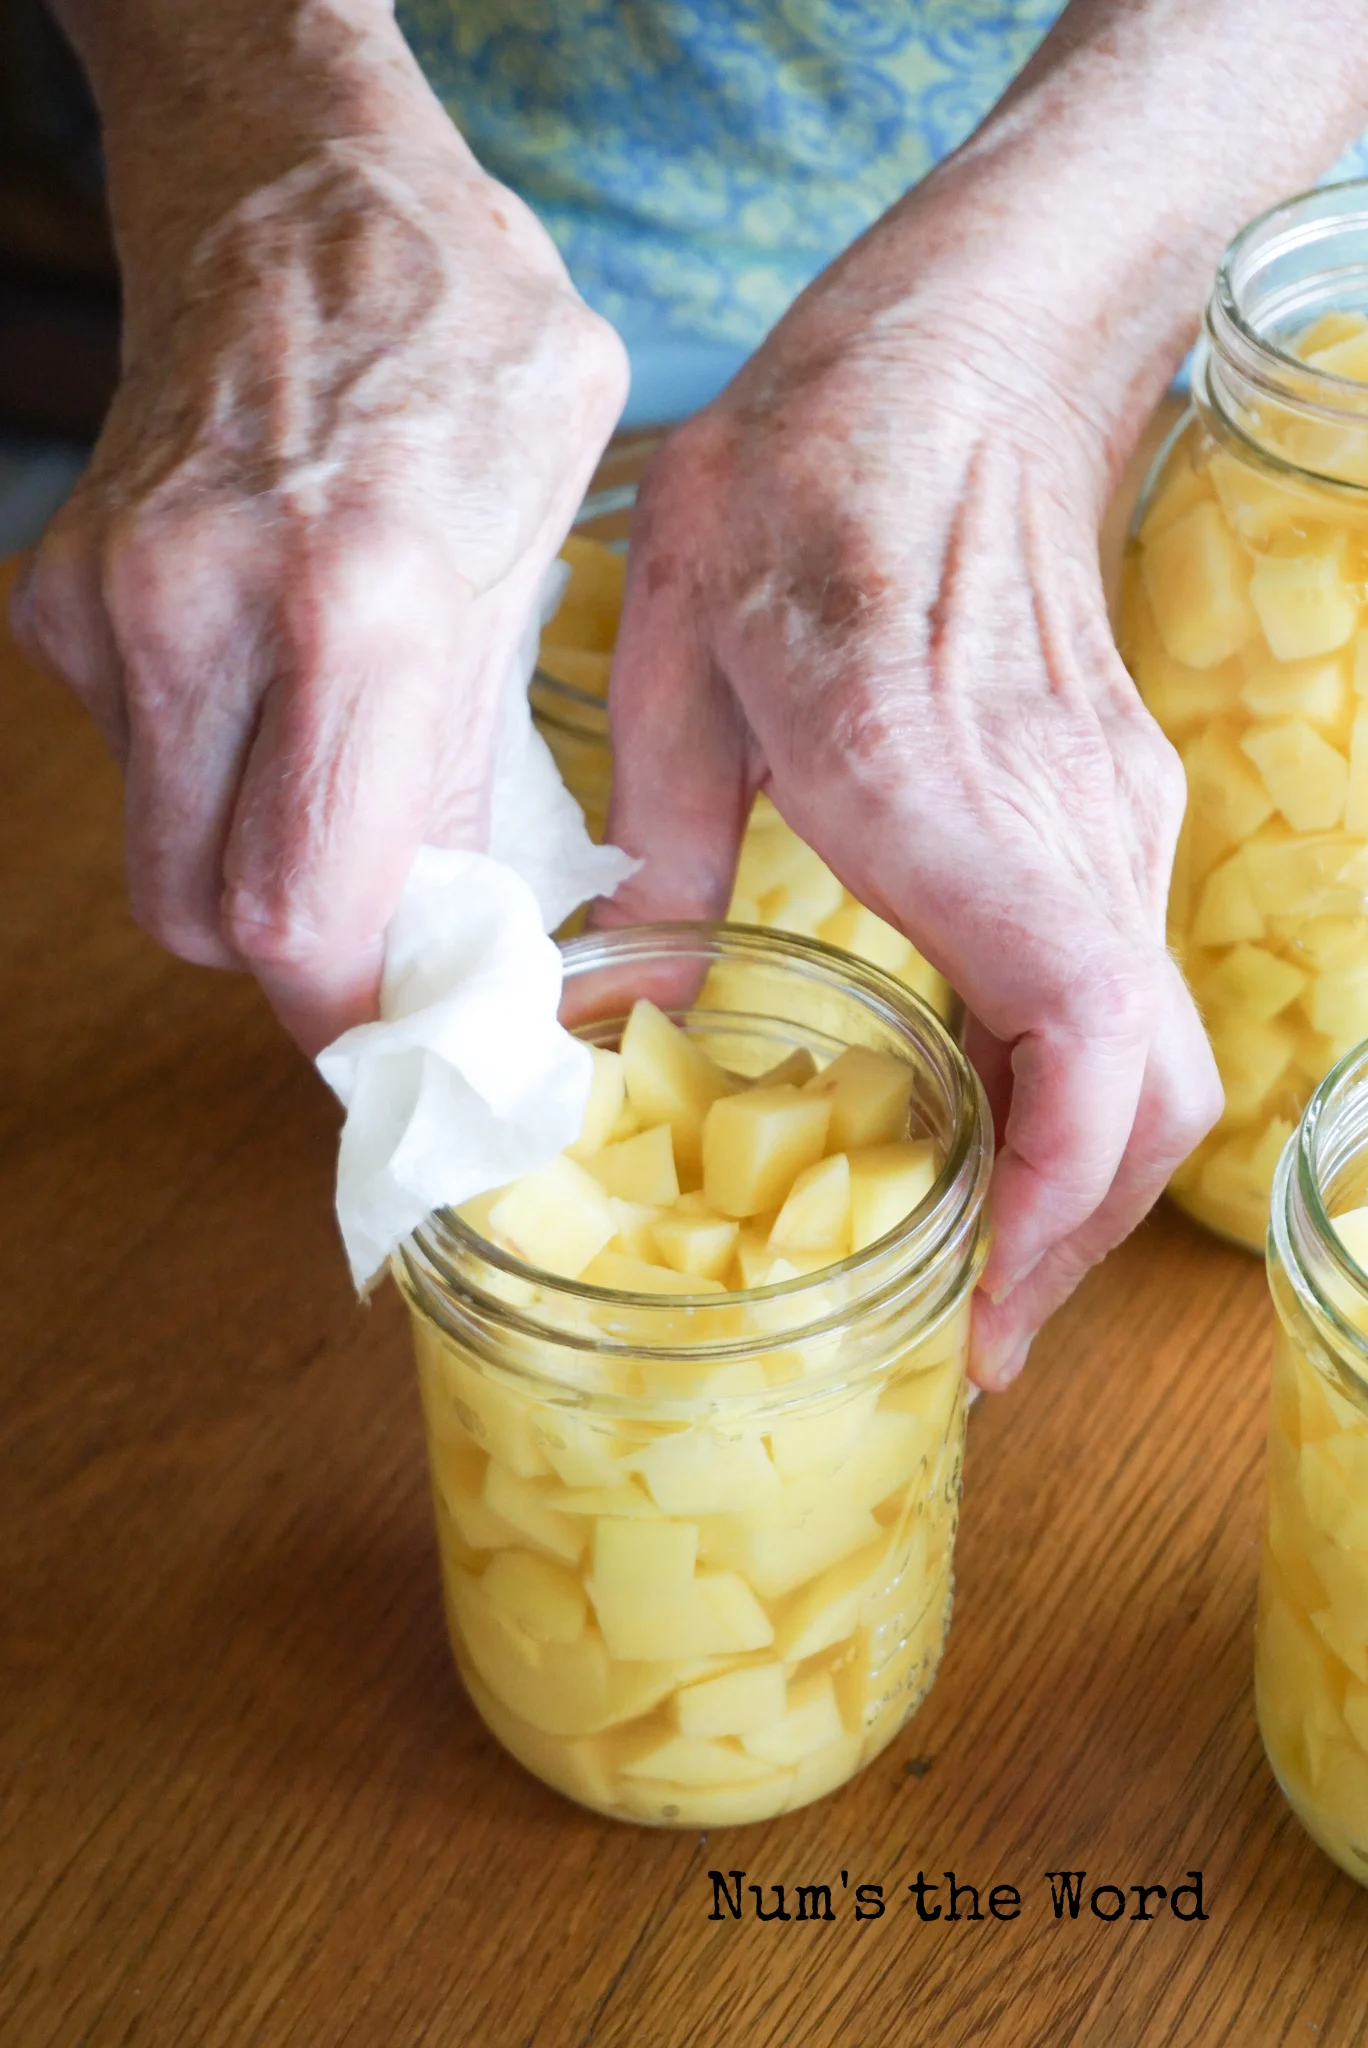
Canning Potatoes Step 11:
Once each rim has been wiped clean, place a canning lid on top.
After the lid is on, screw on the ring. Don’t OVER tighten the rings. Tighten until it wont go anymore (naturally) then give it one extra twist. Do not try to over tighten the lids or they may buckle in the canning process.

Canning Potatoes Step 12:
Now it’s time to teach you how to can potatoes with your pressure canner.
Before we begin, you should know that once we start, you cannot leave your kitchen. Grab a book, an iPad and go to the bathroom before you continue.
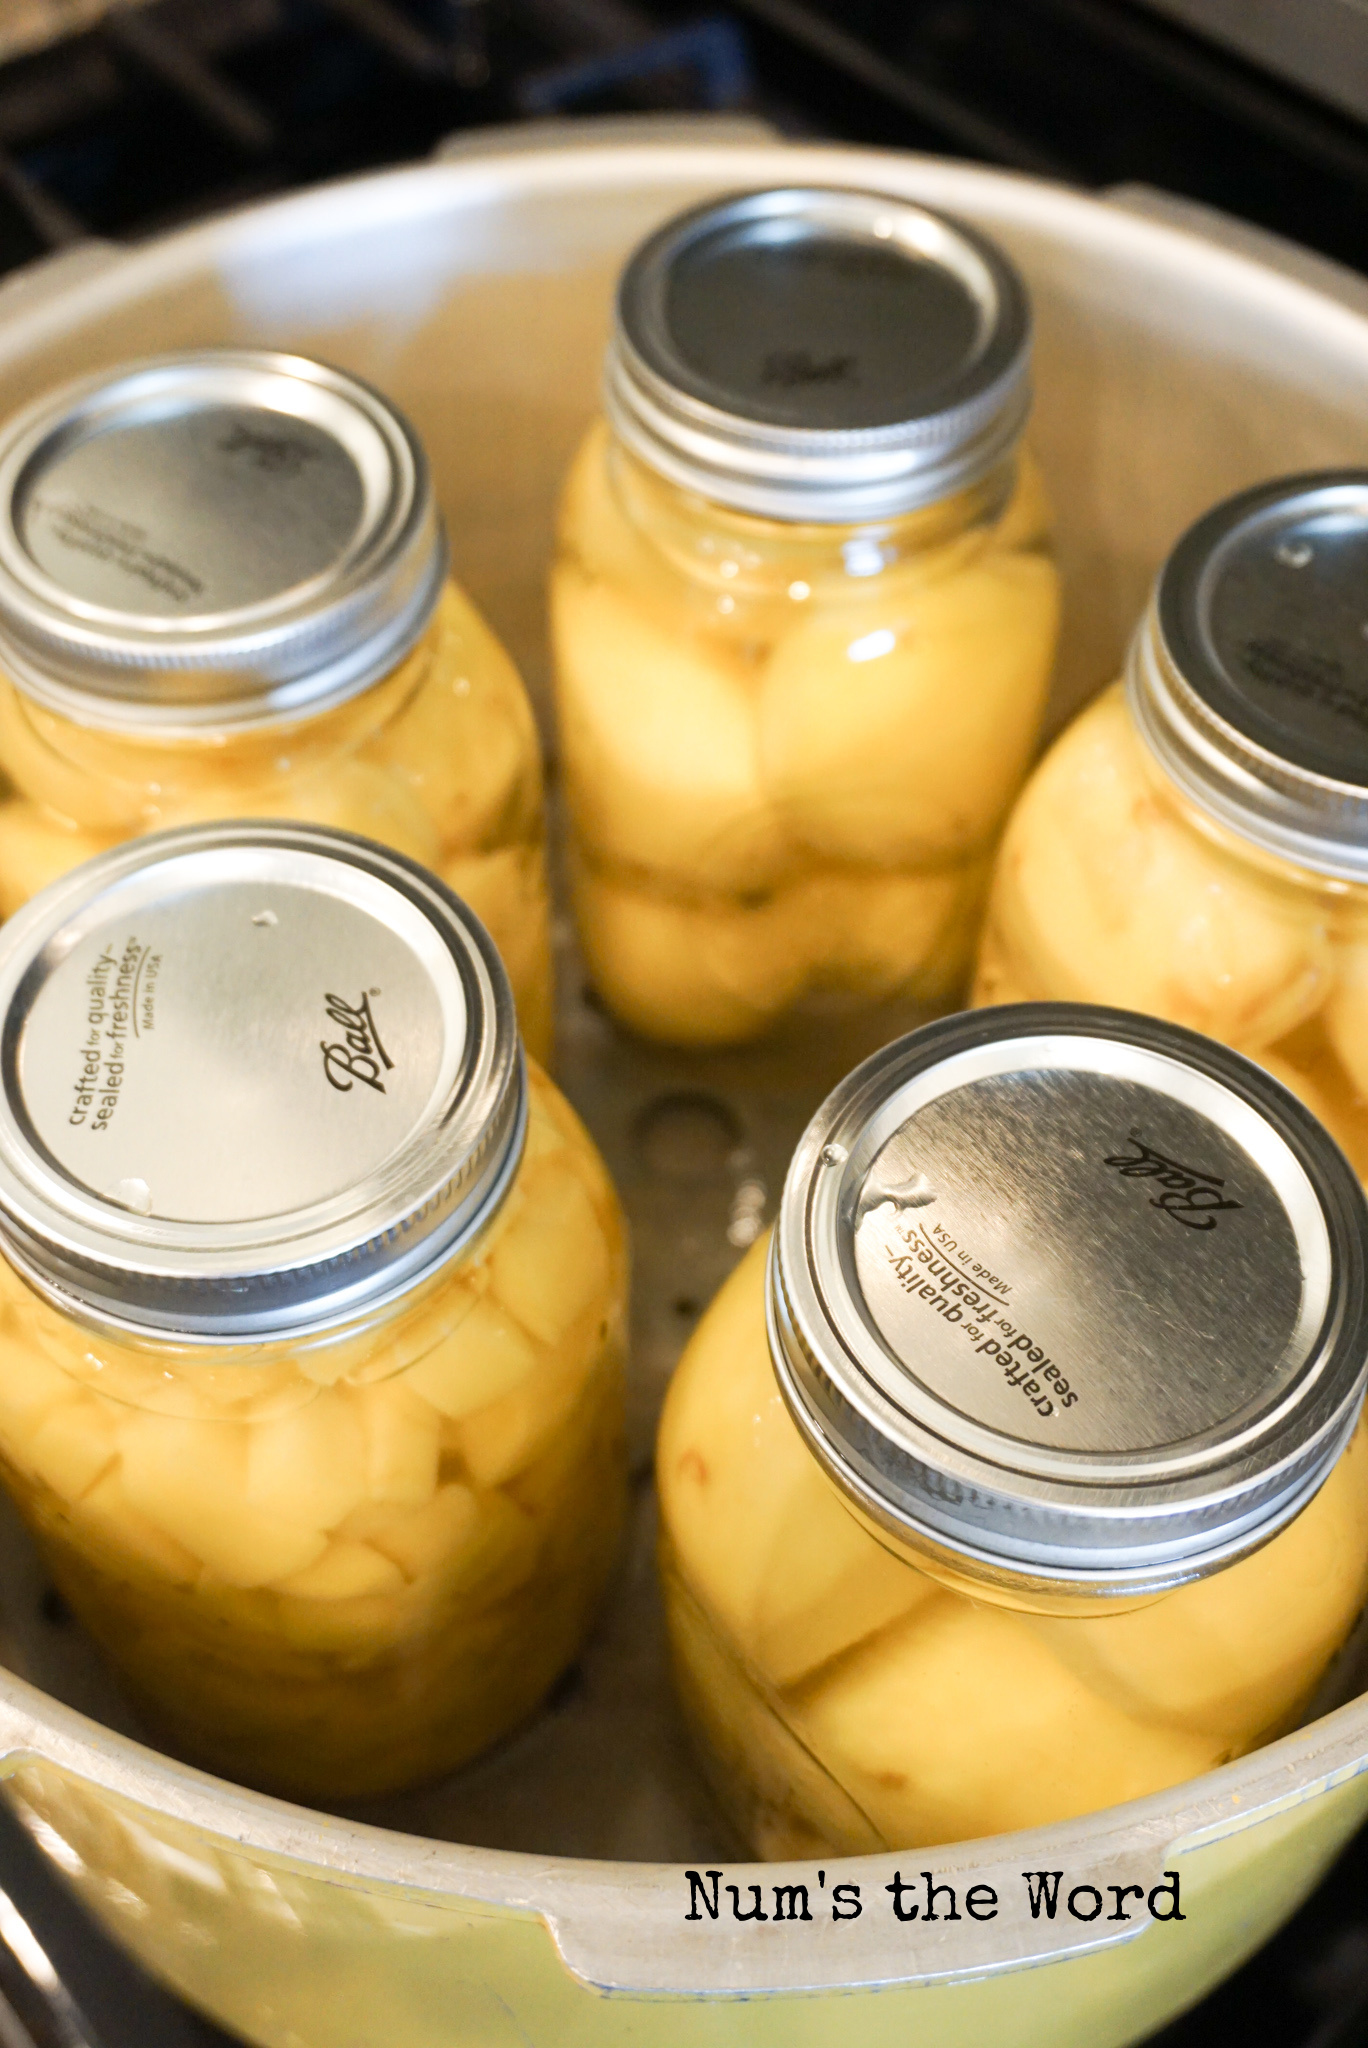
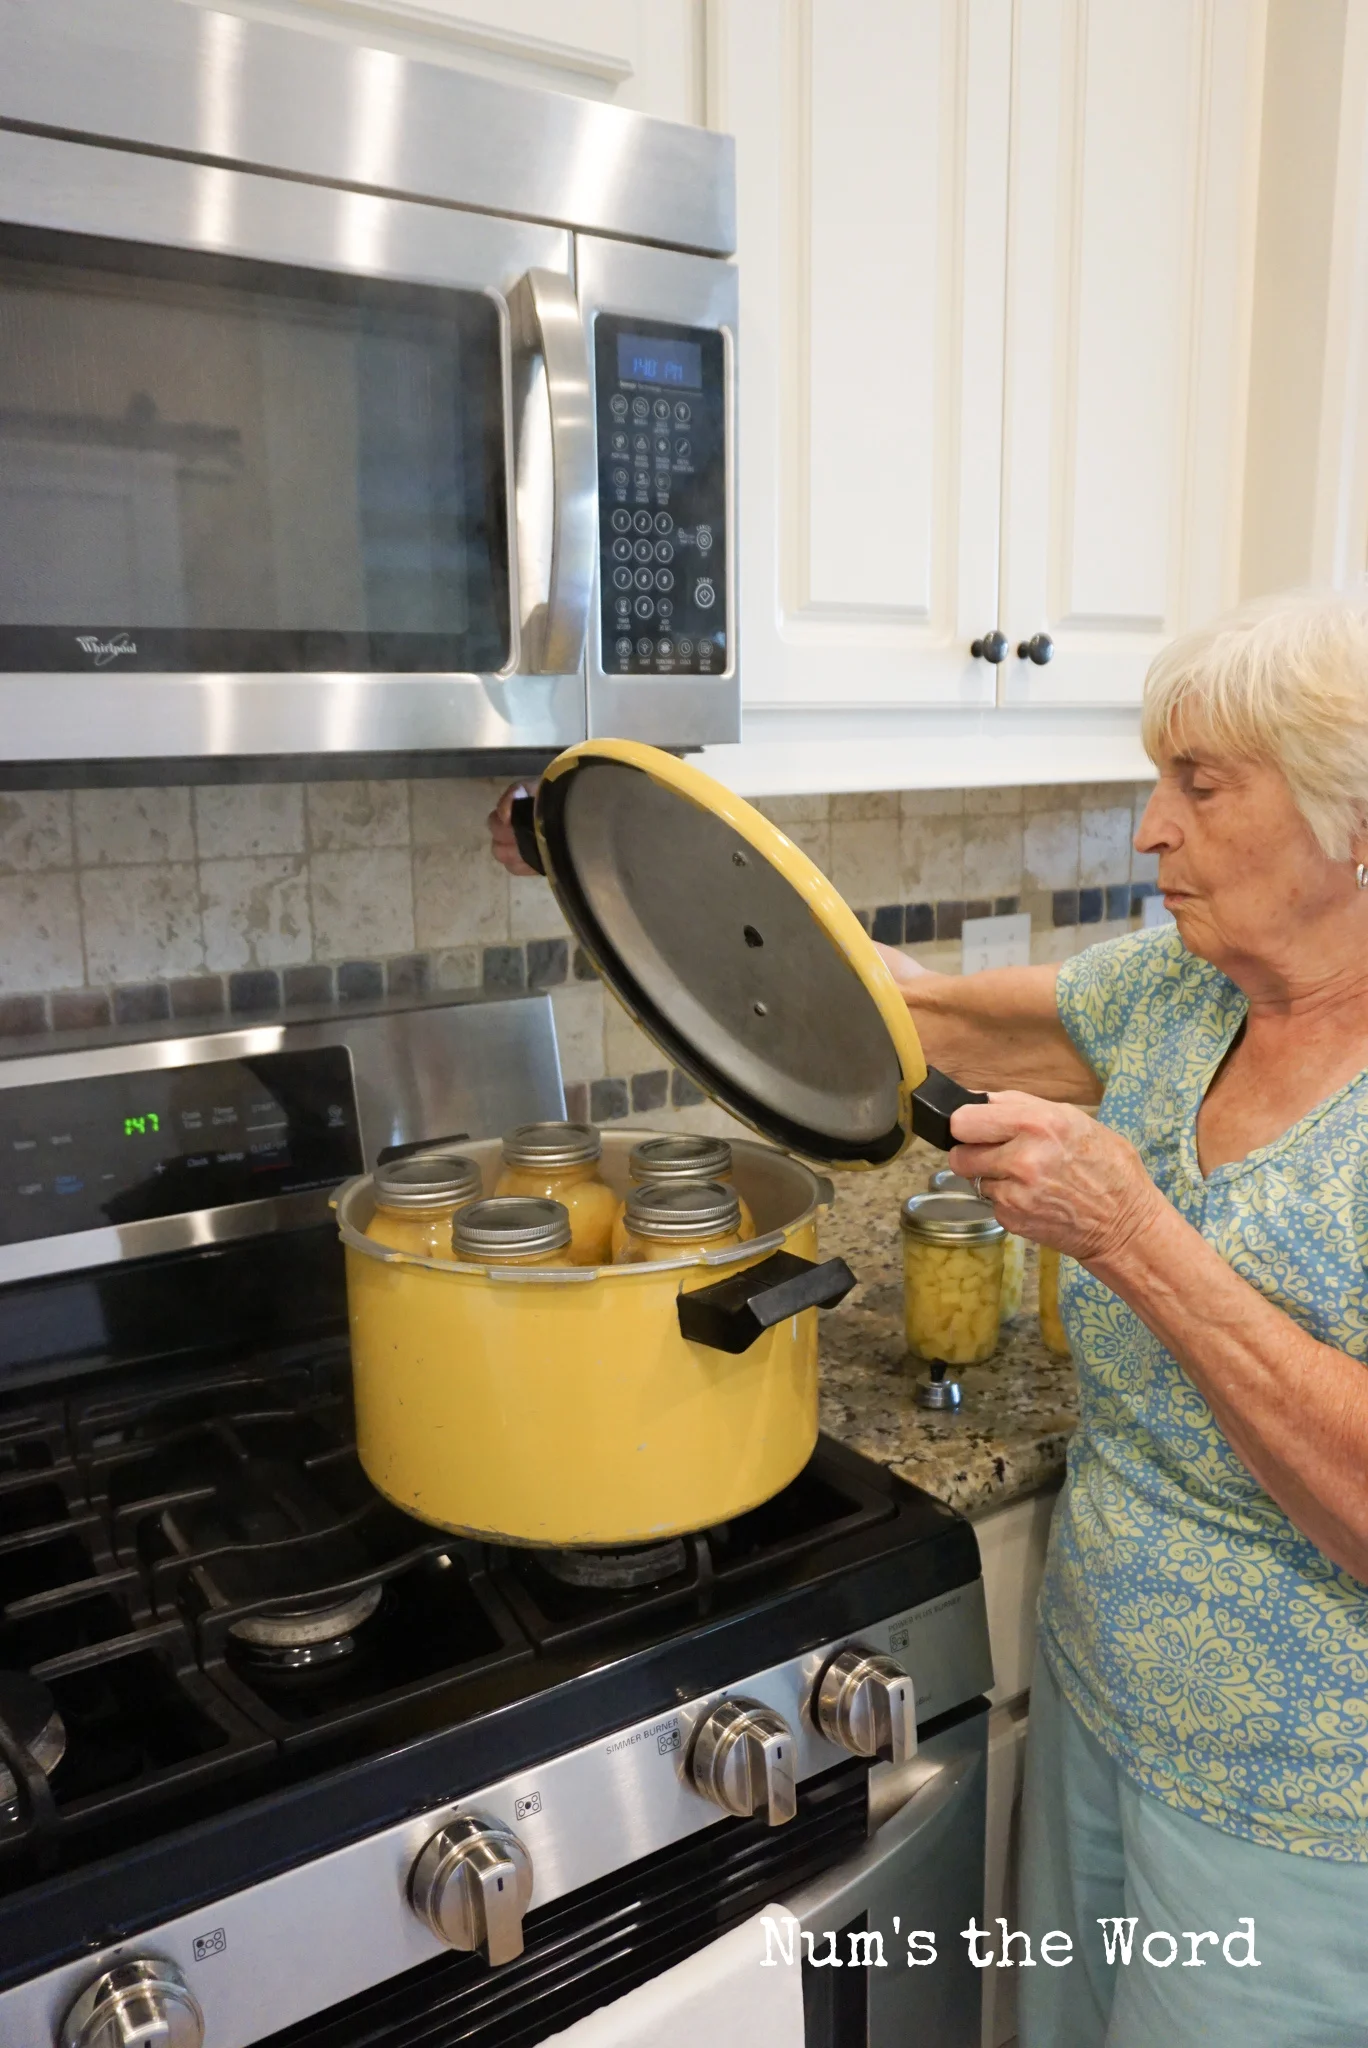
Place prepared jars into pressure canner. How many jars you can get into your canner, will depend on your canner.
Make sure the jars do not touch each other or the outside of the canner. For my canner, we can get 7 pint jars and 5 quart jars in per batch.

Canning Potatoes Step 13:
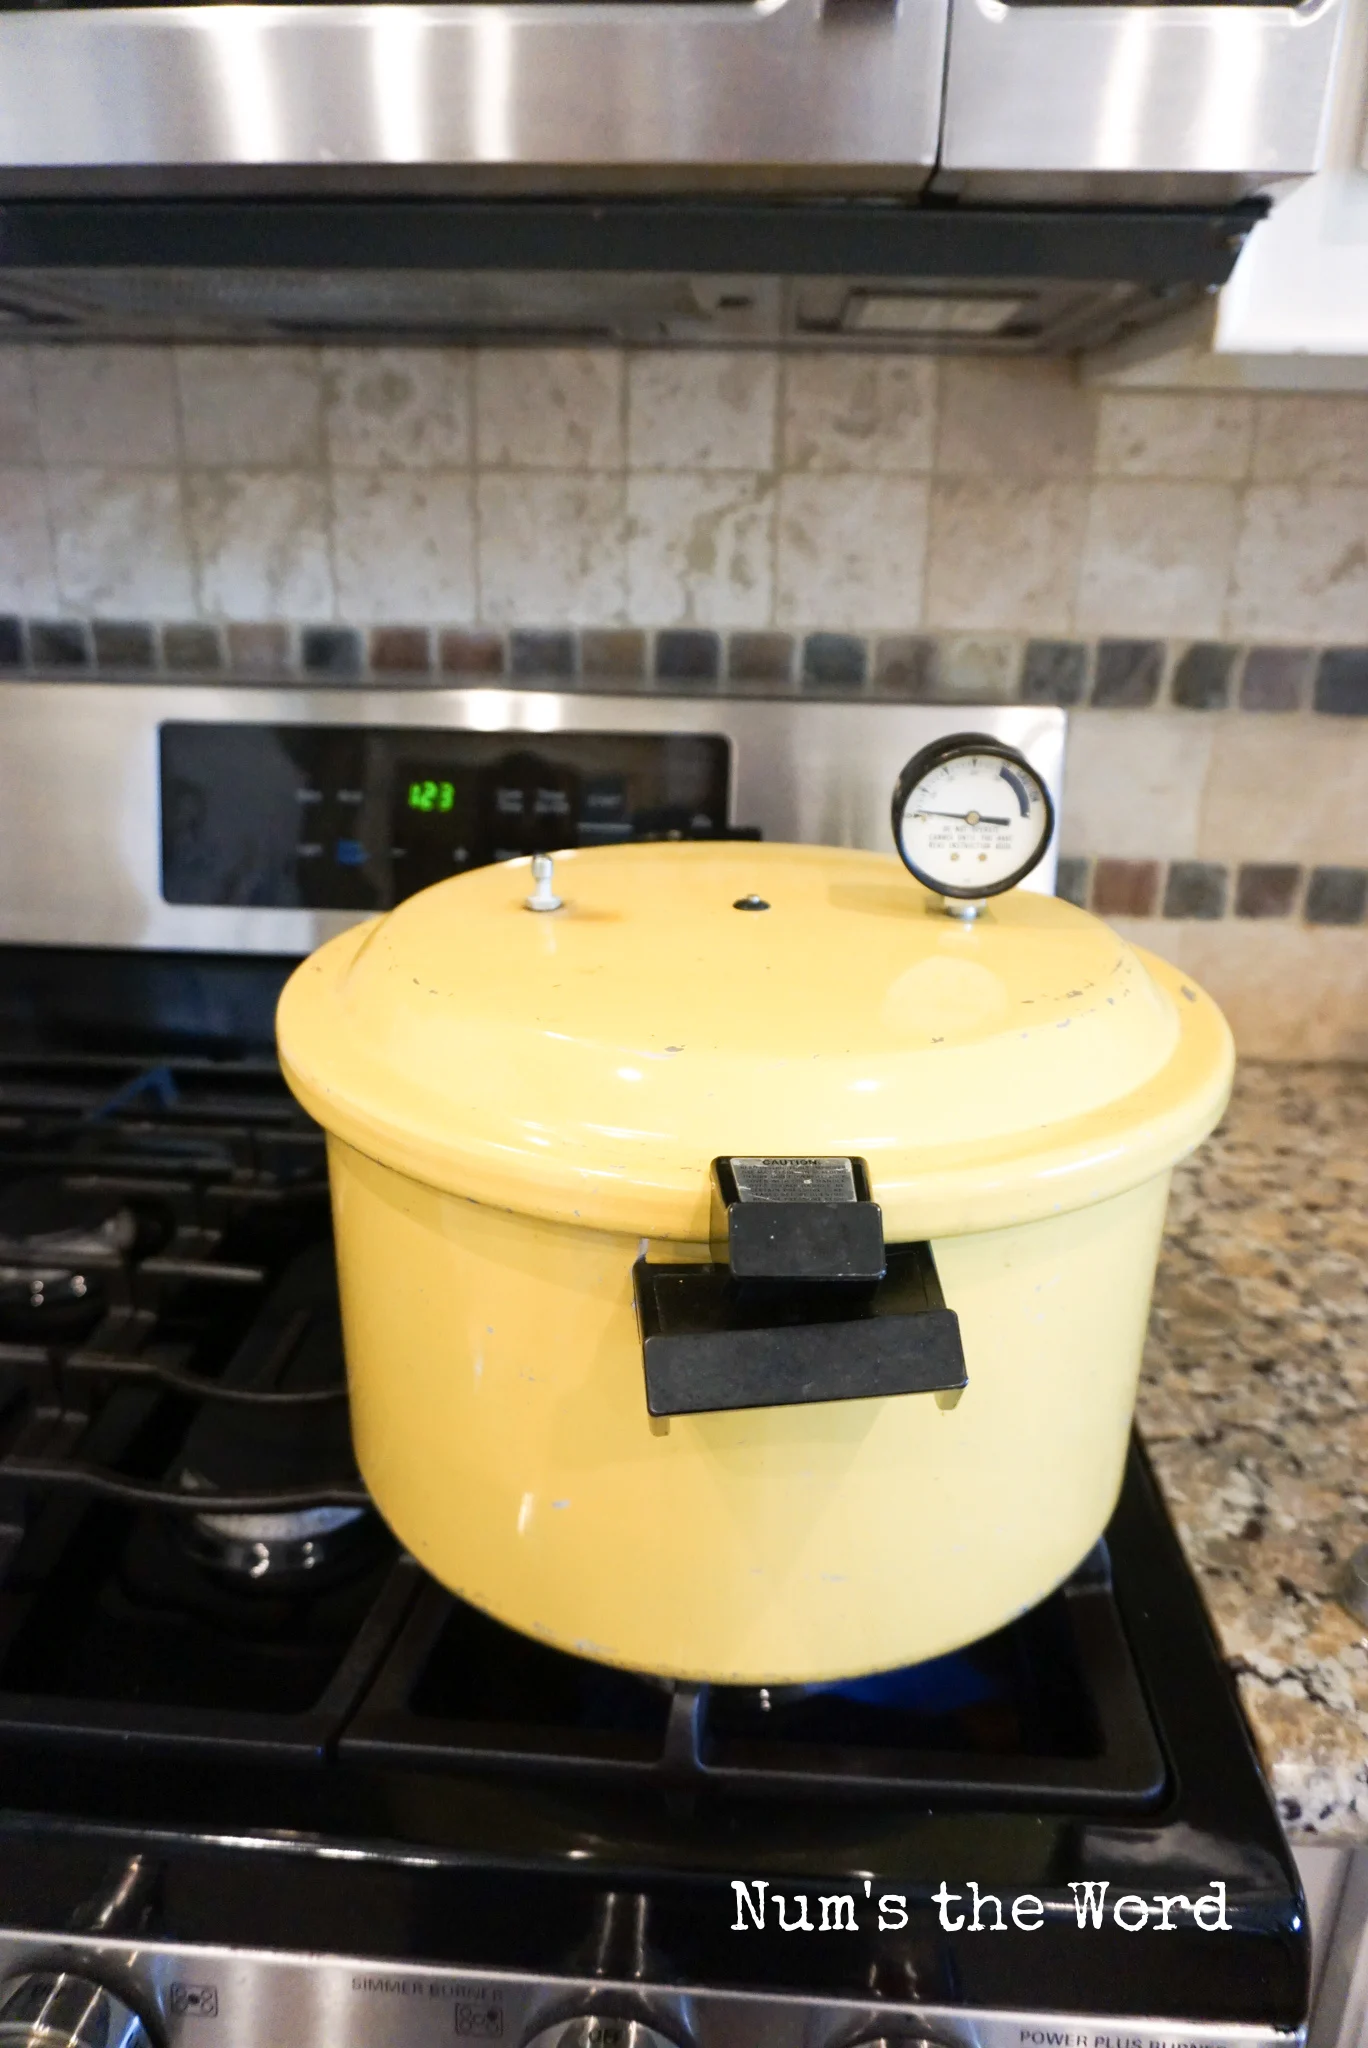
Once your jars are placed into the canner, turn the heat up to high.
Place lid on the pressure canner and lock lid.
Set your timer for 7 minutes.
As your water begins to boil, steam will rise to the top of the canner and release from the steam vent at the top. This is a good sign. It may take up to 7 minutes for this to happen, don’t panic.
After 7 minutes, steam should rise. If it isn’t continue heating until steam does pour out of the spout on top of your canner.

Canning Potatoes Step 14:
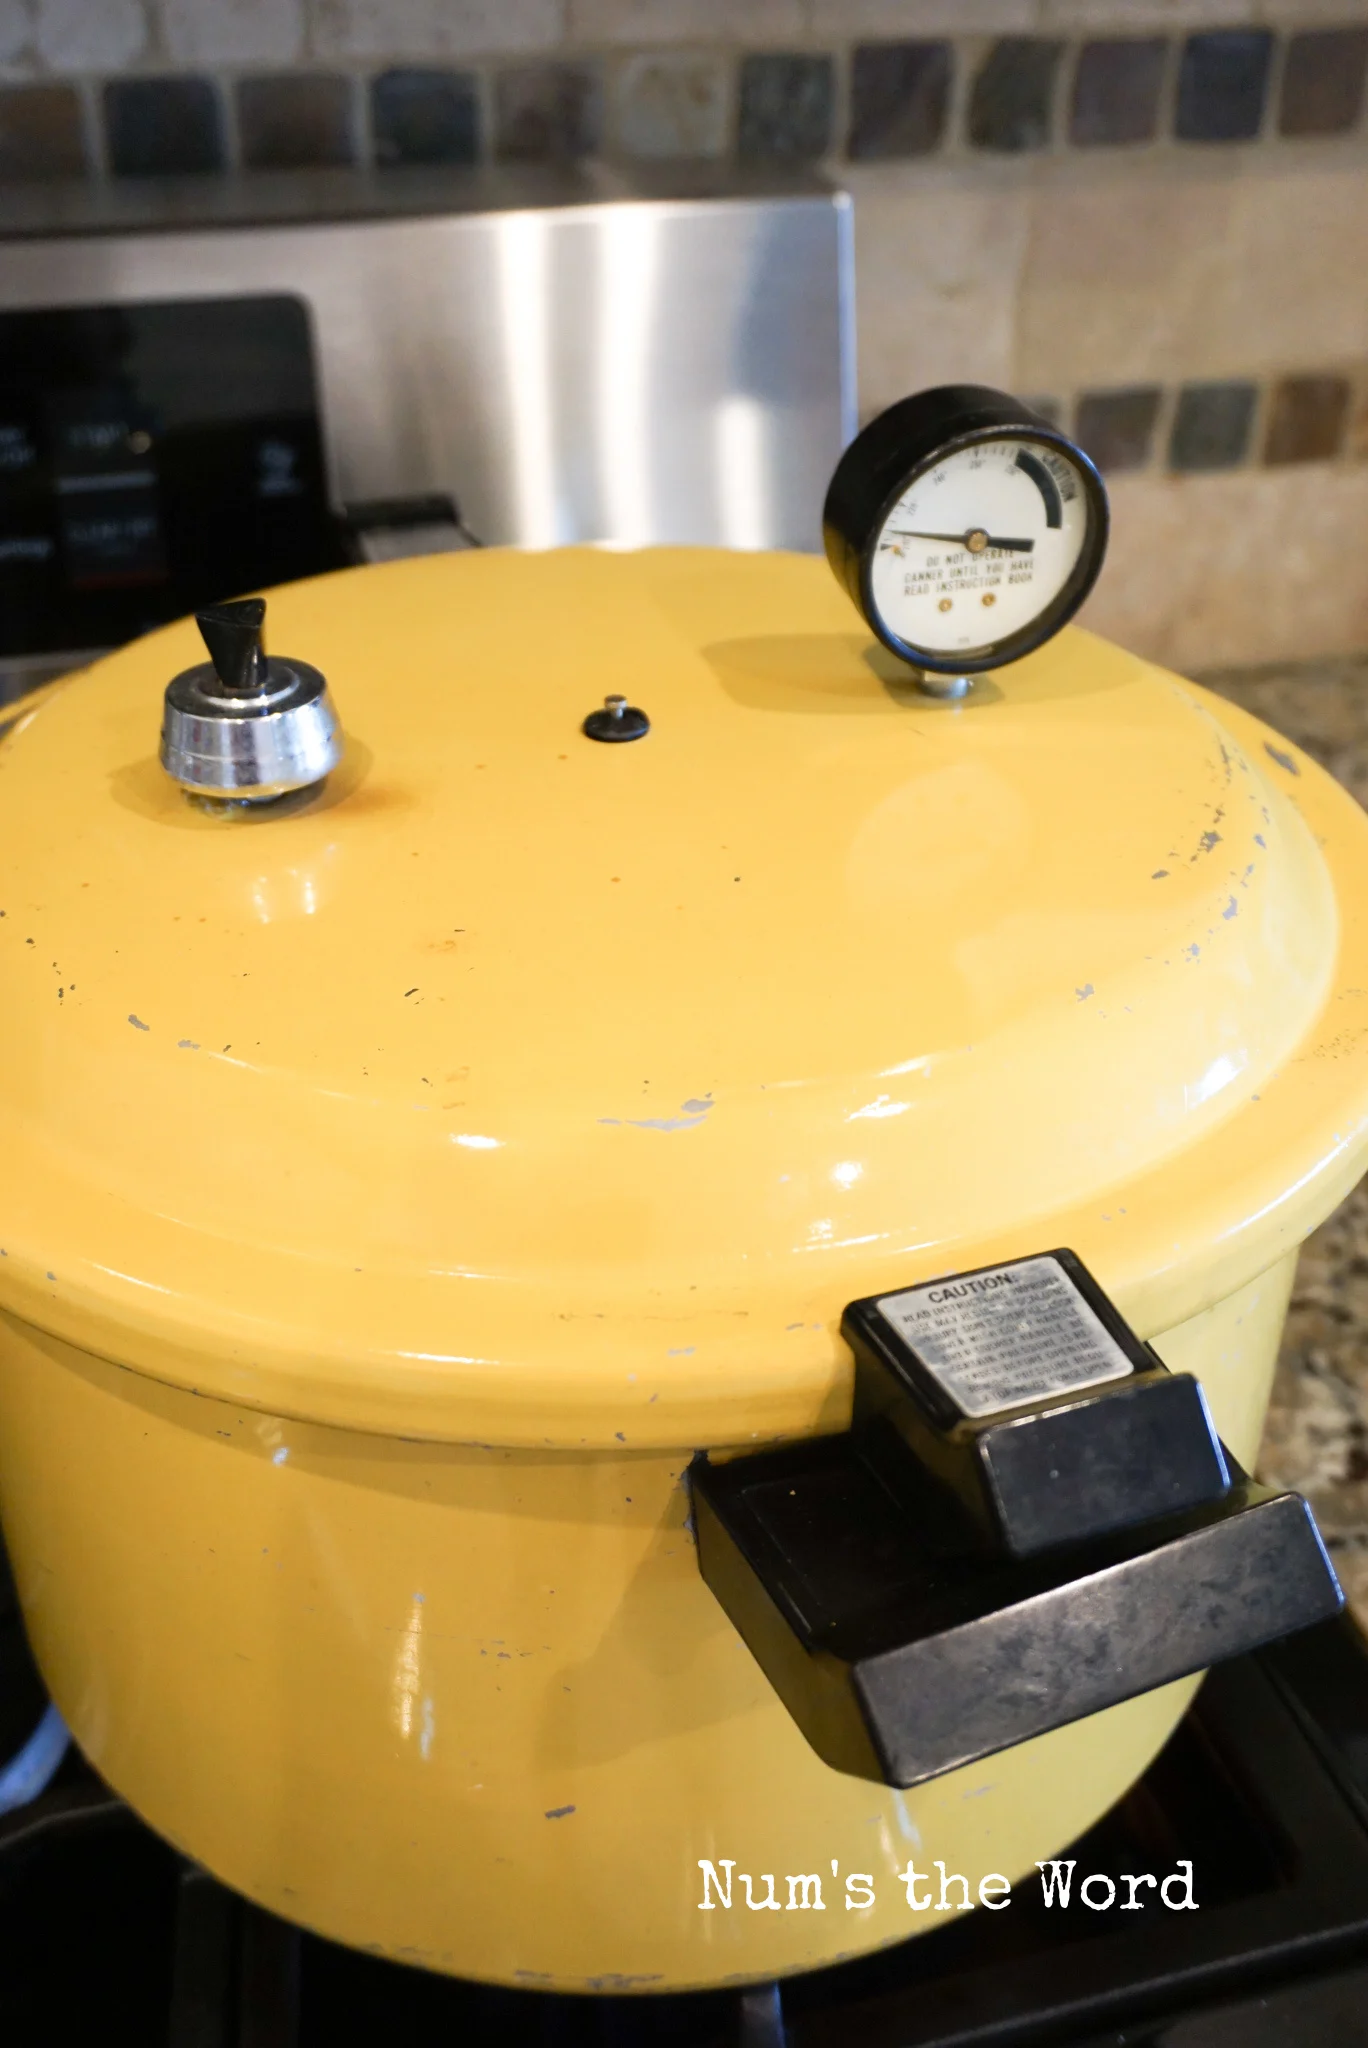
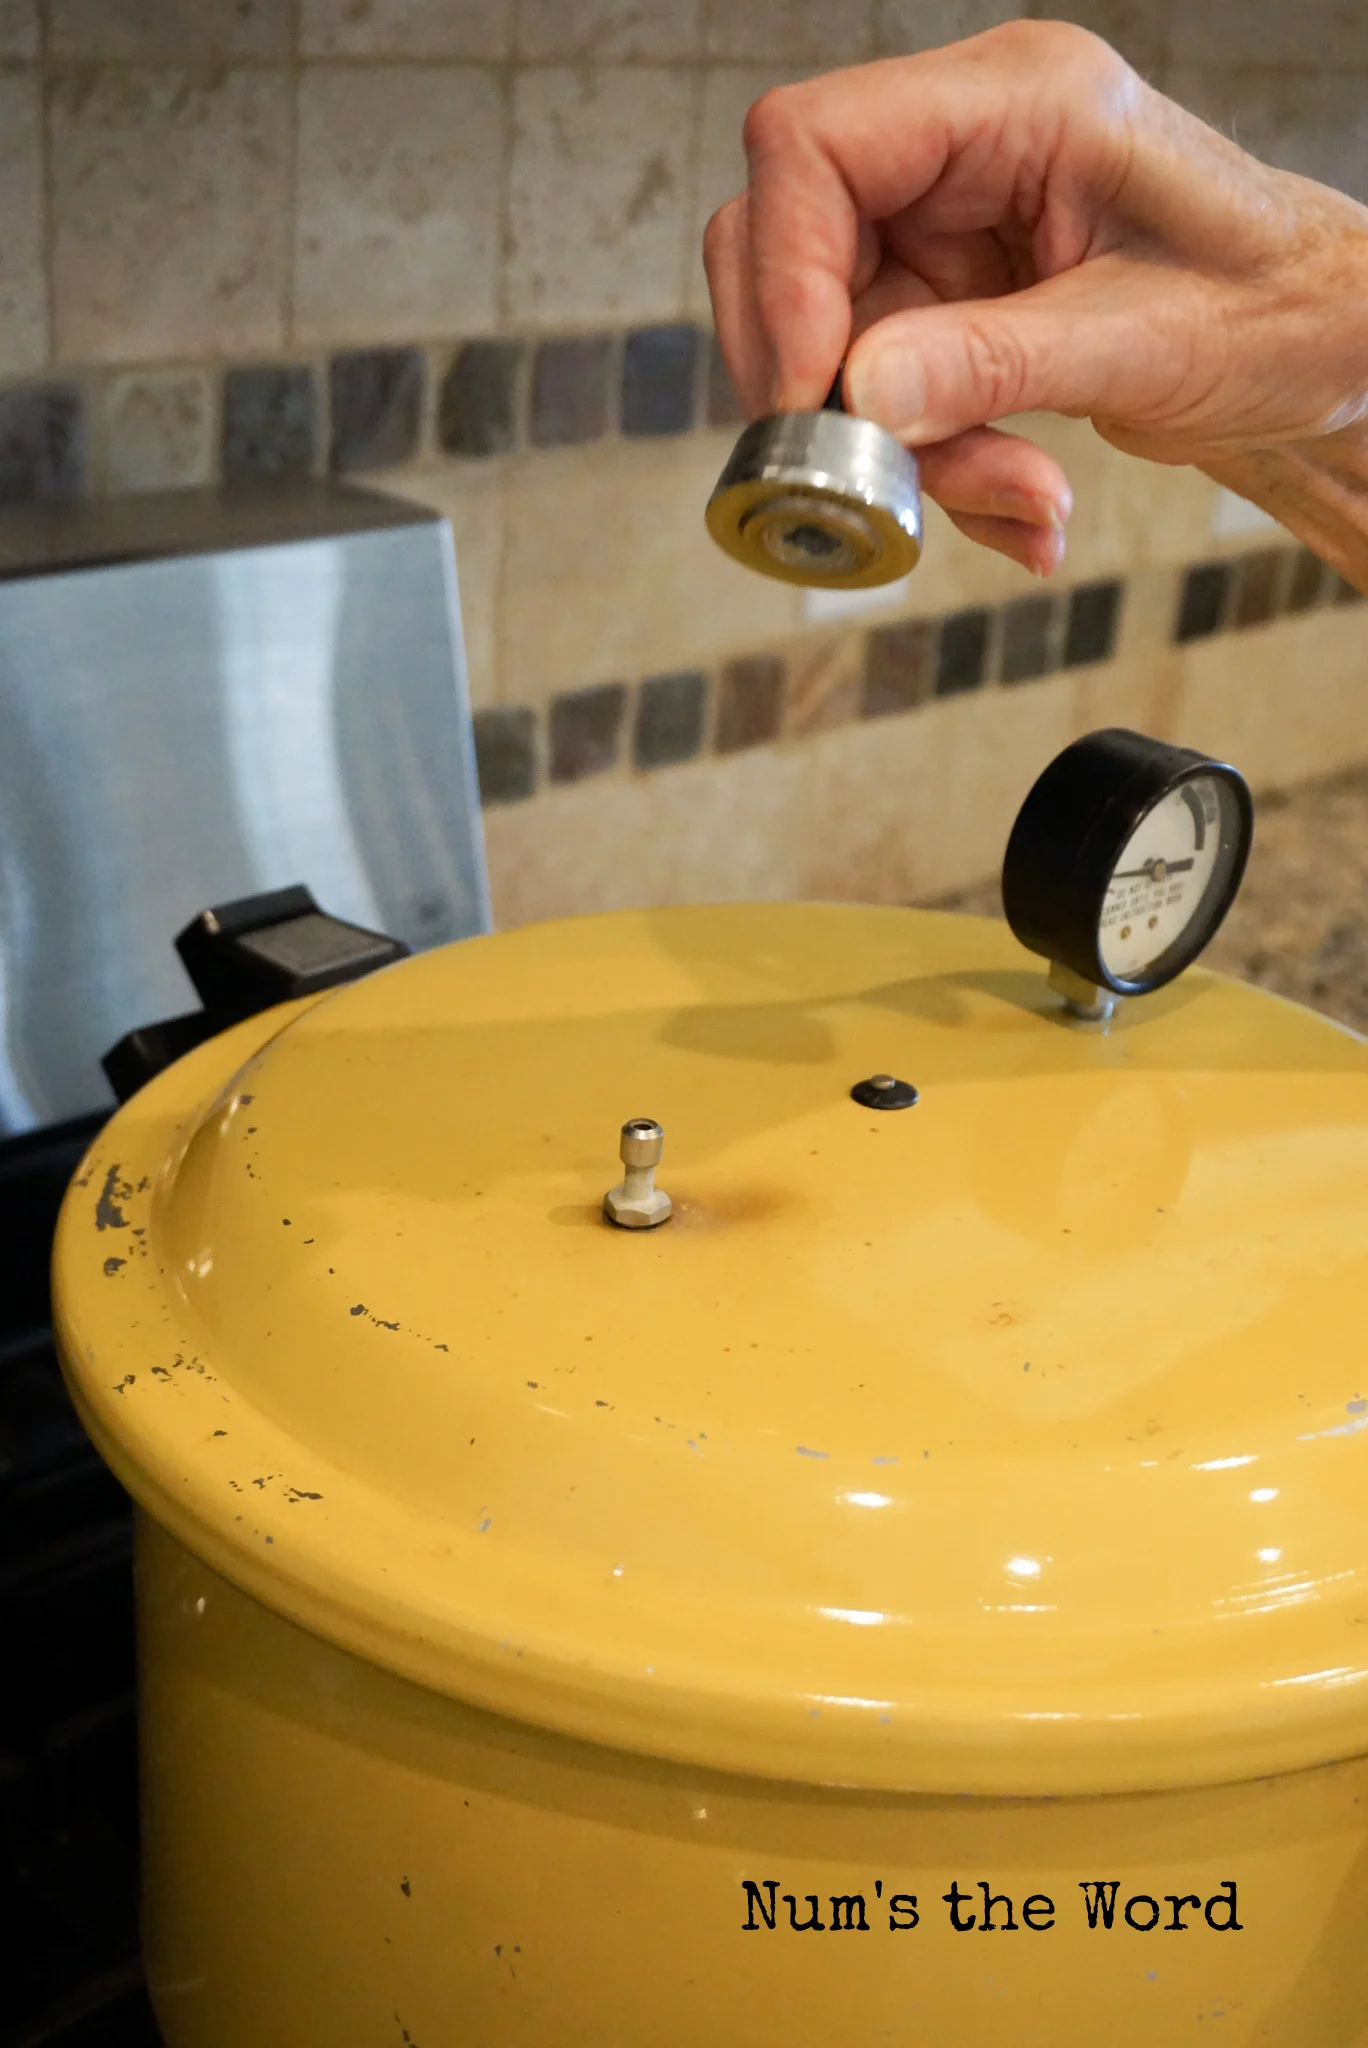
If steam does pour out of the vent at the top of your canner, place pressure canning weight over the steam vent and watch to ensure your canner seals itself.
There should be a little dial on the top that will pop up when the canner is sealed.
Once sealed, you should see your pressure gage rise.
Pro Tip: If you live below 1,000 feet, the 10 pound weight that came with your pressure canner will be the best choice. If you live at 1,000 feet or above then you should use a 15 pound weight, which you’ll have to order HERE.

Canning Potatoes Step 15:
Grab a chair and plan to sit in your kitchen facing your canner for the next little bit.
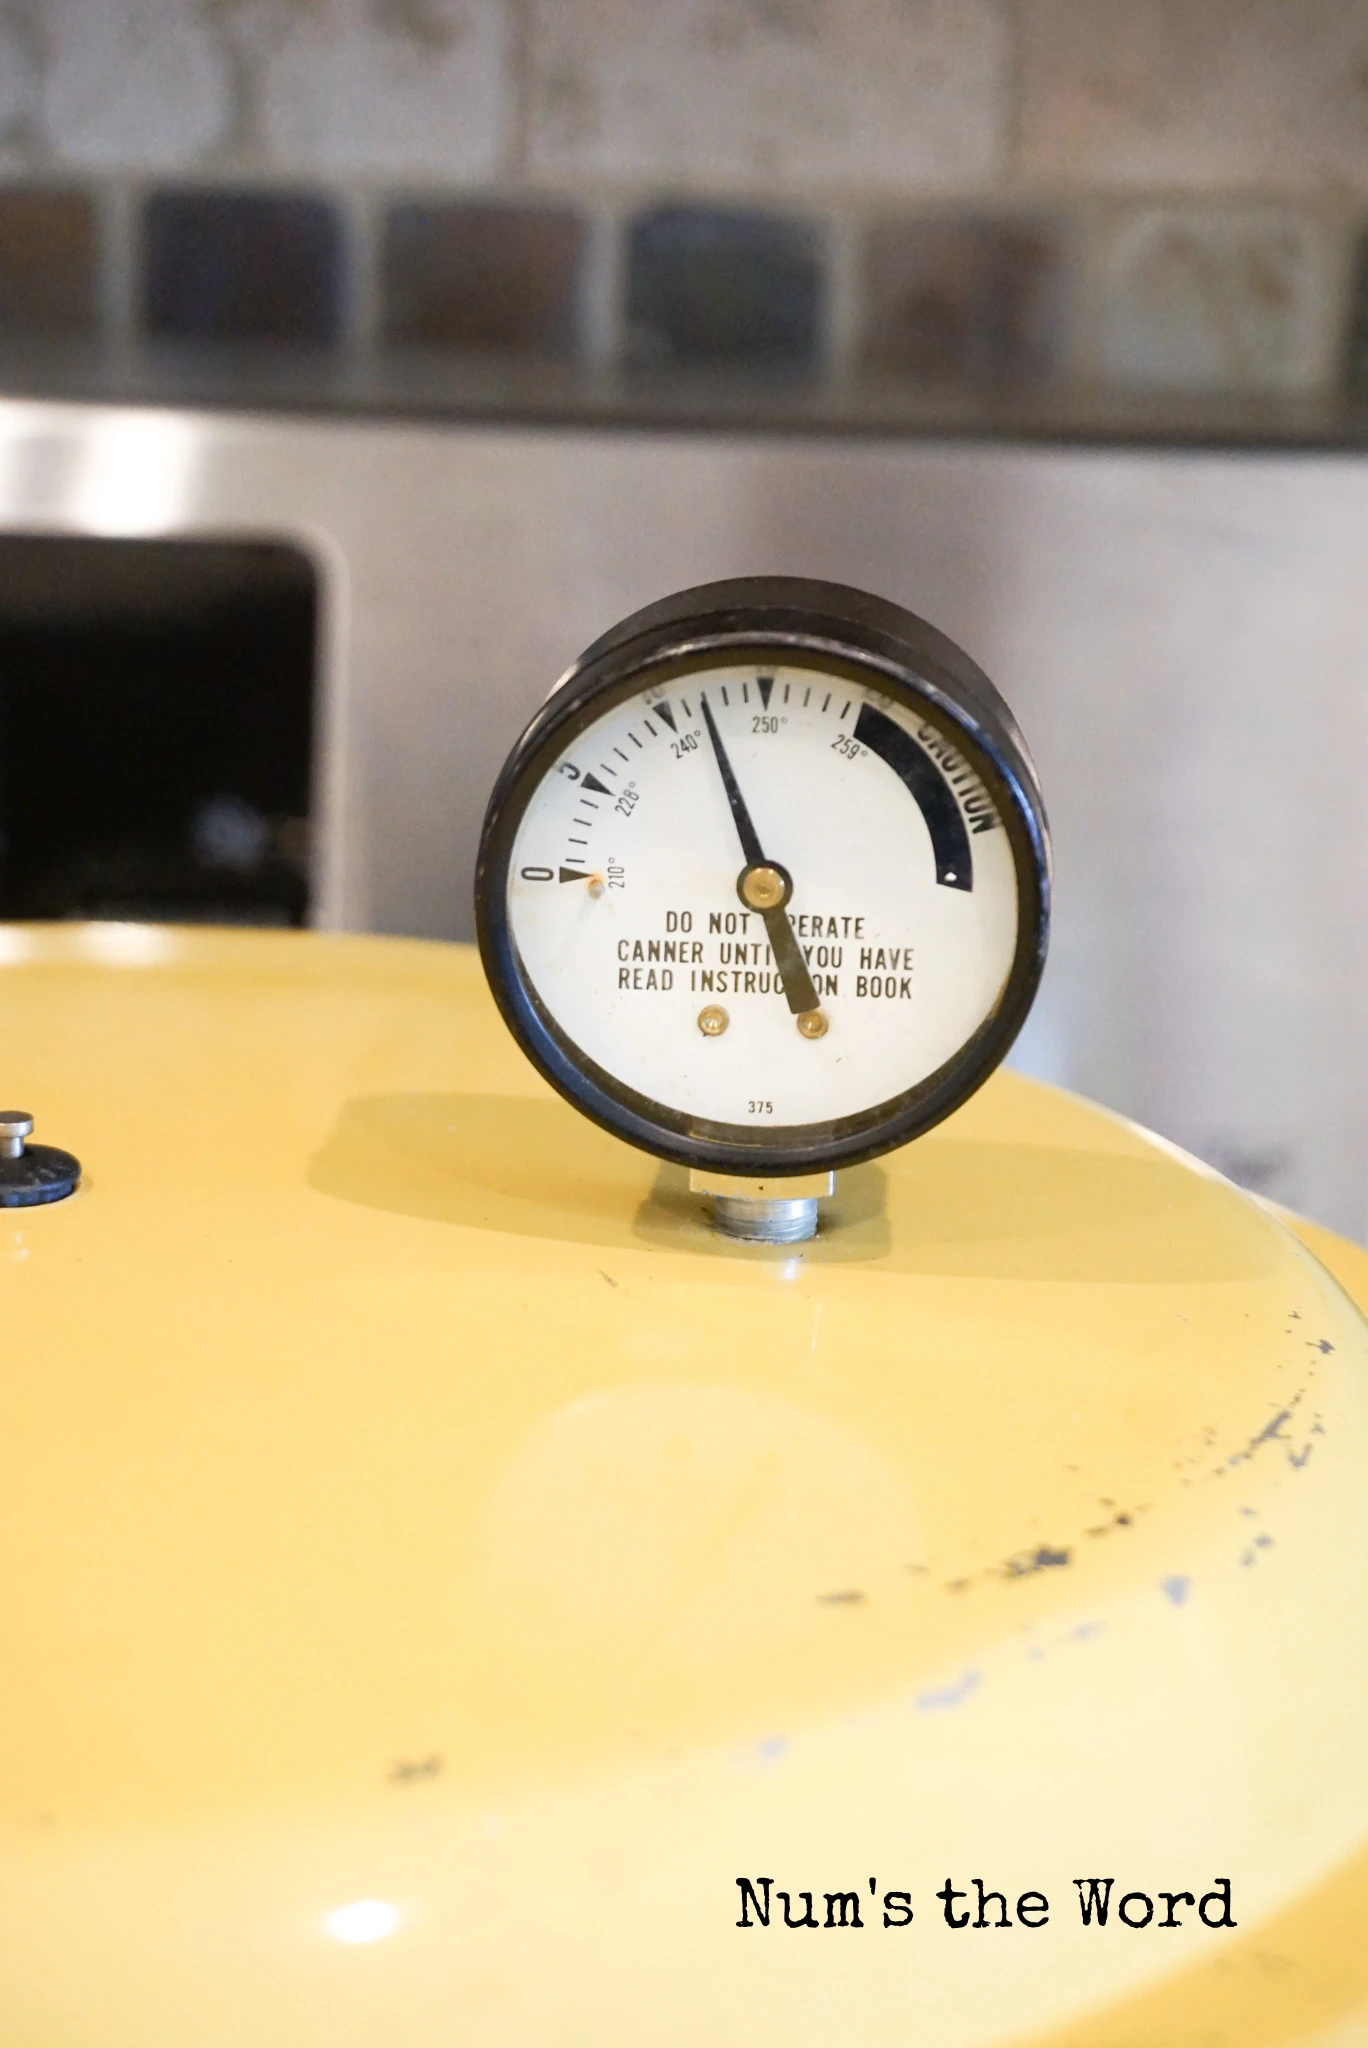
Your pressure gage should rise to 10 pounds of pressure.
Once at 10 pounds adjust your heat to medium heat and keep it at or as close to 10 pounds as you can.
According to the National Center for Home Food Preservation, processing times for canning potato pints requires 35 minutes of pressure cooking. Canning potato quarts requires 40 minutes of pressure cooking.
Set your timer and keep an eye on your potatoes.
If you haven’t finished filling and preparing your remaining jars, you can do that now, but continue to watch your pressure gage and keep it at 10 pounds.
This may require you to regularly adjust your heat, depending on your stove.

Canning Potatoes Step 16:
After the required amount of cooking (30 minutes for pints, 40 minutes for quarts), turn your stove off.
Let the pressure naturally release and come to zero.
Canning Potatoes Step 17:
Once your pressure reaches zero, remove the canning weight and let any additional steam escape from the pot.

Canning Potatoes Step 18:
Now it’s time to open your canner.
Opening your canner will require you to unlock the lid and then open the lid.
Note: Open the lid AWAY from your face. There is still a lot of steam in the pot and it can burn your face. If you open it away from your face the steam will escape away from you.
Canning Potatoes Step 19:
Once the canner is open, gently place lid back onto the canner and allow steam to escape naturally for 10 minutes. This trick will help prevent the jars going into “shock” and losing their water. If you simply let your jars cool in the canner they will retain most if not all of their water.
It’s often asked how to prevent water loss during canning, and this is what we’ve found works best!

Canning Potatoes Step 20:
Once the lid is opened and the steam has calmed down, using a canning lifter, remove each jar from the canner and set on a kitchen towel.
Note: The term hot potatoes, is a real thing so please be careful as the jars are boiling hot and can burn you.
Jars are not sealed yet and will hopefully seal within the next 24 hours.
Note: My jars are usually fully sealed within an hour of coming out of the pot, but some may take longer.
Repeat canning steps for remaining jars.
If water is low in pot, add more to equal two quarts (or your manufacturers recommendations).
Canning Potatoes Step 21:
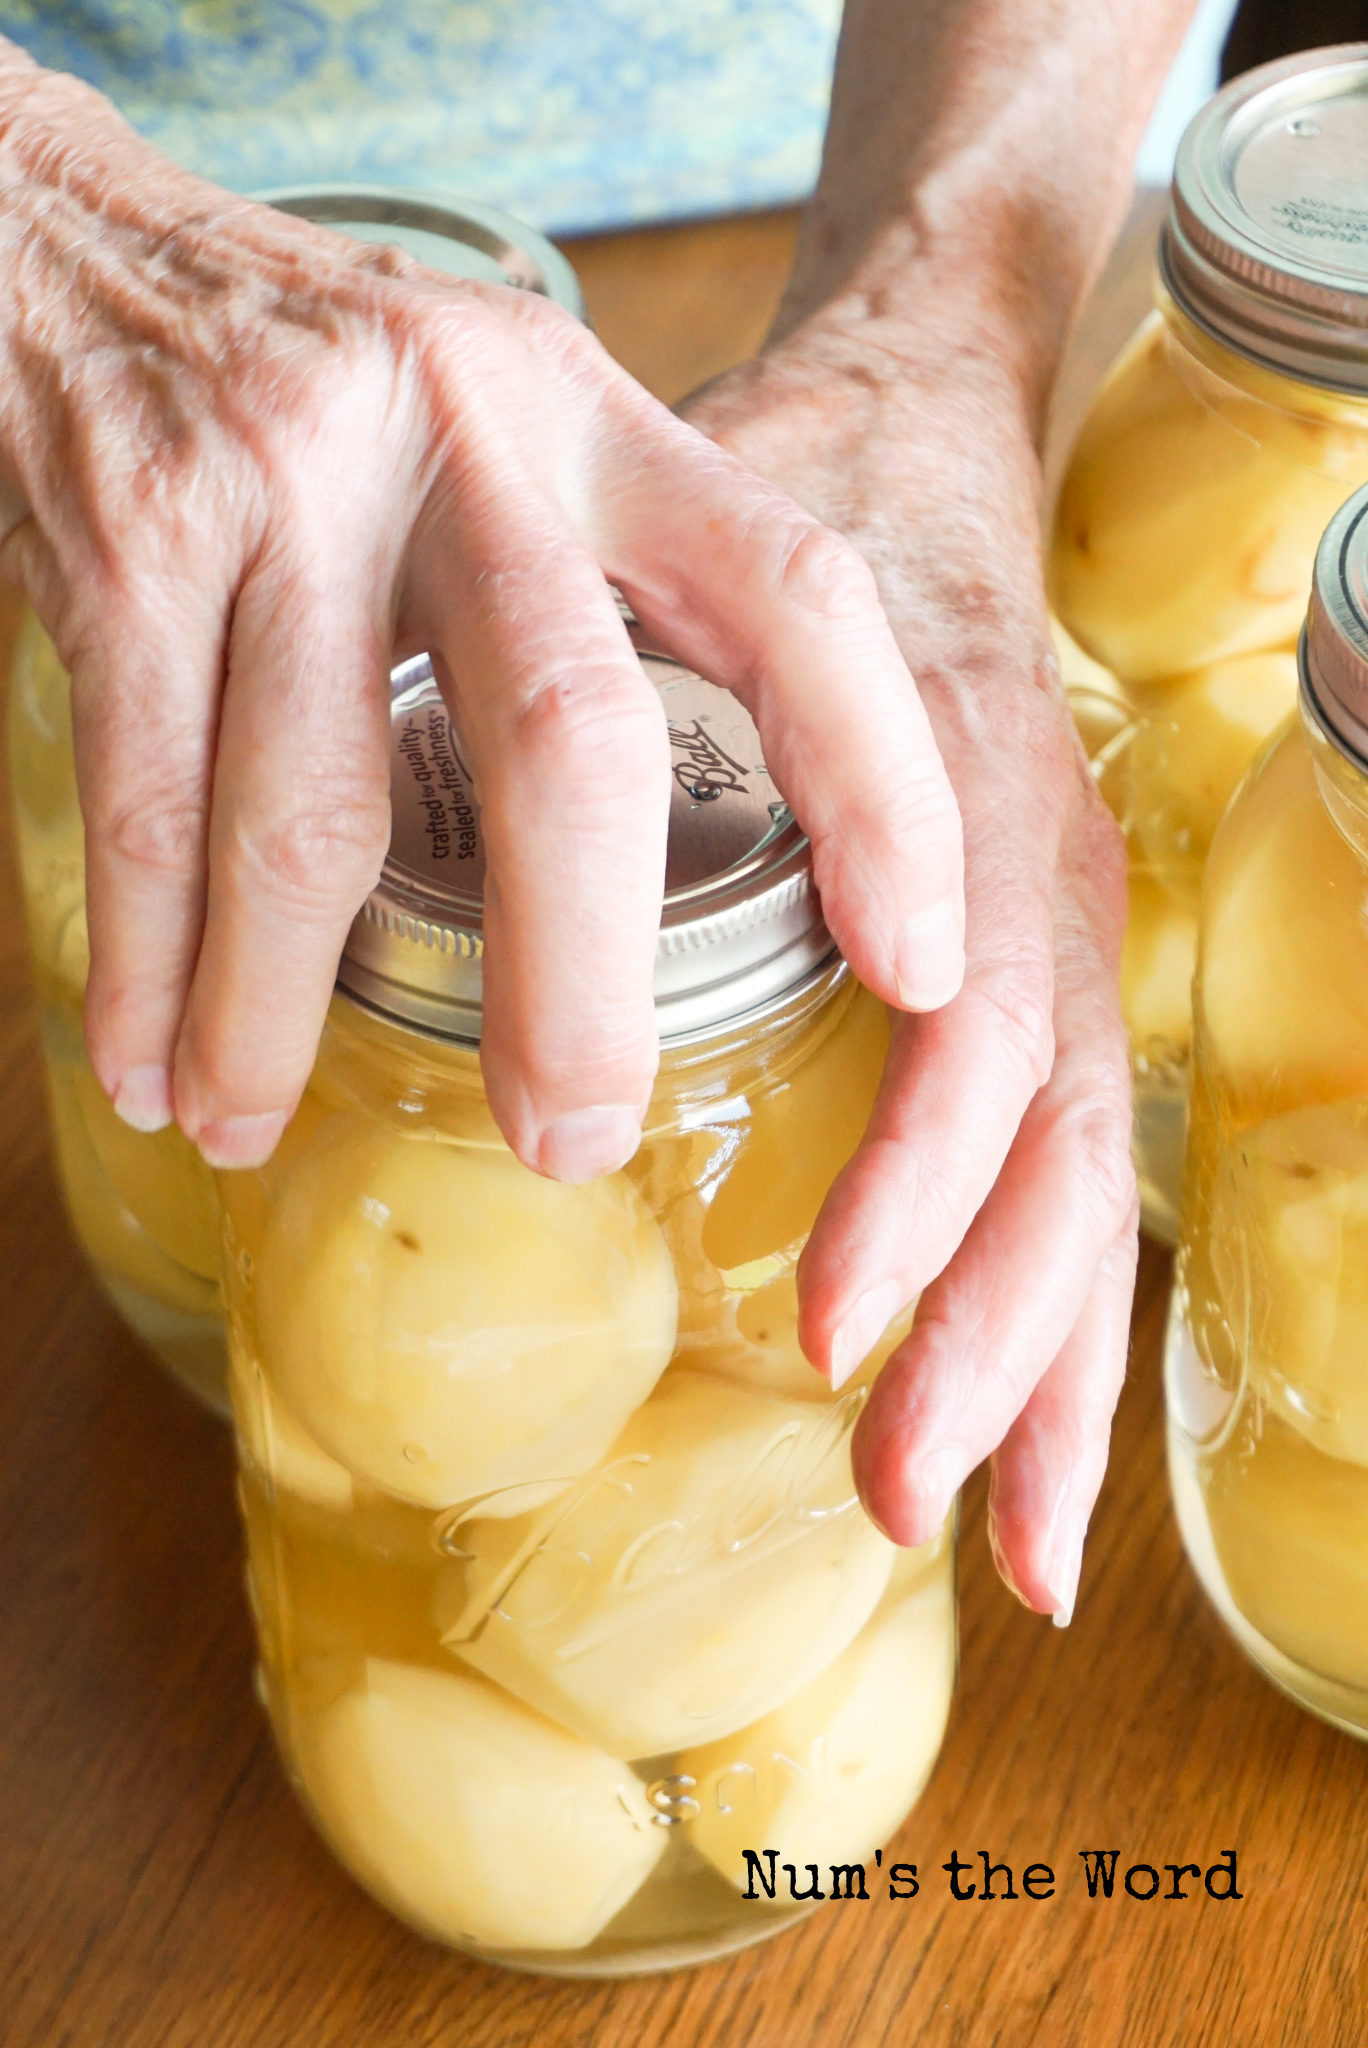
Your jars will take at least 6 hours before they are cool enough to handle. During that time you should hear a high pop noise coming from the jars. This is the sound of a jar sealing itself.
As the jar seals itself you’ll hear a pop or ping and that is the best sound you can hear when canning!
After all jars have sealed themselves (or you hope they have), remove each ring and carefully try to lift the jar up by the rim.
If the jar is sealed properly you’ll be able to lift the entire jar by the lid. If the jar did not seal properly it will pop off instantly from the jar. This jar will need to be put into the fridge and used within a week.
This however is rare as all should seal.

Canning Step 22:
Store your newly canned jars in a cool dry place. Because I live in Mississippi and not in a cooler climate, I keep mine in my kitchen in a cupboard.
I’ve also been known to keep canned goods above the fridge and under the sink in my laundry room. All places that are usually under utilized in some part.
Now it’s time to congratulate yourself on becoming a master potato canner!
We recommend that after your jars have cooled, before putting them in your cold dark place like a root cellar, to wash the outsides of your jars with hot soapy water.
Recipes that you can use canned potatoes with:
- Potato Salad with Paprika
- Sour Cream Potato Salad
- Potato Soup with Canned Potatoes
- Old Fashioned Potato Soup Recipe
- Cauliflower Cheese Soup
- Hamburger Potato Soup
- Crockpot Beef Stew
- Potato Bread
- Roasted Garlic Mashed Potatoes
- Potato Cakes
How to Can Potatoes


Have you ever wondered how to can potatoes? Don't worry we have you covered! This simple step by step guide will teach you everything!
Ingredients
- Gold or Russet Potatoes
- Canning Salt
- Water
Instructions
How to Can Potatoes
Ingredients:
Gold or Russet Potatoes - how many you need will depend on the size of your potato
1 teaspoon canning and pickling salt per quart jar
Hot water
Instructions:
- Bring a large pot of water to a boil.
- Boil jars and lids for the desired number of jars you wish to can for 1 minute each.
- Gently remove jars and lids with tongs and set on a cutting board or dish towel to cool.
- While the jars are cooling, rinse and wash potatoes from any dirt and debris.
- Peel each potato and cut out any bad pieces. Place potatoes in a bowl of ice water.
- Slice each potato lengthwise into 1” slices.
- Turn each slice onto the flat surface and cut into 1” cubes and place in cold water.
- Repeat with desired number of potatoes.
- While potatoes are chilling, prepare the pressure canner.
- Place the pressure canning pot on the stove.
- Add the canning base and fill with 2 quarts of water (8 cups).
- Turn the burner to medium heat and bring to a boil.
- While canner comes to a boil, it’s time to fill the jars!
- Using a large funnel, fill each jar with cubed potatoes, leaving 1 inch of space at the top.
- Place 1 teaspoon of canning and pickling salt in each jar.
- Gently pour boiling water into each jar, filling until 1 inch from the top of the jars.
- Run a butter knife down the sides of each jar, gently pressing potatoes to the center to remove any air bubbles.
- Using a damp paper towel, run the paper towel over the rim of each jar, removing any debris or salt granules.
- Gently place the canning lid on each jar.
- Screw a ring over each lid until hand tight - do not go too tight.
- Place prepared jars into the pressure canner, making sure the jars do not touch.
- Place the canning lid on and lock it into place.
- Let the water continue to boil, until steam comes out of the top.
- Let the pressure canner steam for 7-10 minutes, removing oxygen from the canner.
- After 7-10 minutes of constant steam, place canning weight over the little steam spout.
- Steam may begin to pour out of the center hole. Don’t panic, this is normal. It will seal itself and steam will stop coming out.
- Continue letting the pot boil until the pressure gage reaches 10 pounds. Once pressure gage reaches 10 pounds, then lower your heat to medium and watch carefully so that it does not go above or below this. DO NOT LEAVE THE KITCHEN!! You may need to continually adjust the heat to keep the pressure at 10 pounds.
- Cook pints for 30 minutes and quarts for 40 minutes.
- Once the timer goes off, turn your burner off and let the pressure gauge slowly return to zero. Once your gauge reaches zero, using hot mitts, remove the weight and then slowly open the lid AWAY FROM YOUR FACE. Do not open it towards your face.
- Once the canner is open, gently place lid back onto the canner and allow steam to escape naturally for 10 minutes. This trick will help prevent the jars going into "shock" and losing their water. If you simply let your jars cool in the canner they will retain most if not all of their water.
Richard
Wednesday 4th of December 2024
As for Red Potato's, Yes. Very good potato for canning. Keeps a certain firmness I like as well. Pontiac Red potato. This year we canned a combo of Red and Yukon Gold. Excellent for Mashed, Heated up with butter or my favorite, drain and lay some bacon grease in the pan and fry till a crisp on the outside. Make sure to take your Plavix pill.
Rita Daniels
Wednesday 1st of November 2023
I read the whole article, then discover you're from Mississippi! So am I! Can't wait to try this process! I have a new 10# bag of gold potatoes to can! I love your step by step instructions!
Kathryn
Wednesday 27th of September 2023
Shouldn't the pot pressure be equivalent to how many feet you are above sea level? I have been using a 15 lb. weight for other products that I have canned. Are potatoes different, and I should use 10 lb. weight? Great idea, I am going to try canning potatoes once we get them all dug up!
Janelle
Thursday 28th of September 2023
Hi Kathryn! Thank you for pointing this out. Since I started canning I've always lived in low altitude states. But you are 100% correct. If at high altitude (above 1000 feet) it is recommended you use a 15 pound weight and if at low altitude, a 10 pound weight. Thank you for pointing this out! I'll add this to the text above.