
There are certain foods that we never tire of in our house.
I am sure it is the same for you too. My husband could eat Pizza every day for the rest of his life. My daughter could eat ham and bacon. My son would choose candy and milk and I would choose bread products and cheesecake.
Oh glorious cheesecake. Oh how I love thee. I especially love chocolate cheesecake.
I was once talking to a friend when I was pregnant with my son about how I was craving turtle cheesecake and chocolate cheesecake, they looked at me funny.
Chocolate cheesecake, they said?
YES! Chocolate cheesecake.
I’m not weird right? You, my readers, have heard of chocolate cheesecake…right?
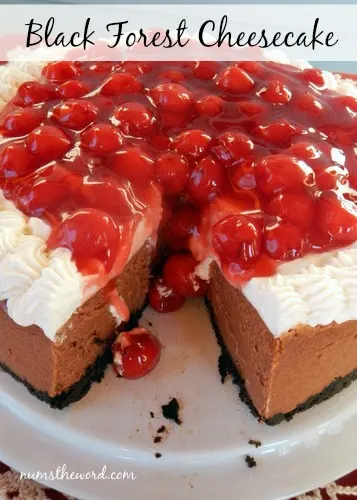
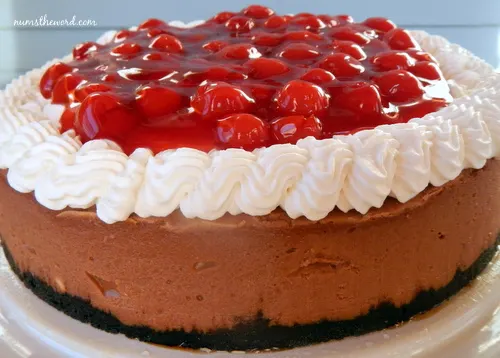
Rich, velvety, smooth chocolate cheesecake. Then if that alone wasn’t enough you put that glorious cheesecake on top of an Oreo crust, add whipped cream and cherry pie filling and you have just created a party in your mouth.
Your taste buds will thank you for giving them the delight known as Black Forest Cheesecake.
There is though, one requirement when making this Black Forest Cheesecake. You must invite me over. How fun does that sound? You, me, chatting, eating cheesecake and getting to know each other better! Yep! Sounds good to me!
If you love black forest cake and you love cheesecake then you must combine the two and enjoy this Black Forest Cheesecake. It’s absolutely scrumptious.
Black Forest Cheesecake

Ingredients
- 16 Oreo cookies, crushed in a food processor
- 3 Tablespoons Butter, melted
- 1 bag milk chocolate chips (12 ounces)
- 3 packages cream cheese (8 ounce each), room temperature
- 1 cup sugar
- 1/4 teaspoon salt
- 1/2 cup sour cream (any fat content - we use full fat)
- 2 teaspoons vanilla extract
- 3 eggs
- 3/4 cup heavy whipping cream
- 1/4 cup powdered sugar
- 1/2 teaspoon vanilla
- 1 can cherry pie filling
Instructions
Preheat oven to 375*F.
In a food processor or blender, toss Oreo's in and blend until crushed and powdered. (Leave filling inside the cookies). Pour contents into a bowl.
Melt butter and pour over crushed cookies. Mix well and press firmly into the bottom of a spring foam or cheesecake pan.
Bake for 10 minutes.
Reduce oven heat to 300*F
While mixture is baking, make cheesecake filling.
Melt chocolate chips in microwave or in a double broiler on the stove over low heat. Once smooth set aside.
Using a mixer or hand blender, blend cream cheese until smooth.
Add sugar and mix.
Add salt, sour cream and vanilla. Mix until well incorporated.
Add melted chocolate chips and mix until well blended.
Crack eggs into a separate bowl and blend slightly with a fork.
Add eggs to cream cheese mixture and mix just until incorporated. Do not over mix.
Wrap bottom and sides of cheesecake pan with heavy duty foil. Overlap foil and press foil tightly around pan ensuring bottom and sides are covered.
Pour cream cheese mixture over crust.
Place into a large deep pan like an over sized casserole dish.
Fill pan with water until water is half way up the sides of the cheesecake pan.
Bake for 55 - 65 minutes or until cheesecake center does not jiggle when gently nudged.
Gently remove cheesecake from oven and from water bath.
Allow cheesecake to cool completely before refrigerating. Refrigerate for 8 hours or overnight.
Prior to serving, prepare whipped cream topping.
In a mixer or using a hand mixer beat whipped cream, until it begins to thicken. Add powdered sugar and vanilla and continue mixing until stiff peaks form.
Place whipped cream in a pastry bag or in a large zip lock bag. Cut tip off and pipe whipped cream around the outer edge of cheesecake. Gently spoon cherries into the center of the cheesecake.
Serve immediately.